
A Word On Safety
Safety is paramount when working under your trailer and no shortcuts should be taken.
All work should be undertaken with the trailer fully supported by rated stands on solid ground with suitable hardwood chocks and cribbing to help spread and support the weight of the jacks and trailer.
Never use the trailer leveling jacks as the primary source of support.
Always use jack stands in conjunction with the leveling jacks.
Ideally, never work alone – always have someone nearby to help if needed.
Raising the Trailer
Getting the trailer sufficiently high enough that you can get the wheels back on after the modifications have been done requires raising the trailer by at least 8”.
The simplest method is to nail together 2” x 12” planks into a makeshift ramp as shown in the diagram below.
Get someone to guide you while you tow the trailer up the ramp. Chock the trailer wheels securely before unhitching or crawling under the trailer.
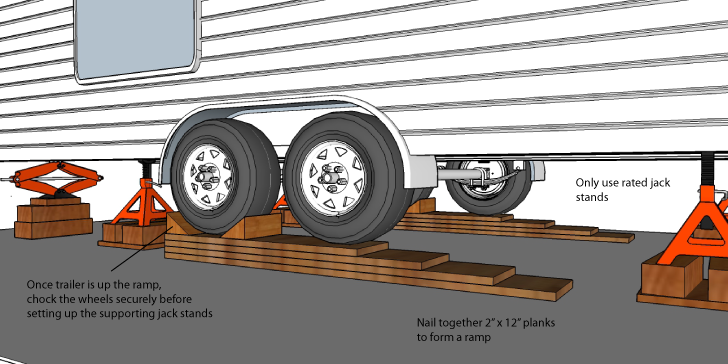
Once the trailer is secure, position the jack stands evenly under the trailer chassis, making sure that they will not crush or damage any cables or lines.
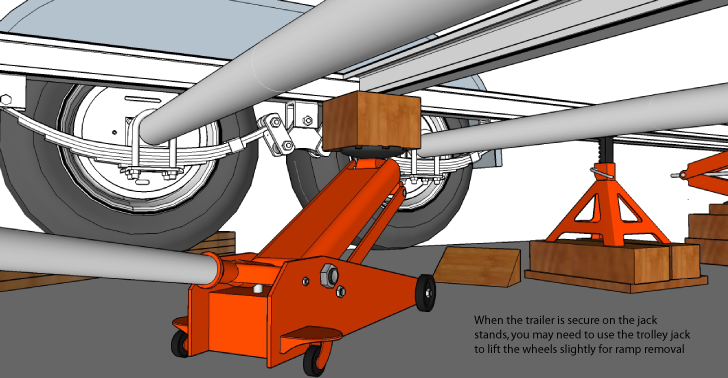
Use a trolley jack to lift the trailer at each point to get any additional height advantage from the jack stands. When the trailer is fully supported, remove the makeshift ramps – you may need to use the trolley jack to raise the wheels slightly off the ramp.
Do not use the trolley jack to lift the axle tubes, they can be easily damaged.
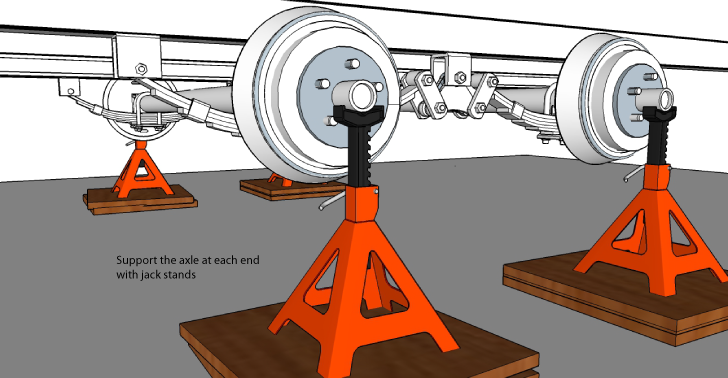
Remove the wheels and support the axles at either end with additional jack stands.
The brake wiring will normally need to be lengthened to allow for the height difference once the modifications are complete.
Label the wires and disconnect or cut them, being sure to allow plenty of wire length for stripping and fitting crimp connectors.
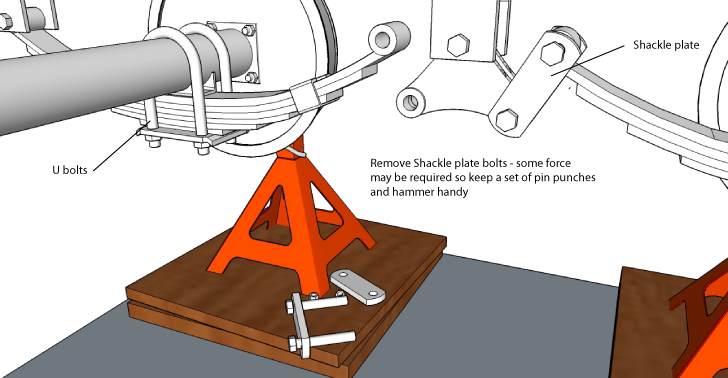
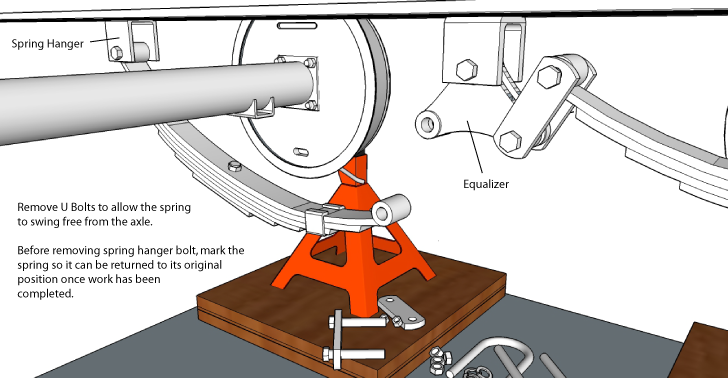
Working on one axle at a time, remove the shackle plate nuts, and tap the bolt and shackle plates off the equalizer and spring.
Some manufacturers fit spring and shackle bolts with serrated shoulders to prevent the bolts from turning in the mounts. If this is the case, they may require a bit of force to knock them out of position.
To do this, loosen the nut slightly and give the nut a tap directly and squarely with a brass/copper face hammer. Loosen the nut another turn or two and give it another tap.
If all is going well you should notice movement, and continuing this procedure will remove the bolt quickly.
If the bolt is being stubborn or corrosion has set in, apply some penetrating oil (CRC/WD40 or similar) and leave for 20 minutes or so before again attempting removal.
Patience and perseverance will always win in the end, just be sure not to get frustrated and end up damaging the end of the bolt to the point where some serious cutting and grinding will need to be done to remove the bolts!
Once the shackle plates are removed, loosen and remove the axle U bolts and let the spring hang free.
Mark and label each spring before removal, so that it can be fitted back into its original position if you are replacing the spring bushings.
Using a trolley jack, raise the axle off the jack stands and lower it gently to the ground.
With the axle free from the trailer, measure the position of the existing spring perch and position the new spring perch over the top of the axle. Square the new perch so that it is perfectly parallel to the original.
Clamp the new perch in position and double-check all measurements match the existing perch. When satisfied, weld securely onto the axle.
When welding the new spring perch, make sure the earth clamp is mounted on the axle tube and not around or on the hub or backing plate. Any welding current passing through the wheel bearings will damage them and cause premature failure.
Do not make any attempt to remove the old spring perch from the axle, doing so could compromise and weaken the axle.
If you have been supplied with “no weld” spring perches, follow the manufacturer’s instructions for the correct fitting procedure.

Check around the spring and equalizer hangers for any wear, damage, cracks or faulty welding. Remedy any faults before continuing.
Now is a good time to fit the new spring bushings, equalizer and shackle plates and bolts if required.
If possible, source and fit new bolts with zerk fittings (grease nipples) to allow lubrication of the moving parts. This will give your trailer suspension a quieter, smoother ride and a longer life if greased regularly.
At the bare minimum, new U bolts and spring plates should be used. Do not reuse the old ones if you can help it.
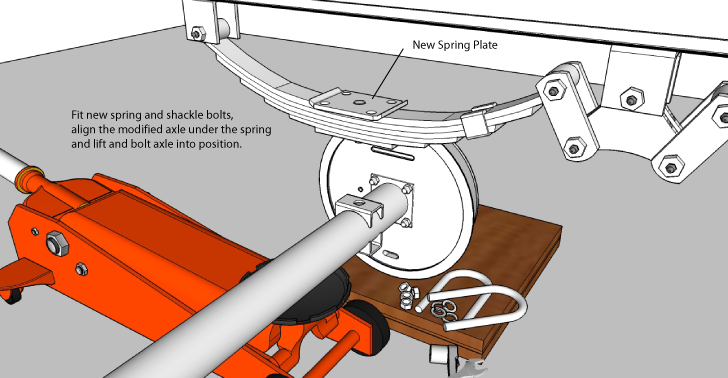
Loosely tighten the U bolts on both sides of the axle until you are sure the spring holes in both the spring plate and new spring perch line up and are centralized.
Tighten up the U bolts evenly going around the nuts equally to prevent any excess tension placed on any one side, then torque the nuts up to the manufacturers recommended setting.
Double check all spring hanger, shackle and equalizer bolts are torqued up to the correct setting and everything is looking as it should.


Hi and thanks for the article. I recently had my axles flipped by a local RV dealer. In most articles I noticed that they include welding the spring seats to the axle. Like your article the dealer did not weld the seats either. What are your thoughts on this. I’m concerned that the axles might rotate over the course of years to where the camber is not bowed up as it should.
Can you get more ground clearance on a trailer that doesn’t have springs? Thanks
Glad you found it helpful Rich, thanks for your comment.
Bryce,
Very nicely done, great instructions. Thank you for publishing this.