

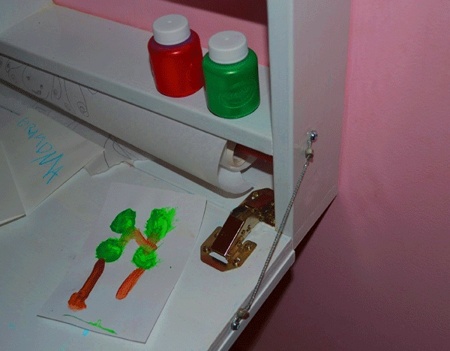
After a comment from Jen, one of DoityourselfRV.com’s loyal readers, I decided to prepare a follow up or a sequel if you will of the RV Table / Desk. This time I wanted to look at it from the perspective of building it custom with your own two hands (or a loving friend’s hands). Our friend Jen was looking for something that had less obstruction below the table so it could be used as a fold down table next to her couch so she could have a workstation. I hadn’t considered that application so I want to thank Jen for the idea and want to show our readers a quick tutorial from Ana-White.com that will show you how simple this project can be. Keep in mind this tutorial is for making a child art center but the size and simplicity are a perfect application for an RV. I even think the chalkboard feature is ingenious and useful for an RV’er!
According to Ana-White.com this do it yourself RV Table / Desk will require the following:
Shopping List:
- 1 – piece 3/4″ plywood 16″ x 24″
- 1 – 1×4 @ 10 feet long
- 1 set hinge supports
- 1 set basic hinges
- 3 D ring hangers
- Chalkboard paint (optional)
- Moulding or trim (optional)
- 2 inch screws
- 2 inch finish nails
- wood glue
- wood filler
- 120 grit sandpaper
- primer
- paint
- paint brush
Tools:
- measuring tape
- square
- pencil
- safety glasses
- hearing protection
- drill
- circular saw
- nailer
- sander
- level
- countersink drill bit
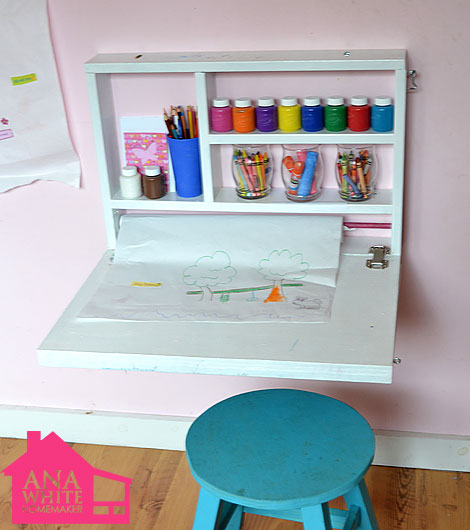
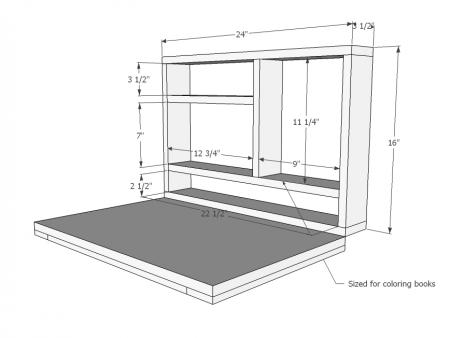
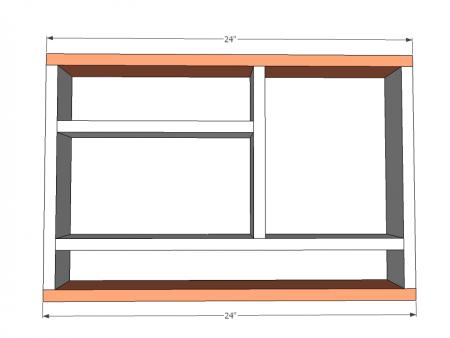
The support and basic hinges will be very important towards the durability and life of the RV table you build. Be sure not to skimp when it comes to the hardware.
For a thorough tutorial along with supporting pictures please visit http://ana-white.com/2011/09/flip-down-wall-art-desk-0


I did this for a catch all and work station, BUT, I cut into paneling in the wall and flush mounted it between the studs, and when closed is flush against the wall, (don’t catch elbow on a corner). Rv dealer thought was a good idea. I came across this conclusion when I realized that I had 3 1/2 inches of hollow wall space that wasnt being used. I also flush mounted my 19 inch flat screen LCD TV in an interior wall and wires all run thru the walls and hidden. Looks very professional being flush with the wall,, and I used the extended arm with swivel mount behind tv so it can be pulled out and turned in the direction its needed.. I have incorporated hundreds of ideas with using available space in and UNDER RV’s that are not being utilized.
Thanks! That’s exactly what I was picturing!!