There’s a growing enthusiasm among RVers to hook up solar panels to their mobile homes, and it’s easy to see why. Solar power stands as the premier solution for RV electricity needs, offering a blend of simplicity, efficiency, and eco-friendliness.
At its core, solar installation is straightforward, requiring just a handful of components. However, the nuances of selecting the right equipment and properly connecting everything can vary with each setup. This DIY project guide dives into the essentials of how to hook up solar panels to your RV, ensuring you harness the sun’s power to fuel your journeys with confidence.
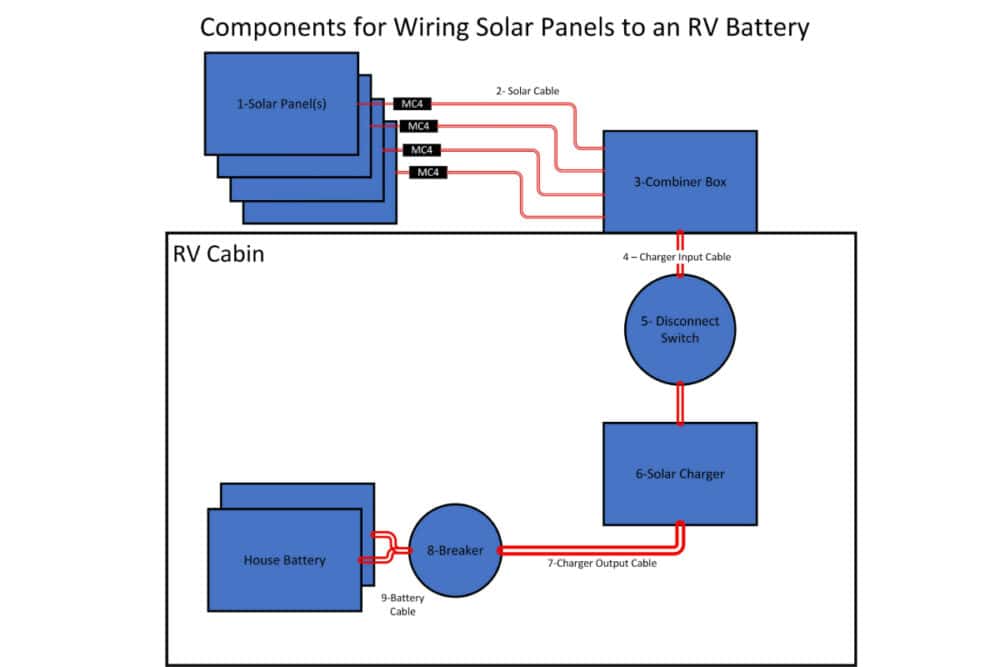
Getting Started: How To Hook Up Solar Panels for Maximum Capacity
The number and voltage of panels will establish the maximum capacity of the system. How they are mounted will determine if the panels can operate at their full capacity. Normally, fixed, flat mounting will decrease the maximum collection capacity by 15%. Reducing collection capacity will reduce the entire system capacity, which also affects all other equipment.
Connection Essentials: Wiring Your Solar Panels with Ease
Panels normally arrive pre-wired with short cables that end in MC4 connectors. These short cables may suffice to connect to parallel or serial adapters. But the arrangement of the panel’s wiring often necessitates additional cable with an MC4 connector to reach the RV cabin’s entry point.
Manufacturers must rate this cable for solar exposure to prevent the sun from damaging the insulation. Typically, MC4 connectors have a 20A rating, even when attached to wires of higher capacity.
Amplifying Power: Hooking Up Multiple Panels with a Combiner Box
Simple panel systems may not require a combiner box. However, for larger systems, grouping a ‘panel array’ of two or more panels can increase either voltage or amperage. When dealing with multiple arrays, installers typically use a combiner box, which often also serves as the waterproof entry point through the roof.
Cable Considerations: The Right Size for Hooking Up Your Panels
Sizing the input cable to the charger is based on the maximum current capable of being delivered by the panels, not the rating of the charger. Panels wired in series create higher voltage without increasing amperage and can use smaller cables. Panels wired in parallel increase amperage and require larger cables.
Secure Connections: The Need for Switches When Hooking Up Panels
Solar panels produce power whenever light is present, necessitating a switch to cut off power to downstream equipment. Commonly, installers use a breaker as this switch, though it isn’t necessary for over-current protection. One should not use a fuse for this purpose.
Charging Right: Hooking Up the Ideal Solar Charger
A solar charger takes power from the panels and converts it into a voltage that can charge batteries efficiently. When sizing a charger:
a) It doesn’t have to have a larger capacity than the panel since any excess power won’t overload it; instead, the solar system won’t use the surplus.
b) Chargers exhibit an efficiency range of 85-95%, meaning the system loses 5-15% of the input power to heat. Position the charger in a spot with access to cooling air to ensure proper venting of the heat.
c) Choosing a charger with a capacity below the panels’ maximum practical capacity will reduce the entire system’s maximum capacity, a crucial factor in calculating wiring sizes.
Optimized Output: Ensuring Efficient Power Delivery Post-Hook Up
The output current from the charger surpasses the input current, making a larger output cable essential. For long, high-current cables, using a size above the minimum can enhance the efficiency of power delivery to the battery.
Protection Is Key: Hooking Up Safely with Over Current Protection
An Over Current Protective Device (OCPD), either a fuse or breaker, is needed to protect the system cabling and must be located within 7” of the connection to the battery.
Finalizing Your Hook-Up: Connecting to the Battery Bank
Output cabling from the breaker to individual batteries in a bank can be smaller than input cabling because the current divides equally among the batteries. The cabling can extend from the battery to an existing power distribution block within the RV’s DC power system.
Typically, there’s no need to add or change battery cabling, as its capacity to deliver power to RV systems generally exceeds the solar charging capacity.
Wrapping Up
Hooking up solar panels to your RV represents a strategic move towards energy independence and sustainability on the road. This guide has outlined the crucial steps for integrating solar power into your mobile lifestyle, from selecting the appropriate panels and solar panel wiring to ensuring your system is protected and efficient.
By following these guidelines, you’re not just installing a solar power system; you’re investing in a reliable and eco-friendly power source for your travels. With solar panels hooked up, you’re ready to embrace the freedom of the open road powered by the sun’s endless energy.