
Keep Your RV Air Conditioner In Top Shape
Unlike camping decades ago, almost all RVs have at least one air conditioner. Often they have two, or even three. Besides cleaning awnings, resealing roofs, and checking RV batteries and water heaters, it’s very easy to forget that your RV air conditioner needs maintenance on a regular basis too.
Yes, an RV air conditioner is mostly self-sufficient, but annually you should give them a good look to make sure all is well. Depending on where and when you travel, you’ll want—and need—your air conditioners operating at peak efficiency. After all, a winter spent boondocking in Quartzsite wouldn’t be a fun experience.
Outside Maintenance on Your RV Air Conditioner
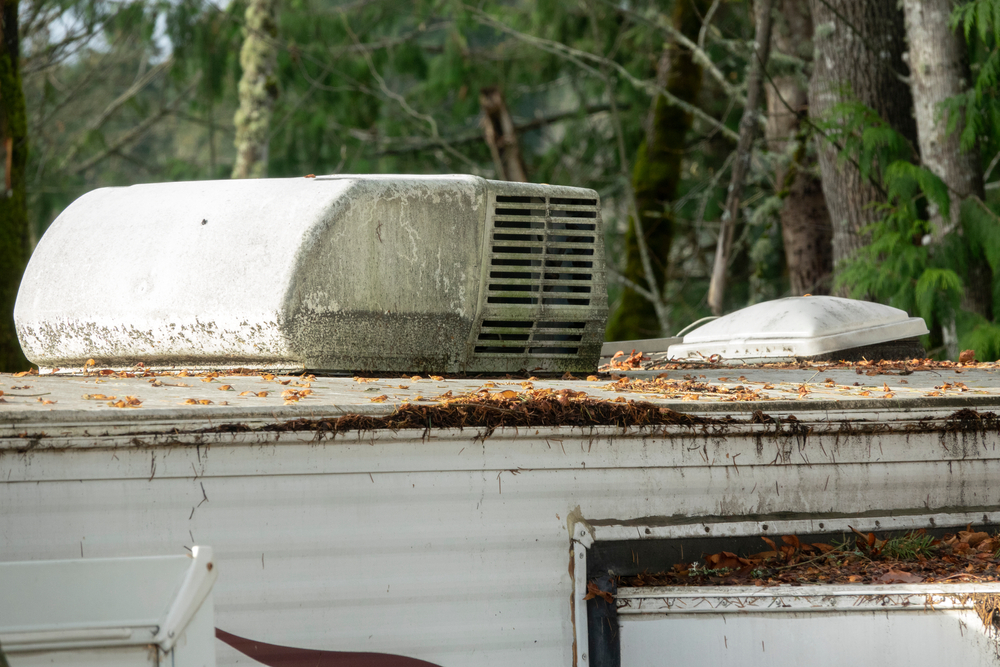
Get yourself a ladder, and being careful where you step on the roof, give your RV air conditioner an up close and personal inspection. Make sure that the plastic cover over the A/C is in good condition, and doesn’t have any cracks or splits in the plastic.
Not only does this cover provide a streamlined and semi-attractive appearance to the appliance, it serves another very important purpose. It helps keep rainwater and snow from getting into the workings of the air conditioner, which would greatly shorten its functioning lifespan.
Wind, Rain, and Debris Take Their Toll
The outer plastic cover might get damaged over time due to the harmful chemical interactions of the sun’s U/V rays, or physical trauma from being struck by low hanging branches at your favorite boondocking campsite.
Over a period of years, the effect of ultraviolet rays from the sun will actually weaken the plastic shroud to the point it may completely fall apart into pieces.
New shrouds for your RV air conditioner can be purchased online, and you might consider obtaining a high-quality replacement so that you only have to buy it once.
Look for Leaks and Water Intrusion
While you are on the roof, check that the air conditioner is securely mounted. There is a foam rubber gasket between the A/C and the roof. If the mounting is loose, rainwater may find its way into your RV, often with disastrous consequences.
When water enters your camper, it will likely follow roof rafters and wall framing and come out somewhere you would least expect. Often you’ll think the leak started in another location, and would never figure to check the integrity of the gaskets around your RV’s air conditioner.
If the water damage becomes severe enough, you could be faced with having to repair your RV’s wood flooring.
Cooling Fins Should Be Straight
Check the condition of the cooling fins too. Bent-over vanes will restrict air flow through the unit and greatly reduce the air conditioner’s cooling ability. If you have bent fins, you can use a comb or dull knife to straighten them out. Do be gentle because if you puncture the condenser tubes you have just turned your air conditioner into a boat anchor!
RV Air Conditioners are Single Use
Did you know that when your air conditioner ages to the point it isn’t cooling, it becomes scrap metal? RV air conditioners are not designed to be recharged, and all but the simplest repairs are not economical. About the only part you can replace is the starting capacitor for the compressor motor.
What causes the capacitor to fail?
Trying to run the A/C on an electrical circuit rated for less than 30 amps.
Using a 15-amp reducer plug is like putting a choke hold on your RV’s air conditioner. You will get a low voltage condition—called a brownout. When the A/C can’t get its required amperage, it heats up and will eventually destroy itself.
Some large motorhomes and trailers will have two air conditioners powered through one 30-amp power cord. This type of setup will cycle one A/C on, and when it comes off, the cooling cycle will switch the compressor on for the other A/C. This way, instead of requiring an even heavier power cord rated for 50 amps, the RV’s A/C system can function well with just a 30-amp power supply.
Part of your annual inspection should include running both A/C’s and verifying that proper load sharing occurs. You don’t want to make it out west, with temps approaching 100° Fahrenheit, only to realize one of your A/Cs isn’t working properly.
Once you have inspected the outside of your air conditioning system, it’s time to go inside.
Inspect Your Air Conditioner From Inside Too
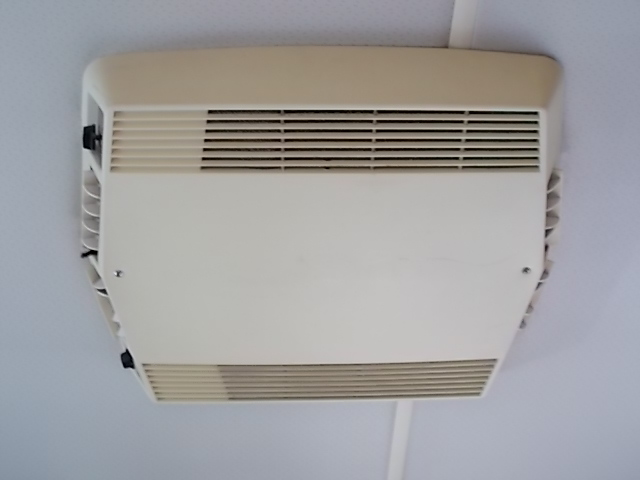
Under the plastic shroud on the ceiling of your RV, you’ll find one or two foam filter elements. These can be washed with warm soapy water and reused.
While you have the shroud off you should vacuum the area, trying to clean as far into any ductwork as possible. Though there are a couple different brands and models of RV air conditioners, maintenance, and annual care is pretty much the same for all of them.
None of them will last long trying to run them without adequate amperage to their power supply. If you are using a portable generator, you need to have one that is rated for a minimum of 3,000 watts.
All brands of air conditioners are mounted to the roof in similar ways, and like with most things “cleanliness is next to Godliness.”
Remember, most RV air conditioners aren’t rechargeable. When they fail, they are pretty much junk. The best you can do is maintain them properly and hope they have a nice, long life.
Give Your A/C Power a Boost With SoftStartRV
The power requirements of today’s modern camping family are much higher than they were a decade or two ago. New appliances, multiple flat-screen televisions, and a dozen USB devices that need charging can tax the power system of your RV.
This additional power draw can make it tough to start the A/C, which has a large initial power requirement to get going, but once running is very manageable.
You can solve this issue and make it easy for your air conditioners to power on by installing a SoftStartRV A/C soft starter on every A/C unit. Whether you have one A/C unit running on a portable generator, two units trying to run on 30-amps, or three air conditioners running on 50-amps, a soft starter will help you.
An A/C soft starter device like those made by SoftStartRV reduces the startup demand required by your air conditioner by as much as 70%. This means you can start two A/C units on just 30-amps.
For big rigs with three RV air conditioners, you can easily start all three A/C units on 50-amp power, when using your generator while boondocking, or on a long, hot drive. You can find SoftStartRV soft starters at https://www.softstartusa.com/rvlife.
Track Your Maintenance
Keep track of all your RV air conditioner maintenance with an online tool such as RV LIFE Maintenance. Not only can you keep all your maintenance records and documents in one place, you’ll receive timely reminders via email when maintenance is due, and potentially avoid a costly repair due to lack of maintenance.
Whether you have a small camper or large class A motorhome, RV LIFE Maintenance can keep track of it all. Keeping accurate maintenance records also increases your resale value, should you ever decide to do so.


Maybe the reason my air conditioner stopped blowing cold air is because the air filter is too dirty. Some advices from you helped me take care my air conditioner. Thanks so much! I will follow more.
Great article. One correction to terminology perhaps, or concept at worse: The issue for damage to A/C units is too low voltage (voltage drop or “brownouts”), not too little current (amps). Available current is not limited, controlled, or even “known” to the A/C unit. It wouldn’t “know” the difference if there were 15 amps or 500 amps available in the supplying circuit. The supplying circuit breaker controls/limits the current (amps) available. If you draw too many amps, by the number of things using current, the breaker will trip. The typical issue is: lower amp the circuits are wired with smaller gauge wire. It is the smaller gauge wire that causes the voltage to drop as more current is drawn. Voltage drop is a function of distance and gauge of the wire. The longer the run to the outlet, the longer the cord, and the smaller the gauge, the greater voltage drop there will be. Using a simple plug-in voltmeter is a really cheap and easy way to monitor your voltage to make sure you voltage doesn’t get too low, which is what can damage appliances. Just because you are plugged into a 30 amp (or 50 amp) receptacle doesn’t mean you are safe from low voltage: the supply wires to the outlet may be too long for their gauge, many campers may be using a lot of current at once, you may be hooked up with too long an extension cord (the shorter the better). Pro tip: if you have a 50 amp camper and only a 30 amp receptacle available, run your 50 amp cord to the receptacle, and use your adapter at the receptacle. Don’t use the adapter at your motorhome and run a 30 amp cord to the receptacle, as the smaller gauge wire in the 30 amp cord will add to the potential for voltage drop.
I work part time in rv repair shop.I retierd from hvac shop .I have soldered many ports in and have repaired leaks,and have added leak stop.Made very many happy customers.
“While you have the shroud off”…how is that done?
The RV HVAC folks need to install cassette mini splits in motor homes. High SEER so you can have the heat pump to 5 degrees F.
Pioneer has great equipment and their Technical Department says they will stand by the Pioneer warranty if you install a Pioneer in an RV. Flexible hoses not copper lines rid the vibration issue.
The biggest hang up is where to put the condenser?
KT
I don’t know what brand AC I have on my 2003 Forest River Wildcat, I do know that it has 3 duct openings in addition to the main plastic section on the inside of my 5th wheel, it also has 2 speeds, hi & lo. It does a good job of cooling the main area (kitchen/living room) but has almost no air flow through the duct in the bedroom, which makes sleeping uncomfortable especially with my 2 dogs trying to lay on top of me.
If I block the main section will that force the air to go through the ceiling ducts? Or do I need to try and clean the duct work to see if that fixes the lack of air flow through the ceiling ducts?
I can’t afford the prices that camping world charges for repairs and standard maintenance work, and if I can do the work myself that will save me a bunch of money in the long run.
Its your start capacitor.
Put a new one in, and it will quit humming.
You can buy a piercing valve for the larger (suction) line to charge the AC. You must first find out how the Refrigerant escaped.
It is a good idea to find out which refrigerant, of 3, or 4 you need for adding, or replacement of refrigerant. I use a meat basting
syringe to add an ounce of mineral oil when adding refrig.
If it needs freon, it has a leak, if you can find and fix the leak, it can last years longer. If you can’t locate the leak and repair it, it should be replaced.
I have a dometic air conditioner on a Layton travel trailer. When the a/c stopped six years ago I had friend/ ac technician braze a port on the unit and recharge it. It is still going. I agree with Scott that there are a few HVAC shops that will work on camper A/C’s.
i found your article very informative. at this time, my wife Karen and I have tackle a remodel job on a 91 motorhome that Karens father gave to us. I look foward to see other articles from you and other remodeling bloggers.
can my 1979 slide in truck camper be retro fitted for an A/C ? A small one would be great, I’ll be running on solar too
Thanks for sharing your tips Larry. Second you on wearing the mask if you have allergies!
I have a Winnebago Bextra that has basement ducted ac. The blowermotor (s) on the unit had to be replaced earlier last year.before it went out it would squeel. No belts, it has bearings that dried out. The motor and labor cost $300.00. The unit now runs like new. On another note, the ducts I have are both in the floor, and cieling. I went to a home hardware store, and bought a dryer duct brush kit which is like a chimney brush, just smaller and flexible. Using this and a canister vacuum wand and hose, cleaned the ducts. If you have allergies, wear eye, and mask protection. This and changing intake filters every 2 months depending on climate, pets, etc saved this full timer money, time, and allergy misery
Thanks for the reminder and the tutorial.
No portion of my AC unit is inside my RV; there’s just a grate over a duct (I assume) in the ceiling. Cleaning advice for that kind?
Hi Curtis: I’m brand new to your page…very infomative….thank you for ti…
Looking forward to more tips and tricks…
Happy Camping
Thanks for the clarification Scott!
I disagree that the A/C is not rechargeable. I own an HVAC business. I have recharged several camper A/C units for customers. It’s not a big deal to braze a port on the unit and recharge it. There are a few HVAC shops that will work on camper A/C’s, not a lot of them though.
Recharging a unit is just a temporary solution though. If you can get by recharging it once a year your doing good and you can limp along with it until you replace it. You will have to replace it…