
RV Storage: Need-To-Know Information For The Off-Season
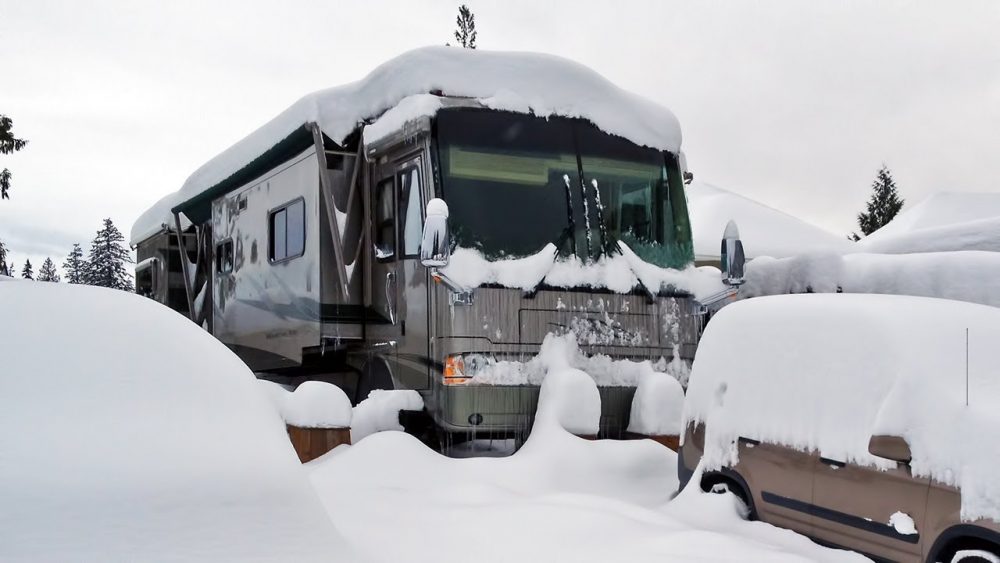
For most RVers, this is the time of year to lay up the rig for the winter season. In some areas “winter” means severe weather and below-zero temperatures, while in others it may be just the occasional hard freeze at night.
In either case, there are a number of chores to attend to so as to protect our RVs while not in regular use. For most folks that means more than the traditional RV winterizing of the water lines. Here’s what you need to know about RV storage for the winter.
RV water systems
Unless your RV is kept inside a heated building, the top priority is to protect the RV water systems from freezing.
This involves the fresh water lines, water heater, waste tanks and drains, and the ice maker, washing machine, and dishwasher if you have those.
Water heater & water lines
It is best to drain and bypass the water heater so that you won’t have to pump antifreeze or air through the tank when winterizing the water lines for RV storage.
To drain the water heater, first let it cool and open a hot water faucet to relieve pressure in the tank (pump and city water off). Then open the outside access panel and remove the plug at the bottom of the tank. Now is a good time to flush accumulated mineral salts out as well.
Most RVs have a water heater bypass system, a valve or set of valves that isolate the heater from the hot water lines. Set the valves in the Bypass position (see your owner’s manual). If your water heater is not equipped with a Bypass Valve, now is the time to consider installing one.
There are two alternatives for RV winterizing the fresh water system for RV storage: the Antifreeze Method or the Blow-out Method. There is also an innovative new Floë Integrated Drain Down System as Camper Report describes here.
Antifreeze method
With the Antifreeze Method, you add enough antifreeze to the water in the system to prevent freezing, while in the Blow-out Method you remove all water from the system. In the Antifreeze Method, you use RV “potable water” antifreeze (propylene glycol), which is usually pink in color.
It is non-toxic, so it won’t harm you if any trace is left in the water lines come spring. Drain all but a few gallons of water from the fresh tank and add enough antifreeze to make a moderately strong solution. 50% antifreeze is a good target, but less is OK in climates that don’t get as cold.
Using the RV water pump, pressurize the water lines and then open each water tap, one at a time, and let it run until you can see or smell the antifreeze solution. This assures there is antifreeze solution in each water line.

Don’t forget the shower (inside and out) and the toilet flush line. You will also need to do the ice maker, washing machine, and dishwasher if you have them, and they take some extra effort. I’ll cover those in a moment.
After feeding the antifreeze solution through each water line, you are done with this part RV winterizing. Leave the remaining antifreeze solution in the fresh tank, to protect it. You can drain the tank further if you wish, but there will nearly always be at least some water left in it, so the antifreeze helps there too.
Blow-out method
As mentioned before, the second method for RV winterizing the water lines for RV storage is the Blow-out Method, you use low-pressure air to force water from the lines. This requires an air compressor and an adapter to connect it to the RV’s city water inlet. First, drain as much water as you can from the lines and the fresh tank.
Your RV probably has a pair of Low Point Drains to empty the hot and cold lines, and may have a tank drain as well. Set the air compressor for 25-30 psi and connect to the city inlet using the adapter. Then open each water tap, one at a time, and let the air pressure expel the water.
Don’t be impatient—give the airtime to remove all the water. As with the antifreeze method, don’t forget the shower (inside and out), toilet flush line, washing machine, ice maker, and dishwasher, if you have them.
RV ice maker
Winterizing your RV ice maker is a bit of a chore. The ice maker itself is fine–it is supposed to freeze–but the solenoid valve that sends water to it is not. This makes winterizing the ice maker more complex when preparing for RV storage.
The ice maker solenoid is behind the fridge and accessed from the outside panel. While the water lines are pressurized with antifreeze or air (above), unscrew the water inlet from the solenoid valve and let the antifreeze or air bubble out. When complete, reconnect the water line and then disconnect the outlet side of the valve, the water line to the ice maker. Let it drip until no more water comes out and then replace.
Washing machine or dishwasher
If you have a Splendide RV-style washer, it should have RV winterizing instructions in its manual or a supplement. Residential-style washers may not. In general, when RV winterizing the water lines you need to let antifreeze or air bubble out of the washer’s water inlet lines, just like you did the faucets.
In most washing machines you should run a spin cycle to remove as much water as possible, and then add some RV potable water antifreeze to the washer drum and run a brief drain or spin cycle to push it down into the washers drain pump.
A dishwasher is done about the same way, first clearing its water inlet lines and then running some antifreeze down its drain by running a brief cycle. Do not drain all the antifreeze away–you want some left in the drain pump.
RV waste tanks, drains, and toilet
While RV winterizing the water lines, hold down the flush pedal or button until antifreeze appears or air pushes the water out, similar to what you do for faucets.
Empty your waste water tanks as much as possible. Pour some potable antifreeze into each sink and shower drain to fill the P-trap so that water cannot freeze there. Also pour enough antifreeze down the toilet and a sink drain to put a quart or so in the tanks, to protect the valve at the bottom of the outlet pipe.
Last, pour a cup of antifreeze solution into the toilet bowl and let it sit there without flushing. This will keep the seal moist without risk of freezing.
RV battery storage
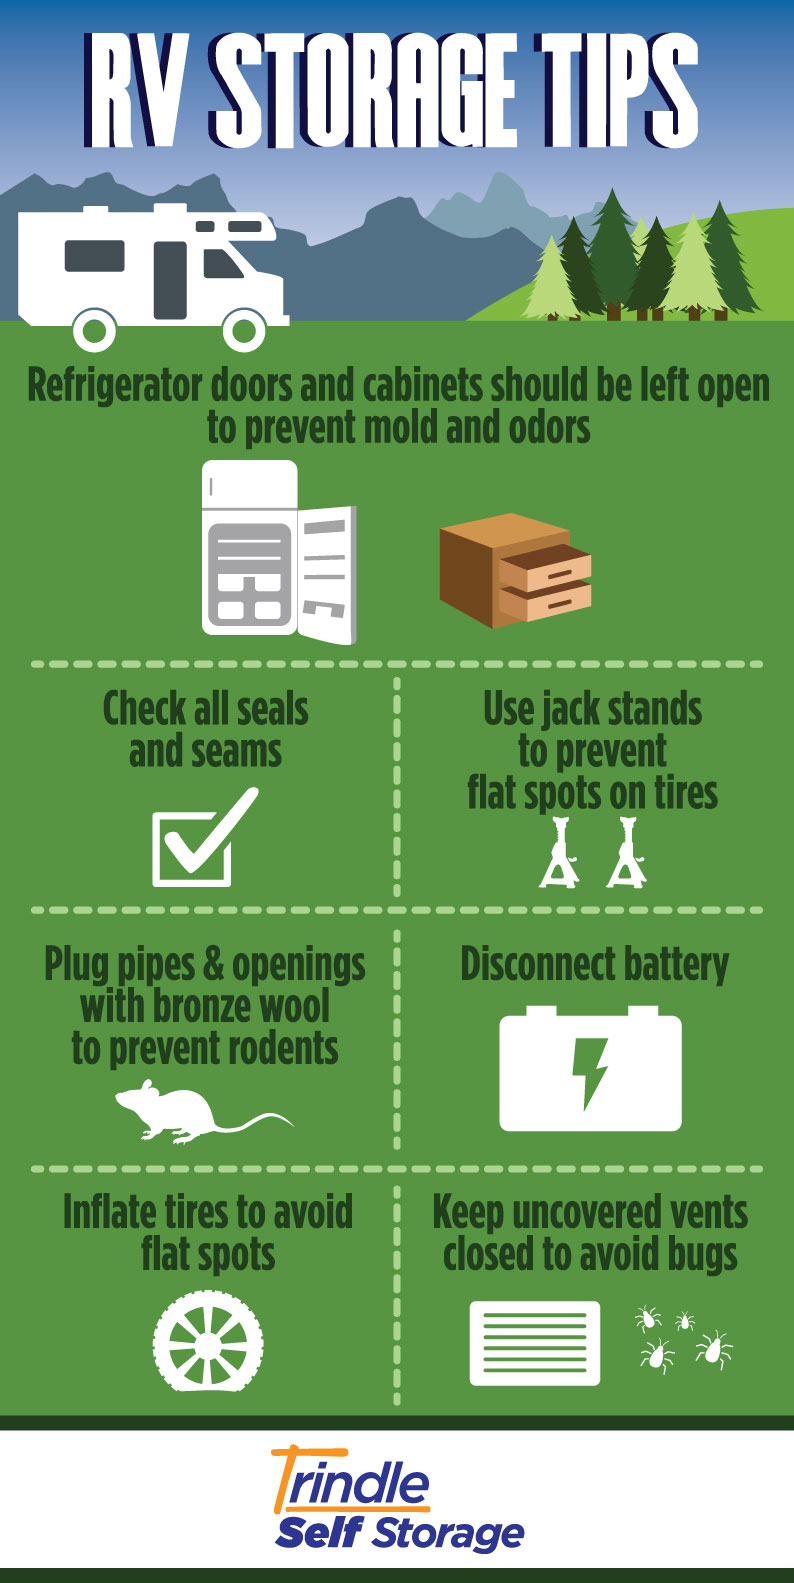
It is extremely important to protect your batteries from freezing. A battery will freeze if it discharges too much in cold weather, so you need to keep it well charged.
The best practice for RV winterizing the battery is to remove it and store it in a warm place, but if you can keep a battery charger operating while in storage, that is OK too. Preventing discharge is also good for your battery’s long-term health.
Keep mice and other pests out of your RV
Mice and other critters are also looking for a safe place to winter, so try to close off as many possible openings as you can.
The area where water lines come to the interior is always a potential entry path–mice can flatten themselves to fit through tiny openings.
Besides prevention, it is a good idea to put out some mouse bait or traps so the little critters can’t thrive if they do get in.
This is a commonly overlooked part of RV winterizing, yet one that could be costly if omitted.
RV storage tire protection
The cold can wreak havoc on your RV tires. Tire care should be a consideration for everyone when RV winterizing. Most tire manufacturers recommend increasing the tire pressure when in storage and/or removing weight on the tires.
You can pump the air pressure up to the sidewall maximum, or even up to 10 psi over, and you can use jacks to partially lift the RV frame to reduce the weight on the tires.
Preventing snow damage
This is one area where it pays to play RV winterizing defense. If snow and ice are heavy in your region, consider placing a wood shield over the roof skylights and refrigerator roof vent.
Both of those are vulnerable to crushing if snow and ice build up on them and then goes through repeated freeze and thaw cycles.
You can make a simple shield with some scrap 2×4 lumber to make a rectangle and cover it with a piece of plywood or sheet metal. Set the covered box over the skylight or vent so that it carries the snow load.
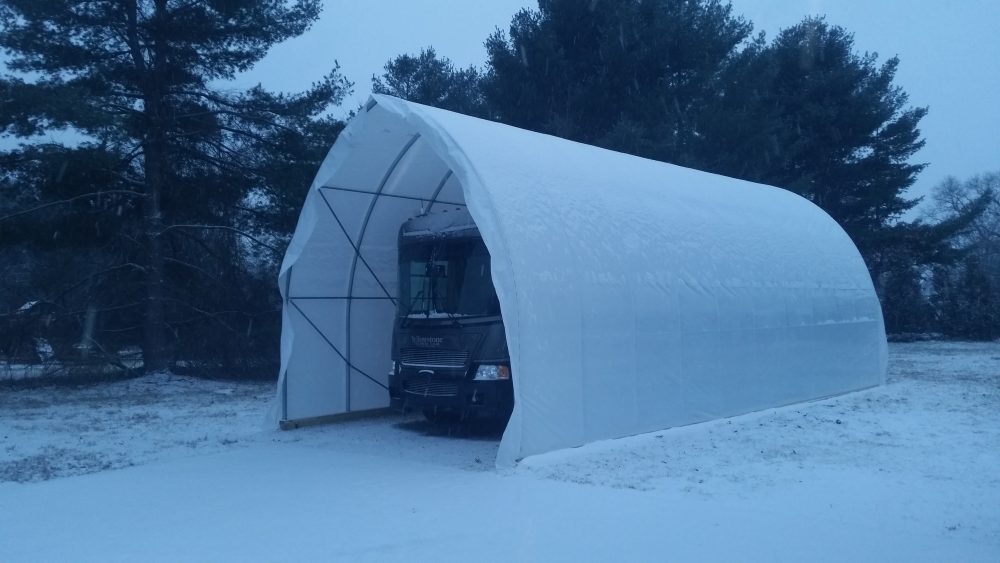
To cover or not to cover?
One hotly debated topic is the use of an RV cover for outside storage. Despite advertiser claims, they are a pain to put on and take off, so you probably don’t want one if you need occasional access to the inside.
However, some covers have zip-in doors or slits to make access easier. The best covers are made from a material that “breathes” yet is water resistant. If you choose to cover, be very careful about leaving any place that can flap in the wind.
A flapping cover will quickly wear away paint, decals, or even the gel coat from fiberglass. Also, watch for sharp corners on the RV that can rub through the cover material.
Ventilation during RV storage
Considering the damage moisture may do should be part of your RV winterizing process. Moisture build-up inside the RV can be a problem in some climates, so it is best to provide some air circulation if possible.
If you can, leave a roof vent or window open a small amount. It may be necessary to put something over the vent or window to deflect rain and snow.
Use these tips for your RV winterizing this offseason and you should increase your chances significantly that your RV will be ready to go come spring. Not to mention the years you will add to the life of your RV.
Keep track of your RV maintenance
When you are winterizing your RV for storage, be sure to keep track of all your RV maintenance with an online tool such as RV LIFE Maintenance.
Not only can you keep all your maintenance records and documents in one place, but you’ll receive timely reminders via email when maintenance is due and potentially avoid a costly repair or serious accident.


I was told by a RV service tech that once you have pumped rv antifreeze
into all the lines, you will have pushed out all the water, Low spots in lines
will have antifreeze in them. Drain out the antifreeze and leave open all
faucets to avoid a vacuum. This leaves better tasting water in spring.
I see no mention of slide outs. In or out for storage? The photo accompanying the story shows the slide out in the out position and covered with snow. What is best?
Winter in AZ, summer in the intermountain west. Our travel in the rig will never take us farther east than Big Bend in Texas. Boondocking all the way. I have no use for the the eastern US.
While my rig is not in use, I place wadded newspapers in the refrigerators and freezers. They help absorb moisture and odors. My refrigerators and freezers smell like they are new.
It was costly but safe & effective (I think) to do what I did a couple years back when we had a cold one…I bought a “freeze cube” (a device that you plug into an outlet or cord and then plug your heater into it and it passes power through only when the temps go below 32…I put that all underneath the rig where the tanks are since – even if you heat the rig’s interior – there is the chance temps could drop below freezing below the floor line whereas when you heat from below the heat will rise & protect the interior water lines, etc. IMO
What about driving down the road in the winter, if there is no ice or snow but just cold weather? We want to take a trip but wonder if we get caught in cold dry weather if our tanks and water will be safe. We plan on keeping the inside warm as that is where we will be.
You are welcome! Hope it solves your dilemma!
Thanks so much for the information. Fortunately I remained hooked to electric so I can continue to run the refrigerator. I will try to find a reliable ceramic heater & set it to the lowest setting on the thermostat, enough to keep it from freezing inside the RV & hopefully near the water pump (limited access). Thanks again for the info.
Hi Duanne,
This weather lately has proven quite a challenge. Perhaps even more so for you given your weekend warrior use of your RV. If you are unable to winterize your RV then you dont leave yourself much of an option besides using some kind of heater. The hope is you have access to power where your RV is stored. In which case you could get a small ceramic heater with an adjustable thermostate that you could leave unattended. You could also use a oil heater or propane as long as it had a thermostat. The problem is there is always a risk that comes along with leaving a heater unattended.
Typically there is one main bay that holds your black/grey/fresh tanks, your sewer connections, water pump, water filter, etc. This is the MOST important bay to keep warm. If you can get a heater going in there that may be enough to get you through a cold spell.
Alternatively, if you have some choice on where you store your RV, try to park in direct sunlight out of the shade. This has always proved helpful for us.
I live in the Gulf coast region, so freezing weather in usually not much of a concern. I do not winterize as I use the RV often (most weekends). When I leave the RV, I shut the water source off and drain the lines as best as I can. I turn everything else off except electricity to keep the refrigerator running. The underside of the RV is enclosed, but I don’t have any tank heaters. Mild freezing weather is usually not an issue. This winter we have had exceptionally cold weather getting down to 15 – 18 degrees a couple times. Last time arriving to the RV I noticed the water in the toilet partially frozen (left some water so the seal does not dry out), and one of the p-traps under the sink cracked. My question (sorry for the lengthy explanation), how can I safely keep the inside of the RV above freezing while I’m away? Light bulbs? Space heater on low setting? Right now I’m just wrapping everything I can reach. We just don’t get that kind of weather down here often!