I love extension cords. What I don’t love is winding them up and keeping them tidy after use.
I personally use simple cord reels to store my extension cords.
Cord reels are great for many reasons.
They’re cheap, don’t break easily, and eliminate the irritating mess you get when you stack multiple coiled cords on top of one another.
Plus, you don’t have to get your hands dirty when you roll your extension cords back up.
Make Your Own Extension Cord Wraps
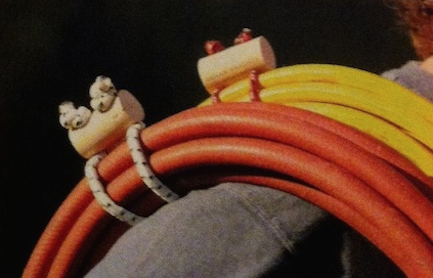
If you don’t want to use a reel to keep your cords stored neatly, you could also make your own cord wrap.
After you coil up your extension cord, use this wrap to keep it from unraveling and getting tangled with other cords.
What you’ll need:
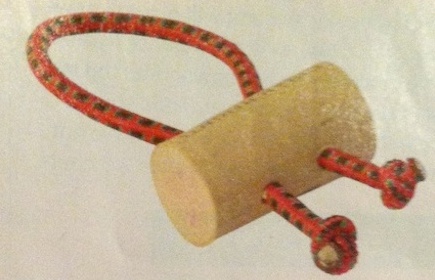
- four to six inch section of an old broom handle
- short piece of bungee cord (12 inches slack will do)
- simple lighter (for burning the edges of the cut bungee cord)
- drill or drill press with a bit the thickness of the bungee cord
Step 1: Cut a two-inch section of broom handle with a saw.
Drill two 1/4″ holes (or the diameter of your bungee cord) through the wooden section.
Step 2: Sand the edges of the broom handle so they’re smooth to your liking.
Step 3: Cut a six-inch piece of bungee cord
Step 4: Use your lighter to gently melt the ends of the bungee cord so the won’t fray.
Be careful with this step.
Melted plastic from the bungee cord will burn you!
And make sure to use adequate ventilation. Don’t breathe the fumes from the melting plastic.
Step 5: Tie a knot in one end of the bungee cord.
Step 6: Lace the bungee cord through one of the holes in the broom handle piece. Insert the other end of the bungee cord section through the other hole.
Tie another knot on the other end.
Now you should have a loop of bungee cord with the wooden piece free to slide down it.
Step 7: With the wooden piece in one hand, and the loop in the other, wrap the bungee cord loop around your coiled extension cord, and over the top of the wooden section.
When you release the tension, the wooden piece will hold the bungee wrap taut against the cord