
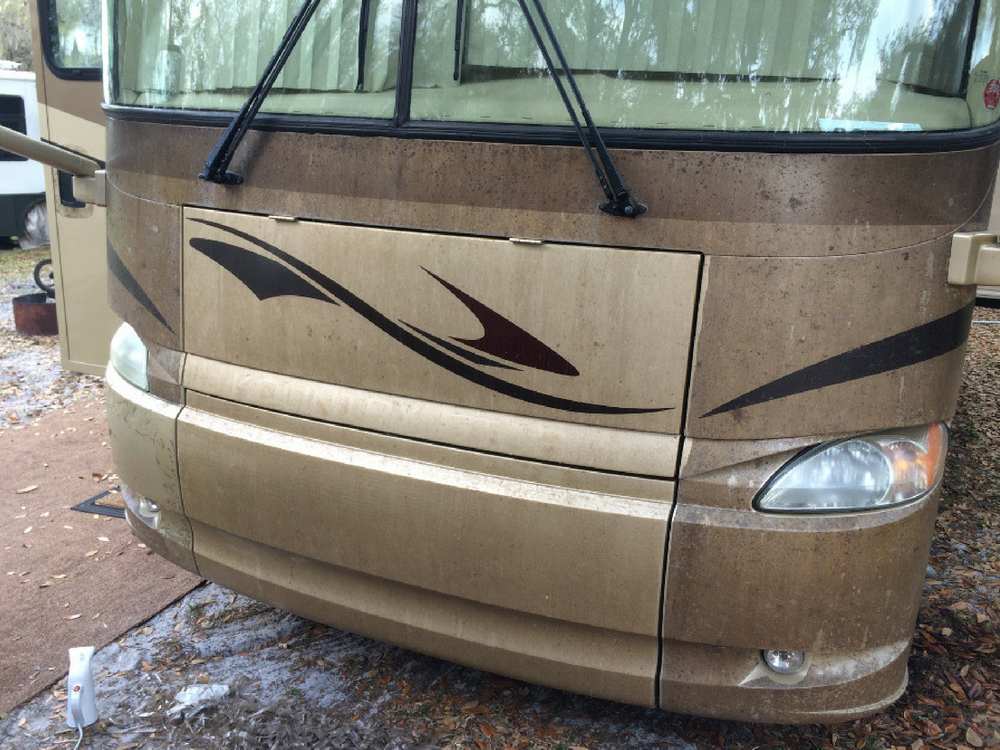
So you’ve bought a new-to-you RV and everything about it is making you smile. Everything except that moldy, dirty film that is covering certain parts of your RV exterior paint and just won’t wash off.
There’s a good chance that it is a protective film that once helped protect the paint, but through lack of maintenance, it has become an eyesore. The good news is that the paint under the film has been protected and probably looks like new, but the bad news is that the film needs to be removed and that’s going to take some elbow grease.
Removing the film from your RV exterior paint will vary in the time that it takes. The first and most obvious consideration is the amount of film that needs to be removed from your rig. Are you removing it from a small section on your van or Class C, or are you removing it from the entire front of your 5th wheel or Class A coach? The other consideration is the product you are removing. 3M will take longer than Diamond Shield because of how it comes off.
As with any job, prep work and using appropriate tools and supplies is key. Don’t try to rush this process. Follow the steps closely, take your time, and you’ll have a fresh new look in no time.
Step 1. Removing the protective film from RV exterior paint
The best way to do this step is by using a simple clothes steamer, some plastic razor blades, a plastic putty knife, protective gloves, and safety glasses. Pick a section to start with and apply some steam to that area of the film, be careful to not apply too much steam as this can damage your paint, finish, and decals.
After applying some steam to a small area, you should be able to get under the film with a plastic razor blade or putty knife. Now it’s just a matter of steaming, peeling, and scraping. Again, take care not to damage your finish or body with the steam and razor blades.
If you’re using the plastic razor blades, be sure to reinsert another blade when it gets dull. Fresh sharp blades make it go smoother and easier. If you are using a putty knife, have a piece of fine sandpaper or smooth file on hand to re-sharpen the putty knife to keep a nice sharp edge.
Don’t be too concerned with getting all the glue off at this point, just focus on removing the film. The product you are removing, Diamond Shield or 3M, will determine how smoothly and how long this step takes.
Keep in mind that 3M will peel off in smaller pieces than the Diamond Shield, which will make it more time-consuming. Either way, take your time and eventually it will all come off. With all the film removed, you are now ready to remove the glue/adhesive.
Step 2. Prepping for removing glue/adhesive
If you have any headlights or running lights that may get sprayed with the solvent in the next step, take the precaution of taping them off so they don’t get damaged, discolored, or covered with adhesive. You don’t want to make any more work for yourself.
Now gather the following supplies to have them on hand during the next step: gloves, goggles, plastic razor blades or putty knife, paper towel/rags, and some painter’s tape.

Get a good pair of rubber nitrile gloves to protect your hands from the blades and solvents used.
Choose which solvent you will be using and pour it into a nice quality spray bottle. The solvent that I used was Goo Gone Pro Power. There are many other products that work well for removing adhesive, just be sure that whatever you are using will not damage your paint/finish or any plastic light covers.
Step 3. Removing the glue/adhesive from RV exterior paint
The process of removing all the glue/adhesive is a pain in the butt. Plan on being patient and scraping and wiping a section a few times to completely remove all of the adhesive. As with the first step, the amount of time will depend on the product you are removing.
Find a section to start working at and work from top to bottom so that you don’t have to worry about adhesive and cleaner dripping over an area that has already been cleaned. Spray on the solvent and allow it to soak in for a minute or two, then take your plastic razor blade or putty knife and scrape off the majority of the adhesive.
Spray on some more solvent and use a rag or cloth to wipe off any remaining adhesive. Like I said, this could take a while, so take your time and try not to get too frustrated, you’ll get it done.
If you find yourself getting discouraged or frustrated, take a break. Chances are that you have been staring at this nasty discolored film for some time, so if it takes a day or two or a week, who cares. A radio and a few beer breaks helped me. And keep reminding yourself that when it’s done, it’s going to look like a million bucks.
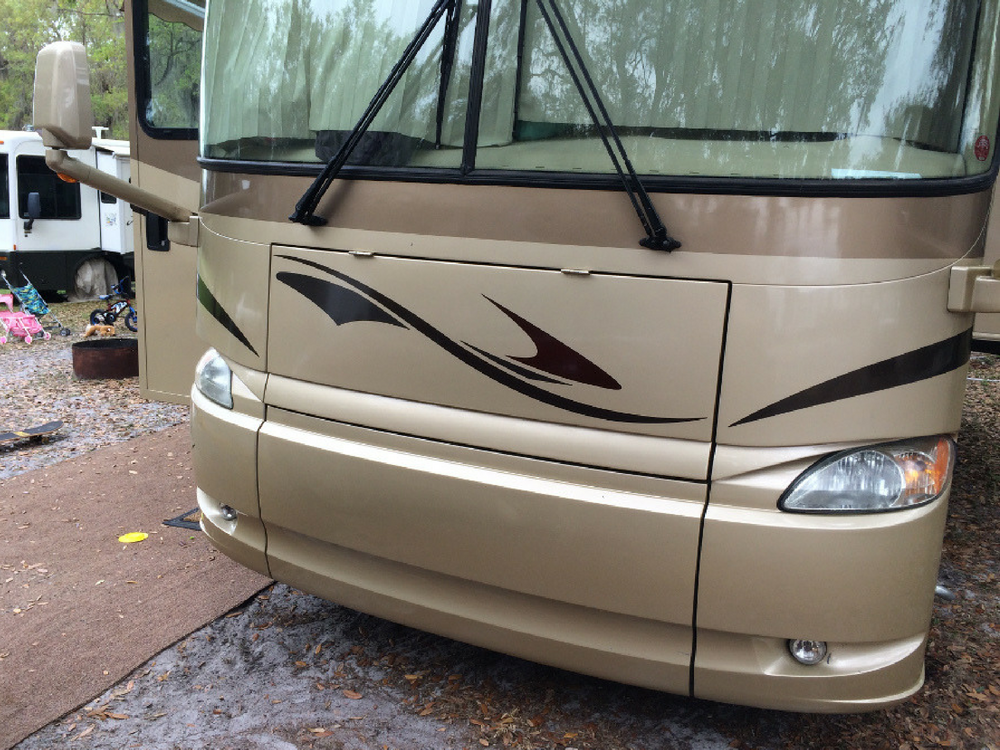
Step 4. Wash and wax your RV exterior paint
With all the film and adhesive removed from your RV exterior paint, your rig will be looking good. At this point, you might be happy with the outcome and ready to just sit back and enjoy it, but I would recommend one more step to complete this DIY moldy motorhome shield removal project. Washing and waxing this area will make it look even better and also help protect it from getting dirty and make it easier to clean when it does get dirty.

Take a nice soft washcloth and do a thorough washing with a basic cleaner. Let it dry completely. Next, use a good quality wax like Nu Finish to make it really shine. Just like removing the adhesive, this process will take a little elbow grease, but when it is done it’ll be shining like new.
There you go! Now all you have left to do is set up your lawn chair. Then, get out your cooler. Finally, just sit back to admire your pretty rig.

Thanks for the informative article. We are in the process of removing the 9-year-old poxed film from the front end of our Newmar Dutch Star. Not too hard to remove the film on a warm afternoon, even without a steamer. And regular GooGone is working well for removing the remaining adhesive. The hardest part has been around the headlights, where it’s difficult to get the plastic scraper into the concave spaces.