In our latest installment of Do It Yourself RV Project Submissions, we spotlight a remarkable endeavor by Steve Hericks, an author with RV LIFE, and his wife Cheryl. Their venture into creating an innovative off-road truck camper build is not just a project but a comprehensive journey.
With extensive documentation accessible via their YouTube channel and website, Working On Exploring, Steve and Cheryl provide an invaluable resource for those captivated by DIY RV projects. Now, let’s hear from Steve himself about this extraordinary build.
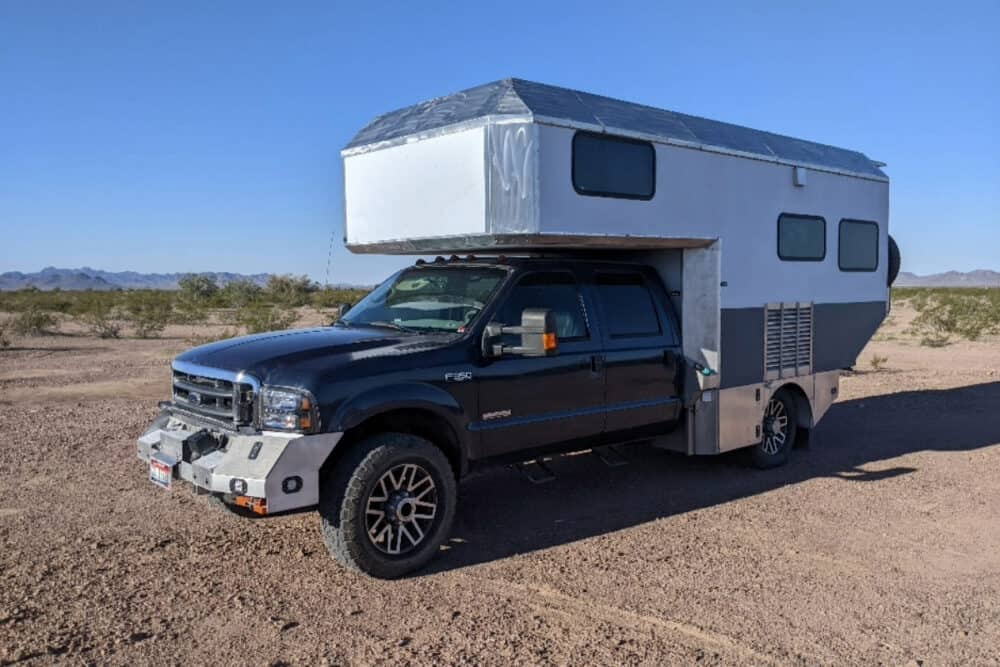
Our journey to build this one-of-a-kind off-road truck camper build kicked off with some hands-on experiments inside a Lance 1130 truck camper. When we decided to craft our next adventure truck from the ground up, our first step was to sketch out what we wanted it to achieve, taking cues from our time with the Lance. These goals were our north star as we developed Maximus the Adventure Truck.
Having spent a good chunk of my career in design and manufacturing, including a solid 3.5 years tinkering around as the plant engineer for Safari Motor Coaches, I’ve seen a lot of RVs. So, when it came to Maximus, I decided to shake things up a bit. We’ve gone for methods and materials that you might not find in your typical RV, mainly because I’ve always felt we could do things a bit differently and better.
Design Philosophy of the Off-Road Truck Camper Build
Most RVs are designed by building a house in the shape of a mobile platform. Prioritizing the house over the platform is most often an exercise in ‘fashion over function,’ resulting in high weight on a vehicle with already low mobility. An adventure vehicle needs a different approach.
A New Approach
We crafted a high-mobility vehicle equipped with just the essentials for making travel both convenient and comfortable, steering clear of luxury to focus on what’s truly necessary for adventure. This approach intentionally diverges from the typical ‘mobile home’ by prioritizing the core needs of a nimble and self-sufficient setup.
Every aspect of this off-road truck camper build was self-designed and constructed. Cost control was a primary objective, so all systems were DIY rather than contracted through specialty RV builders.
The 2004 Ford F350 truck used was not ideal, but it was on hand and could be made capable enough. The high expectations for off-road mobility to get beyond where traditional RVs or truck campers could go demanded substantial modification. (View the specifications of our off-road truck camper build, Maximus, here.)
The Truck
Tires/Suspension
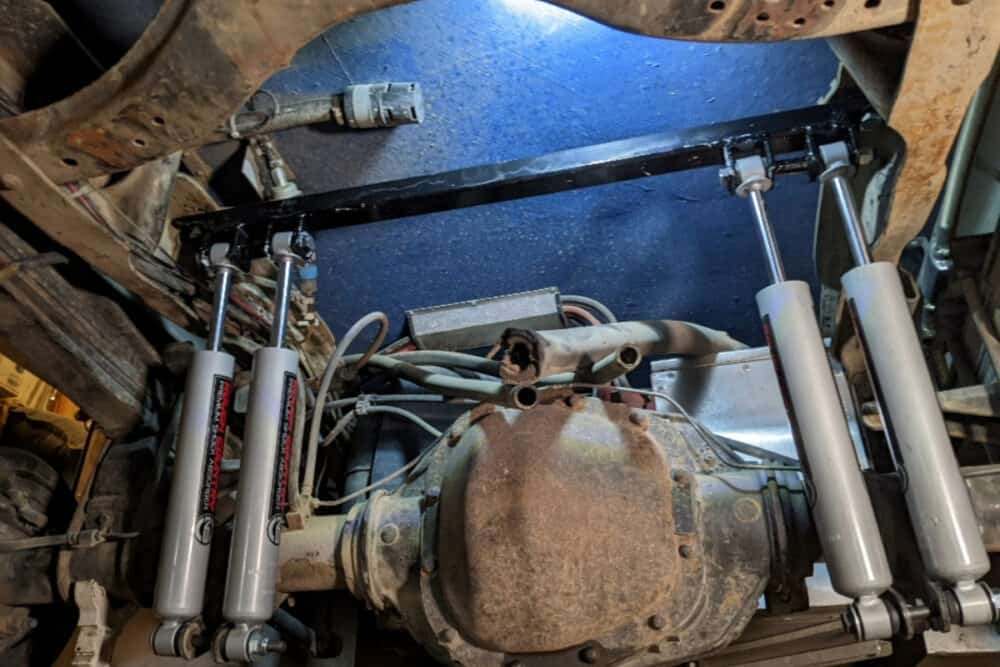
For the tires and suspension, we made significant upgrades to ensure the vehicle could handle the rigors of off-road travel while supporting the additional weight. From the ground up:
- The stock F350 wheels were increased from 16” to 20” with 3800lbs capacity.
- Tires were upgraded to 295/65R20 (35”) all-terrain tires with 4,080 lbs capacity (Load Index 129).
- A ‘Superspring’ leaf spring was added to each spring pack to maintain ~ 16” ground clearance while still supporting a substantially higher payload. No other suspension ‘lift’ was needed or desired.
- Dual shocks were added to all 4 corners to control the sway of the additional weight and higher center of gravity.
- The Sterling 10.5” rear axle has a capacity of 9,750lbs, and the Dana 60 front axle has a capacity of 6,500lbs.
Bumpers/Recovery/Tow
For the bumpers, recovery, and towing setup, we’ve made some unique modifications. Several of these projects are detailed in our YouTube videos, with specific links provided for a closer look.
- The front bumper was replaced with a higher-mounted, heavy-duty, DIY winch bumper, which improved the approach angle to about 48°, mounted the 18,000 lb.
- Warn winch with 14mm synthetic rope, provided recovery and jacking points with 2-2” receiver tube connections at the ends of the frame as well as carrying my DIY recovery jack (video link).
- The ends of the bumper are storage boxes for recovery gear.
- Off-road lighting (video link) is mounted on and into the bumper to illuminate all around the front of the vehicle for finding boondocking sites in the dark.
- The rear bumper was removed, and the factory tow hitch was raised 10” to clear the 30° rear departure angle (video link).
- To restore the ability to tow a Jeep Wrangler (video link), the 10” rise in the hitch was compensated by a 10” drop x 18” long receiver extension.
- Similar to the front, two additional 2” receivers were added to the frame ends to provide recovery and jack connections.
- The spare tire also needed to be relocated from underneath the rear frame onto the back wall of the habitat with a winch that lowered it when needed (video link).
The Onboard Air System of the Off-Road Truck Camper Build
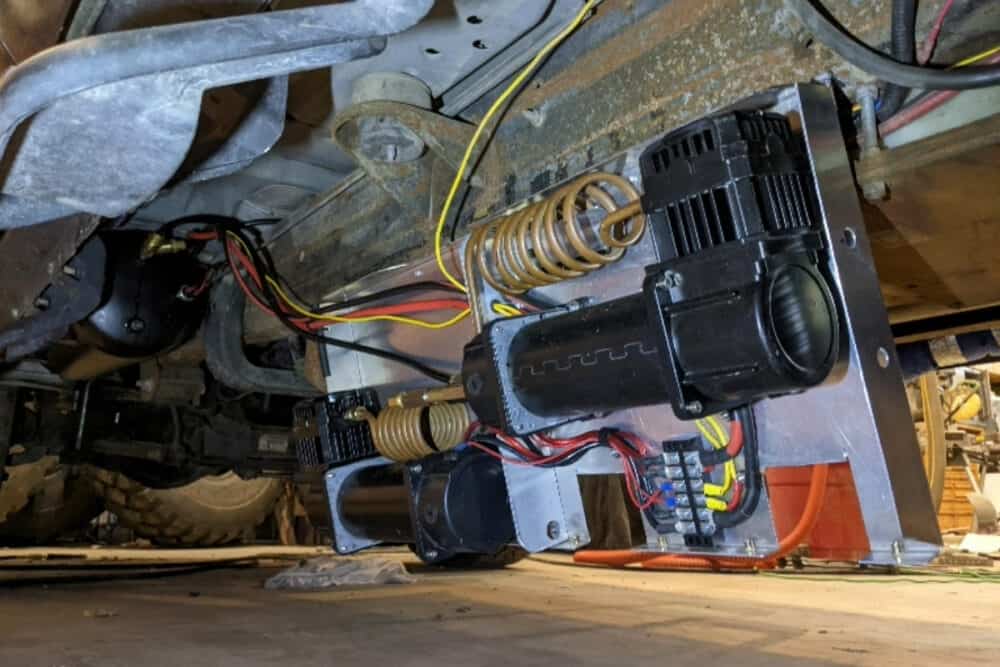
Mobility and off-road comfort were enhanced by the ability to lower tire pressure on rough roads. To return to the highway, a substantial compressor is needed to reinflate the tires.
Our onboard air system features a dual compressor and a 5-gallon tank. It is capable of delivering approximately 14CFM at 135psi (YT-OBA), with air couplers positioned at the center of both sides of the truck. This always-available compressed air supports an air horn. It also powers the tow brake system in the Jeep.
Center Console
Expanding truck systems to support the habitat led to the removal of the center armrest between the front seats and building a custom console containing storage and instrumentation for the dual alternators, onboard air, tow brake, and off-road light system.
An 8” tablet provides navigation, a 10” tablet for engine instrumentation, rear view monitor in place of the rear view mirror, a tow vehicle/hitch monitoring display on the double DIN stereo, and MP3 audio entertainment from a phone as well as USB power for charging cameras and phones.
Habitat Mount
The full-size truck came with an 8-foot-long cargo box (weighing 420lbs) that was replaced by a ‘flatbed’ floor in the camper. A high-mobility truck will subject the frame, and anything mounted directly to it, to more stress and flexing than a typical RV. No box-shaped habitat is going to be as flexible or strong as the frame, so it must not be rigidly mounted lest it be twisted and broken.
The habitat floor is structurally a very stiff composite flatbed, mounted to the truck frame on a 5” tall, 3-point, flexible mount (video link) that allows the truck frame to twist up to 10° in either direction beneath it without transmitting forces to the habitat.
Two, minimally flexible rubber mounts behind the cab, secure the habitat to the center of the frame while a single hinge bearing at the rear supports the habitat but allows the frame to twist. This works great off-road but creates a problem on the highway by preventing the sway bar and shock absorbers from damping habitat sway. Two clamps under the rear pivot can be tightened to ‘lock out’ pivoting.
Weight Distribution
The nature of the 3-point cabin mounting makes it very important to balance the weight inside the cabin and hang as much as possible on the frame. Most of the heavier equipment is mounted to lower the center of gravity, distribute weight between the axles, and attach heavy items directly to the frame instead of the habitat.
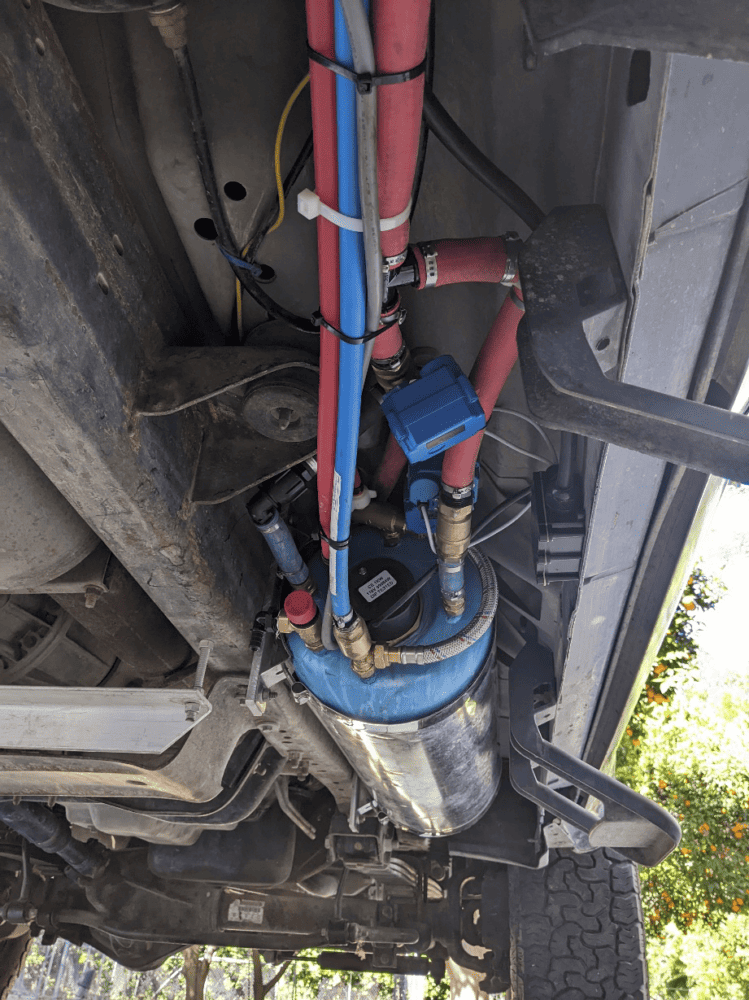
The insulated 32-gallon gray tank is frame-mounted behind the rear axle. The insulated 25 and 18-gallon freshwater tanks (video link) are on the rear wall of the cab. The 350lb lithium battery (video link) is frame-mounted under the habitat. An auxiliary 14-gallon diesel tank and a 20l ‘calorifier’ (coolant-heated domestic hot water tank) (video link) are under the cab.
Exterior Storage
There are four insulated storage boxes mounted under the flatbed floor. They are constructed from a welded frame of ¾” x 16 ga square steel tube that is covered by .062 and .040 5052 aluminum sheet, insulated with ¾” (R4) polyisocyanurate insulation and lined with .030 plastic sheet.
The driver’s front box contains the electrical equipment and a toolbox (video link). The passenger front box is the wet/hydronic bay (video link). The rear boxes are for miscellaneous storage. The battery box and gray tank (video link) are constructed similarly.
The main storage for recreational equipment is in the back of the cab because of its large size and easy access. The rear seat has been removed and a plywood platform installed. A small amount of storage is available under the platform. A tandem inflatable kayak is often carried, but the composition of all equipment varies by season and destination.
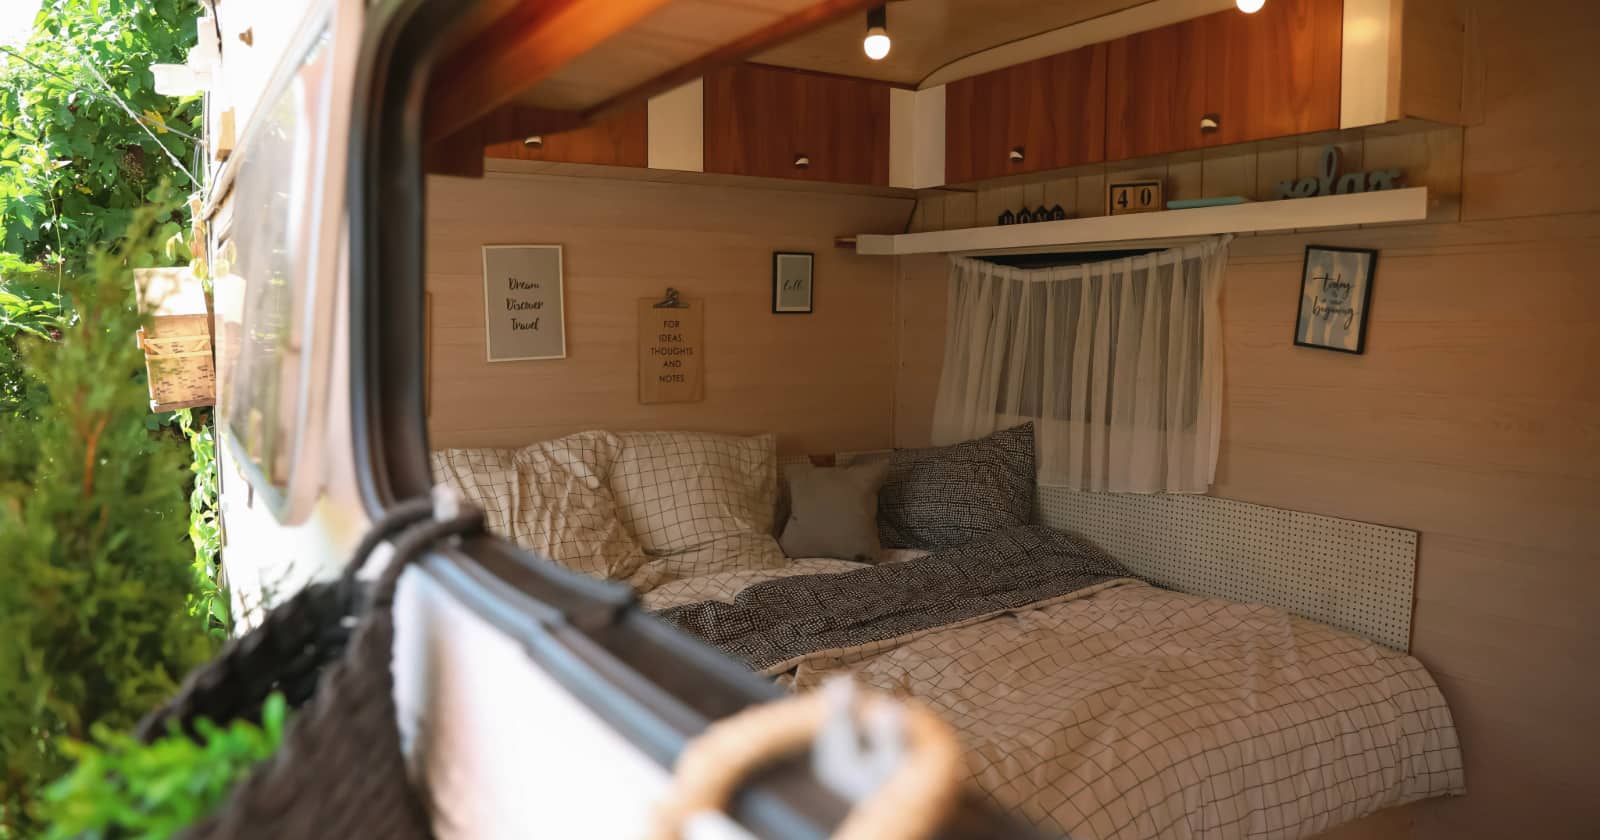
The Camper
Habitat Size/Shape
After outlining everything that is not the habitat, it’s finally time to get to that.
The shape of the camper build is similar to a flatbed truck camper but with a tapered ‘tail.’ The main door is on the passenger side, forward of the rear wheel, but there is also a door into the rear of the truck cab and a central, wide rear door that is mostly used for the view and ventilation. There is also a 2.5’ x 5’ powered roof hatch in the bunk for ventilation and star gazing.
Dimensionally, the (inside) flat portion of the floor extends ~9’2” rearward from the cab wall, plus an additional 2’5” extends upward at 30 degrees, making the internal space 11’7”l x 7’1”w x 7’h (82sf). The bunk is ~7’l x 7’1”w x 3’h (49.6sf). Floor plans and drawings can be viewed here.
Construction
The off-road camper walls are glue-laminated, stressed skin panels (meaning the load is carried by the face material) similar to a Structural Insulated Panel (SIP). But the 2” polyiso insulation was installed in 6” square blocks with a 5mm plywood ‘torsion box’ grid (think of the interleaved cardboard dividers in a box of glass bottles). The panel faces are 5mm poplar/bamboo plywood adhered with ¼” crown staples and Titebond III adhesive.
After a panel was assembled, both plywood faces were covered with 6oz fiberglass cloth and polyester resin. The ceiling has a 1708 biaxial mat (inside).
The panel perimeter and window openings were banded with 2”w x 3/4”t poplar lumber as well as joints of the 4×8 plywood sheets which are offset from each other inside to outside. The doors were made identically to walls using a double overlap perimeter profile (like European doors).
The floor facing is stronger, with 3/8” Baltic birch plywood on top and ¼” on the bottom with a combination of heavy chopped-strand mat and 1708 biaxial mat on both sides. There are 2” aluminum square tubes of various thicknesses in the back wall, ceiling, floor and bunk floor.
Windows/Vents
In addition to the roof hatch, there are 4 Maxxair ventilation fans in the ceiling for the bunk, dinette, shower, and bathroom.
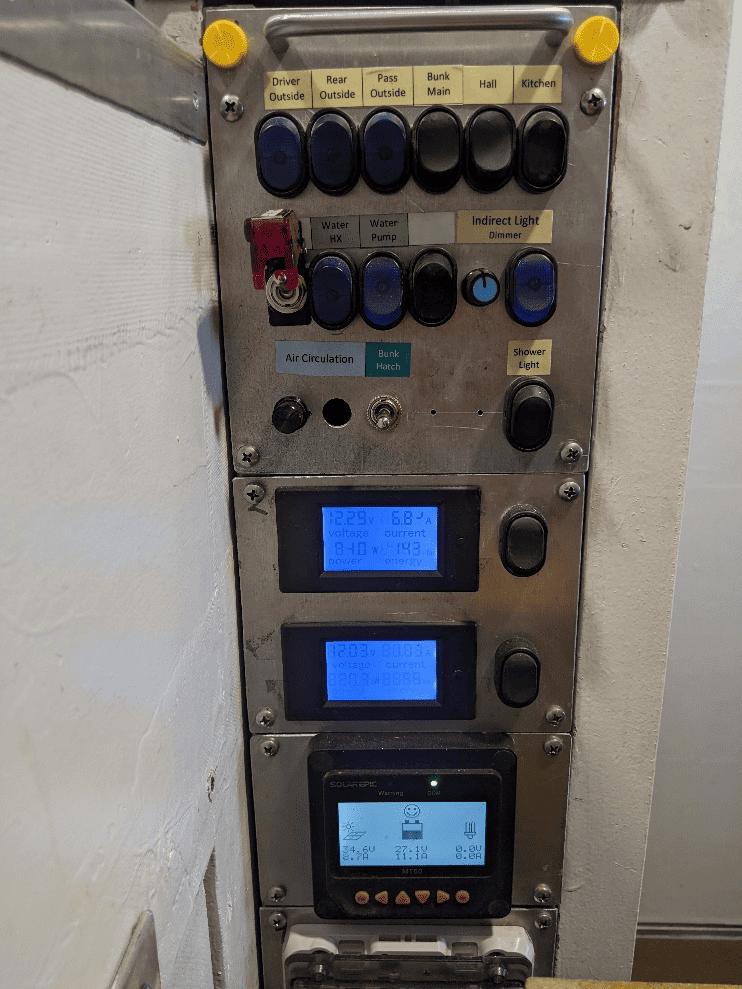
There are 7, fixed, double-pane, aluminum framed windows with 2 in the bunk and 5 in the main cabin. Electric linear actuators open the large bunk roof hatch. It can be raised and lowered by controls in either the bunk or the main cabin control center.
With the 4 ceiling vents and opening back and roof hatches, none of the windows open. There are no exterior access doors that pass through the habitat walls.
Exterior ‘Armor’
The exterior has an additional aluminum sheet applied over the corners and on the roof to facilitate solar panel mounting and to help branches slide over it without puncturing the walls or catching on a solar panel.
The top fairing of .040 aluminum sheet rises 5” above the cabin roof to create a ‘well’ area in which the 5 fixed and 1 telescoping PV panels and 4 vent fan domes are located. This makes the top of the panels and domes flush to the top of the fairing.
On the driver’s side, a large grill over the rear tire covers the outdoor unit (ODU) of the mini-split A/C-heat pump.
Fuel
The vehicle has a 38-gallon main diesel tank with a 14-gallon auxiliary diesel tank. The auxiliary tank provides fuel for diesel-fired air and coolant heaters but can also pump fuel into the main tank. There is no propane or generator onboard.
The Electrical System of the Off-Road Truck Camper Build
The electrical system is very high capacity for any size of RV let alone one this small. The rig is called Maximus because its systems are both powerful and redundant. I’ve written a few articles for Truck Camper Magazine detailing aspects of this build, including RV power systems and battery innovations. Check them out below:
Future Shock: A Bold Vision For RV Power Systems (TruckCamperMagazine.com)
Nissan Leaf EV Batteries For RVs and Campers (TruckCamperMagazine.com)
Big Power in a Small Camper – Going Lithium Cheap (TruckCamperAdventure.com)
The Heart of the System: DC Power
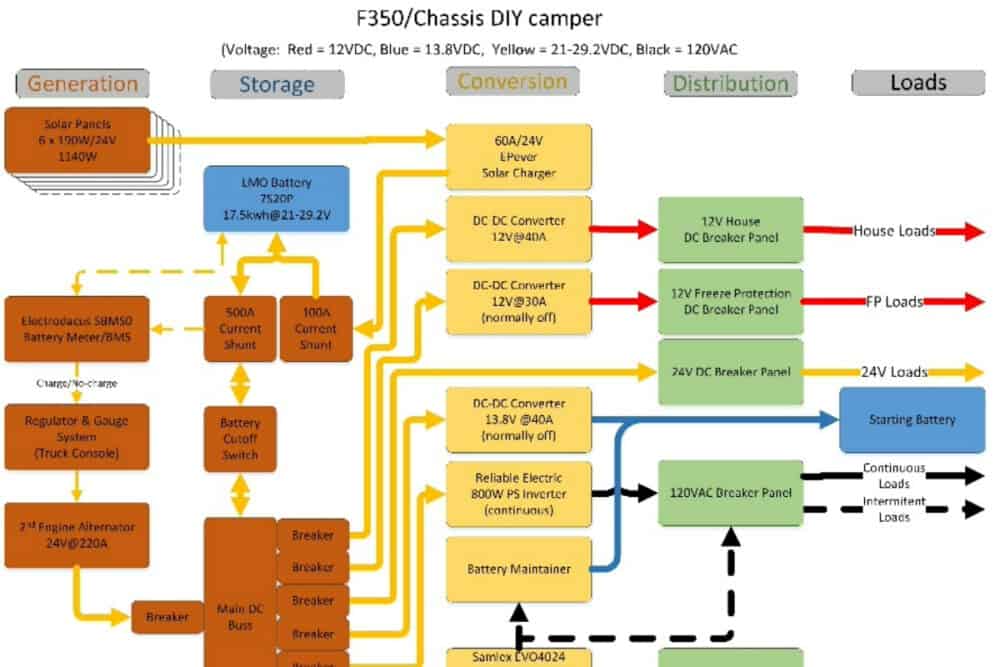
My main DC system schematic shows it is primarily 24VDC. While a 12V system seems most convenient and is most widely available, 12V systems have a lot of losses due to high currents that can’t be avoided with low voltage. With a large system, moving to 24V or 48V is far better.
The benefit of the Nissan Leaf battery is that lithium manganese oxide (LMO) chemistry has 160% of LFP’s energy density, allowing much more energy storage for the same weight. The drawback is that LMO chemistry can only make a 24 or 48V battery. Since the vast majority of DC equipment is 12V, it’s necessary to use DC-DC converters to convert 24V power to 12V.
Solar Generation and Backup Power
Generation is primarily from solar collection. The ceiling fan layout was optimized to place 6 – 24V/190W panels on the roof (each ~2.5’w x 5’l). One panel is atop the bunk roof hatch. Two are stacked at the rear with an electric actuator under the lower panel that telescopes it rearward when we are parked. The system capacity is 1,140W and generates from ~3 to 8kWh per day.
Backup generation is from 220A/24V/3kW engine driven second alternator (video link), with and external diode bridge that is dedicated to battery charging (video link).
Much more information on the system is available in videos as well as a written article listed below”
Alternator Charging – Expectations, Possibilities and Reality
Special Considerations when Charging with an Alternator
Use an Alternator instead of a Generator
Battery Storage and Power Distribution
Electrical storage is provided by a 17.5kWh battery bank of 35 lithium manganese oxide (LMO) battery packs salvaged from a Nissan Leaf (equal to ~14 – 100Ah LiFePoO4 batteries) in an insulated battery box under the cabin.
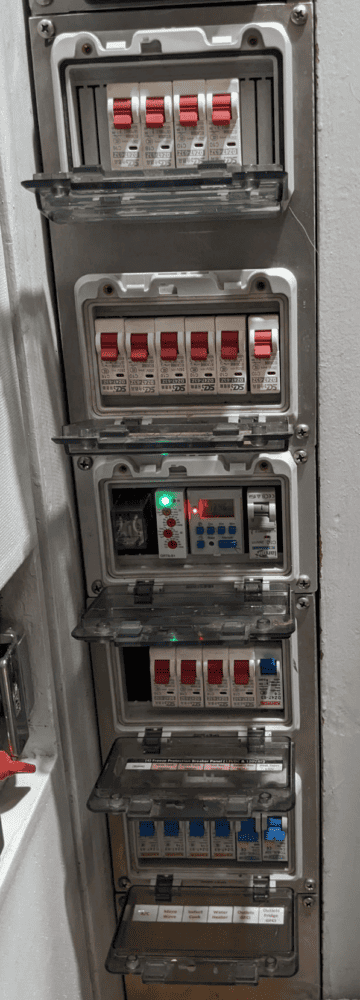
- The off-road truck camper build’s 12V DC systems are supplied by a 40A DC-DC converter for general loads and a 30A for the freeze protection system.
- The 120VAC systems are powered by an 800W inverter operating continuously for the residential refrigerator and a 4,000W inverter for cooking and cooling. Running the A/C while cooking with the microwave, insta-pot and induction cooktop is possible.
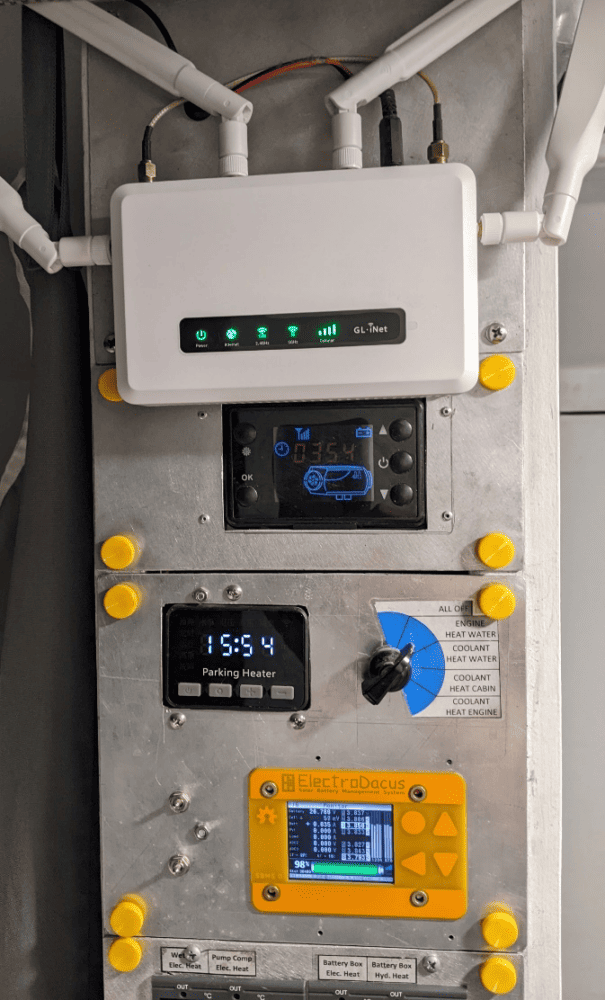
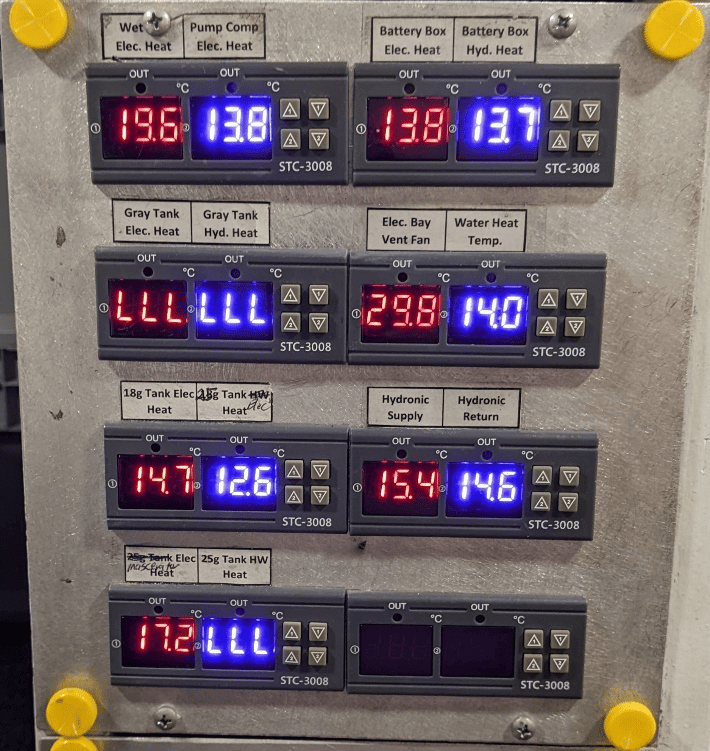
With lots of electricity comes a large electrical control and monitoring system. The 6” wide x 80” tall control center runs floor to ceiling and provides status and enables management of all systems in the camper.
Fresh Water Systems
Fresh water is carried in 2 insulated tanks mounted on the cab’s back wall. A 25-gallon and an 18-gallon tank above an insulated pump compartment are all temperature monitored and automatically heated by electricity or the hot water recirculation system to prevent freezing.
A 20l ‘calorifier’ (water heater) is an insulated tank with a coolant heat exchanger inside, mounted under the cab. It is normally heated by hot coolant from the engine when driving and water reaches 80C/176F in ~20 minutes of driving. When stationary, water is heated by a 1kW/120V electric element or the 5kW diesel coolant heater.
The passenger front storage box is the wet bay and contains:
- Hot and cold water distribution by valve manifolds (Viega ‘Mini-bloc’) that feed 3/8 PEX pipes directly to fixtures in the shower, bath, and kitchen.
- A 5-stage reverse osmosis purification system that purifies drinking water and provides 1.5 gallons of pressurized water to a spigot at the kitchen sink.
- A 5kW diesel-fired heater to circulate hot coolant, which can be used to heat water in the calorifier, provide warmth to the cabin, or preheat the engine during cold weather.
The total freshwater capacity in 4 tanks is 49.8 gallons. An auxiliary pump input can also draw water from a 60-gallon bladder laid on the back floor of the cab.
Our unique freshwater recirculation system purges cooled water in the hot water lines prior to operating the sink or shower and returns it to the fresh tank instead of running it down the drain. The calorifier has a thermostatic mixing valve on its output, limiting water to 50C/125F to prevent scalding. The shower also has one that mixes water to ideal shower temperature (~45C/112F), regardless of input temperature. (video link)
Waste Water System
The toilet is a Natures Head composting style so there is no black tank. The urine from the composting toilet has a direct drain into the gray tank. The insulated gray tank is 32 -gallons with a built-in macerator pump that can dump up to 150 feet away through a ¾” garden hose.
Heating/Cooling/Ventilation
Heating
There are 3 independent cabin heaters.
- The 9kBTU mini-split heat pump (video link) can provide heat down to 18F.
- A 5kw (17kBTU) diesel air heater under the kitchen cabinet heats the main cabin, and a circulation fan/duct system in the false ceiling circulates air through the length of the cabin to maintain even temperature.
- A 5kW diesel coolant heater provides hot coolant to a large fan coil under the kitchen cabinet, radiant tubing coils below the duck-board floor, a ladder-type convective radiator in the shower, and a small fan coil in the bunk.
For a comprehensive understanding of our hydronic heating system—from concept to completion—check out the following resources.
Design of the Hydronic Heat System
Installation of the Hydronic Heat System
Testing of the Hydronic Heat System
Hydronic System Technical Document
Ventilation
There are 4 – Maxxair ventilation fans in the ceiling. All fans are reversable (video link) allowing them to operate with some intake and some exhaust. The primary passive ventilation is provided by raising the screened rear hatch and controlling airflow by the opening of the screened roof hatch.
Cooling
Cooling is provided by a 9kBTU mini split. The outdoor unit (ODU) is located under the kitchen counter, facing the driver side. The indoor unit is located above the back hatch. Power consumption ranges ~400-800W. And when parked in the summer sun, it can easily run 8 hours per day (video link ), with the 1,140W of solar panels bringing in 6-8kWh/day.
Refrigerator/Freezer
A residential (120VAC) ‘apartment size’ refrigerator measuring 11.4cu ft. was installed. This Blomberg high-efficiency fridge freezer (video link) uses ~750Wh/day. A dedicated 800W inverter uses an additional 200Wh and also supplies outlets and USB around the camper. The combined power used by the refrigerator and inverter is still less than using a typical 10 cu ft. DC refrigerator.
Cooking
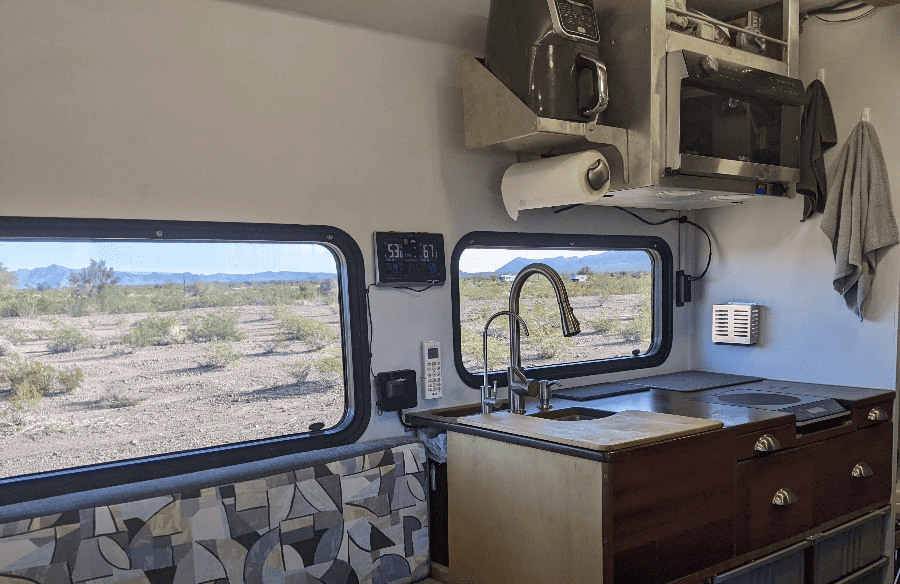
A single-element, portable induction cooktop is inserted flush into the kitchen cabinet but is still removable. A convection/microwave is built over the kitchen counter with a cooking vent. An air fryer is mounted to the left of the microwave and an insta-pot is also used. There are no propane appliances.
4-Season/Insulation/Freeze Protection
- Walls, floor, and ceiling are heavily insulated with 2” of polyisocyanurate, providing ~R14.
- With no pass-through storage doors and no opening windows, air leakage is minimized. The 7 windows are double pane ~R1.7 (typical).
- There are two separate external heating systems for freeze protection.
- All external storage is insulated with ¾” polyisocyanurate ~R4, and most compartments also have temperature sensors that read out in the control center.
- All tanks and water system compartments have automatic electric heaters that keep compartment temps above freezing.
- For sustained cold weather, the hydronic coolant heater not only heats the cabin but the recirculation system is operated automatically by the freeze-protection system to circulate warmed water through all the fresh lines for 30 seconds every 30 minutes. Leftover hot water in the calorifier is gradually added to the fresh tanks, raising their temperature.
Data Communications
Not long ago, traveling remotely meant being disconnected. Now, even in the most remote locations, Starlink dishes can provide service, but the costs and data rates are far greater than my needs.
My trusty off-road truck camper build Maximus uses a GL-iNet mobile cellular router with AT&T and T-Mobile SIMMs and a directional 2×2 flat panel MIMO antenna that can provide internet surfing and streaming entertainment almost everywhere.
Some skills are necessary to plan campsites and set up the equipment, but I have been pleasantly surprised far more often than I have been disappointed.
Inspired by Steve and Cheryl’s Incredible Work on Their Off-Road Truck Camper Build?
We’re always on the lookout for more DIY enthusiasts who are eager to share their projects, big or small, with the world. If you’ve recently completed a DIY project that you’re proud of and would like to inspire others within our community, we invite you to submit your project.
Whether you’re a seasoned DIYer or just starting, your work could be the next feature that encourages someone else to create something great. Submit your project through the form on our website, and let’s continue to build a community of creativity and innovation.