At Do It Yourself RV, we’re all about showcasing the creativity and skills of our RV community. A key part of our site is the opportunity for readers like you to share your DIY RV projects. Through our submission form, you can contribute your own projects, ranging from simple tweaks to full-scale renovations.
To kick things off, we’re featuring our first approved submission–Bruce Gordon’s extraordinary truck camper build! We cover his project extensively below in this article, but for those eager to dive even deeper, Bruce’s blog offers additional details and images.
Project Overview: Bruce’s Truck Camper Build
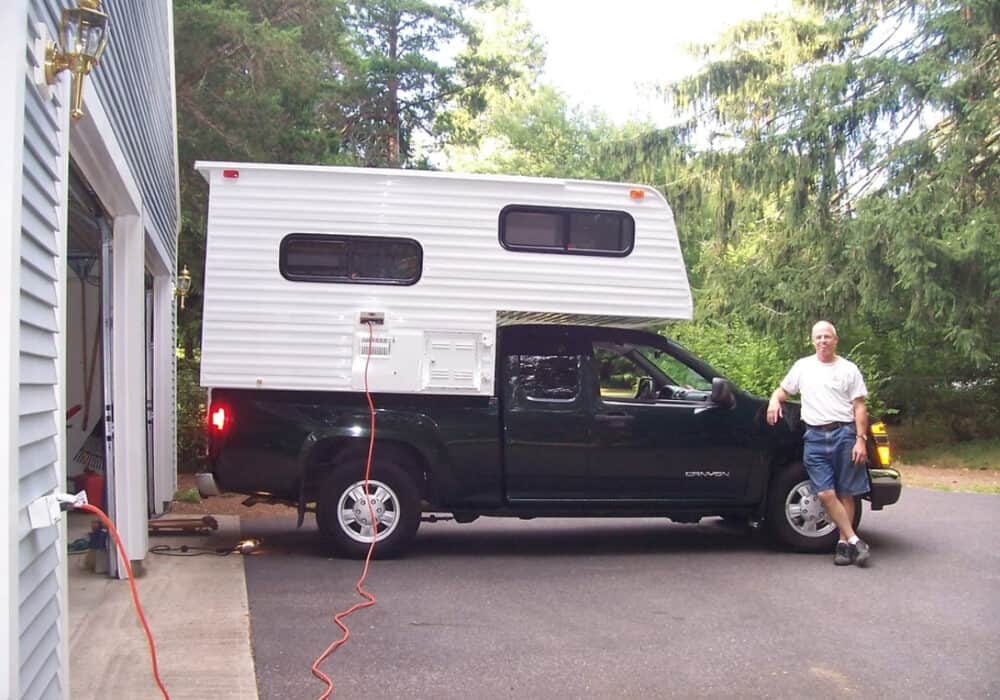
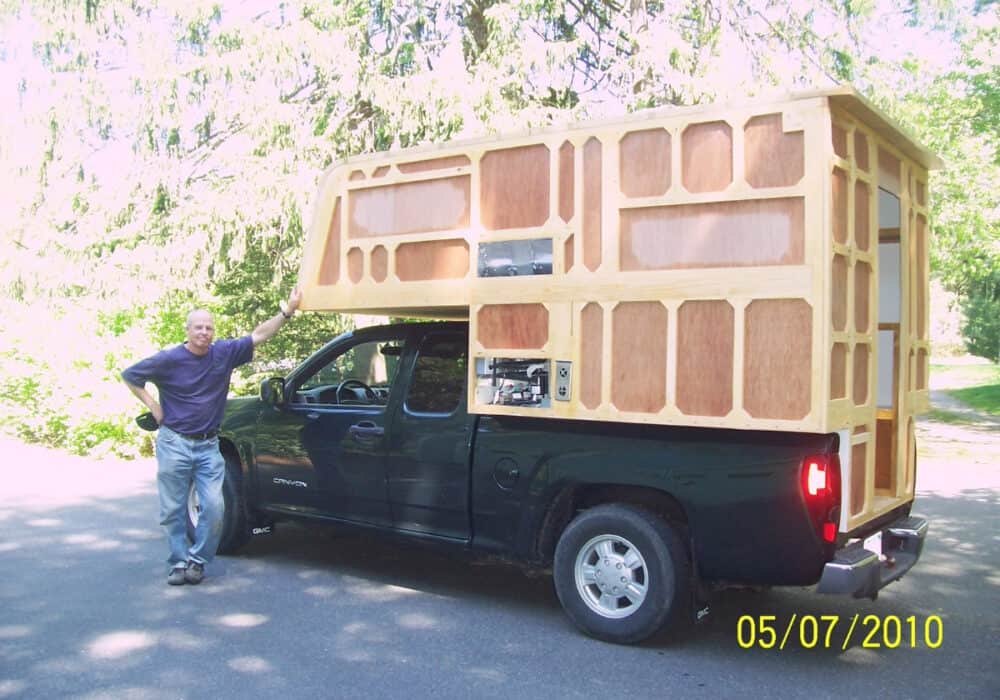
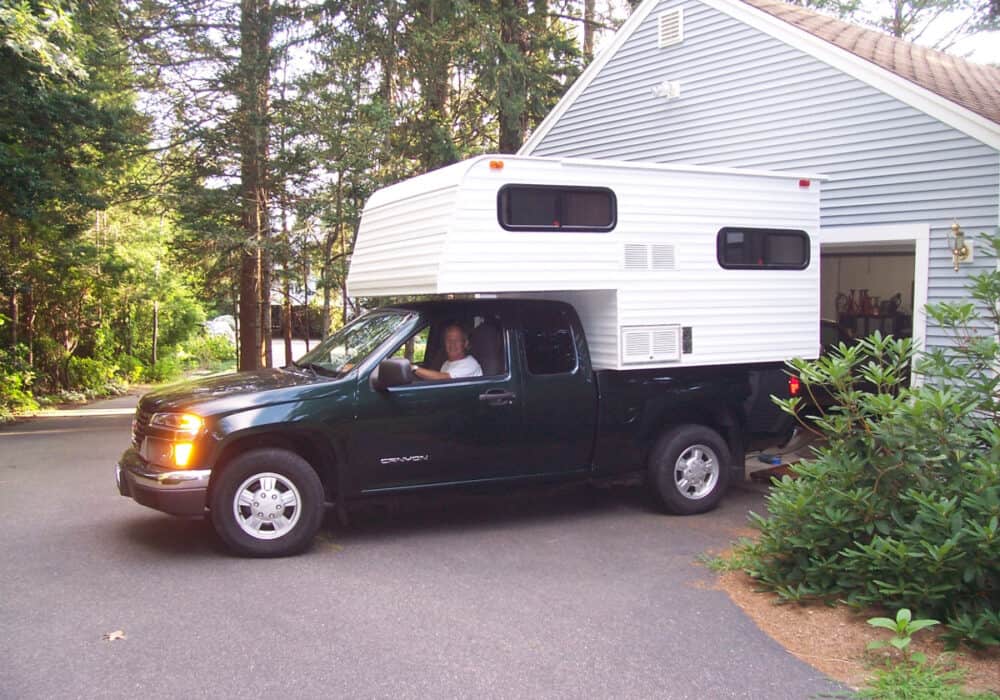
In 2010, Bruce Gordon embarked on a remarkable DIY journey, converting his ’04 GMC Canyon into a fully self-contained truck camper. Documenting every step, he produced a detailed journal complete with sketches, graphs, and pictures.
Design Process: Crafting the Vision
Initial Planning
Initially faced with the challenge of optimizing space within the truck’s 6-foot bed, Bruce aimed to create a camper with all the modern RV comforts, maintaining a dry weight under 1,100 lbs.
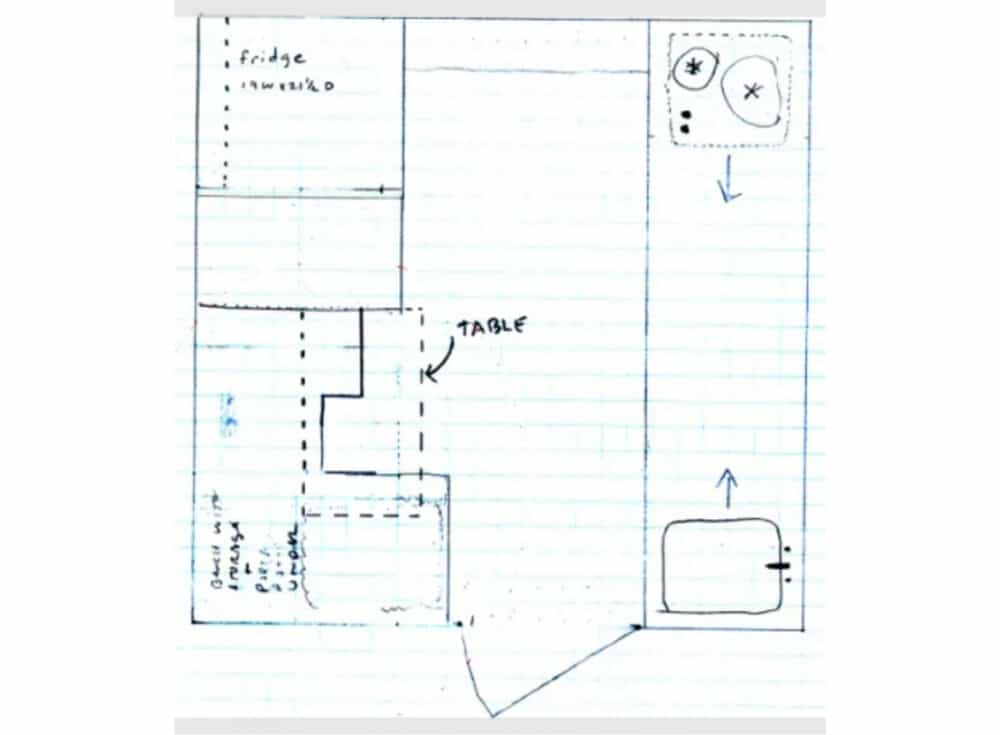
For the first design phase, Bruce utilized his garage floor to map out the camper layout. Rejecting conventional designs, he decided upon an L-shaped rear corner dinette, incorporating a porta-potti. Other features of the truck camper build included:
- Water and Sanitation: Hot/cold running water, gray water tank, and a porta-potti.
- Dining and Sleeping: Cozy dinette for two and a full-size bed.
- Cooking and Storage: Equipped stove top, refrigerator, and ample storage spaces.
- Comfort and Convenience: Ceiling fans for air circulation, skylights, and a heating system.
In addition, he needed to integrate key components like:
- A 12V battery and a 120V 45amp inverter/charger for power management.
- A 20 lb propane tank for heating and cooking.
- A 6-gallon hot water heater, ensuring warm water availability.
Component Selection and Space Management
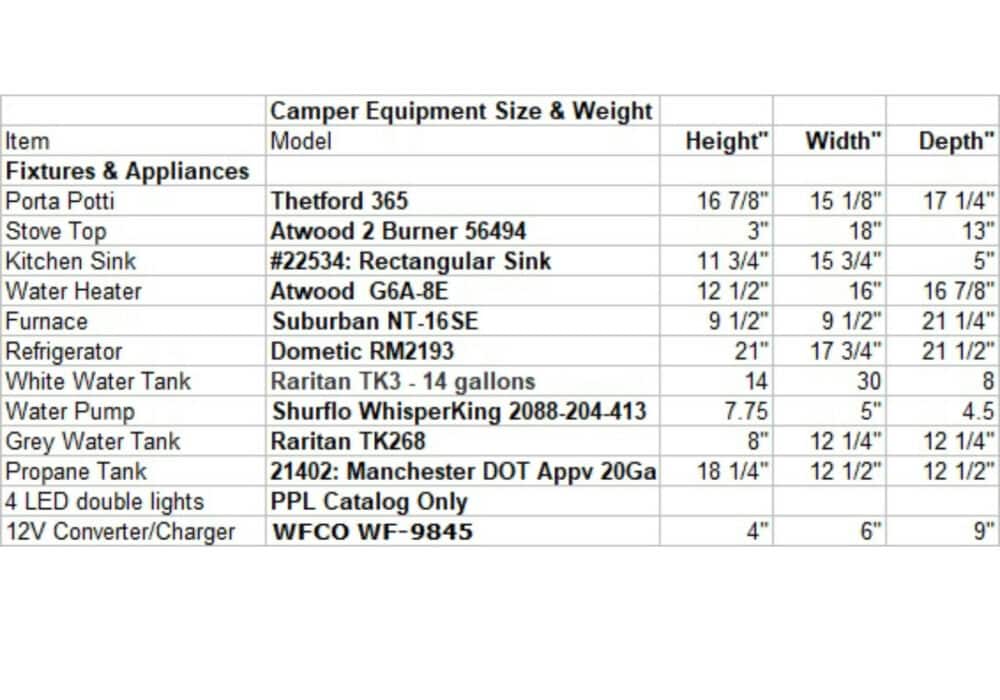
In the next phase, Bruce focused on selecting appliances and support components, taking into account their weights and dimensions. He meticulously planned their placement using graph paper, ensuring everything fit within the “wings” – extensions over the sides of the truck bed.
Bruce strategically placed the white water tank compartment to serve dual purposes: as a storage unit and a step to the cab-over bed, increasing the camper’s forward center of gravity. This detailed planning also revealed the need for a custom-made 21” door, a necessity to fit the space between the dinette and the kitchen counter. Bruce then turned his attention to the side walls, designing them to incorporate as much storage space as possible.
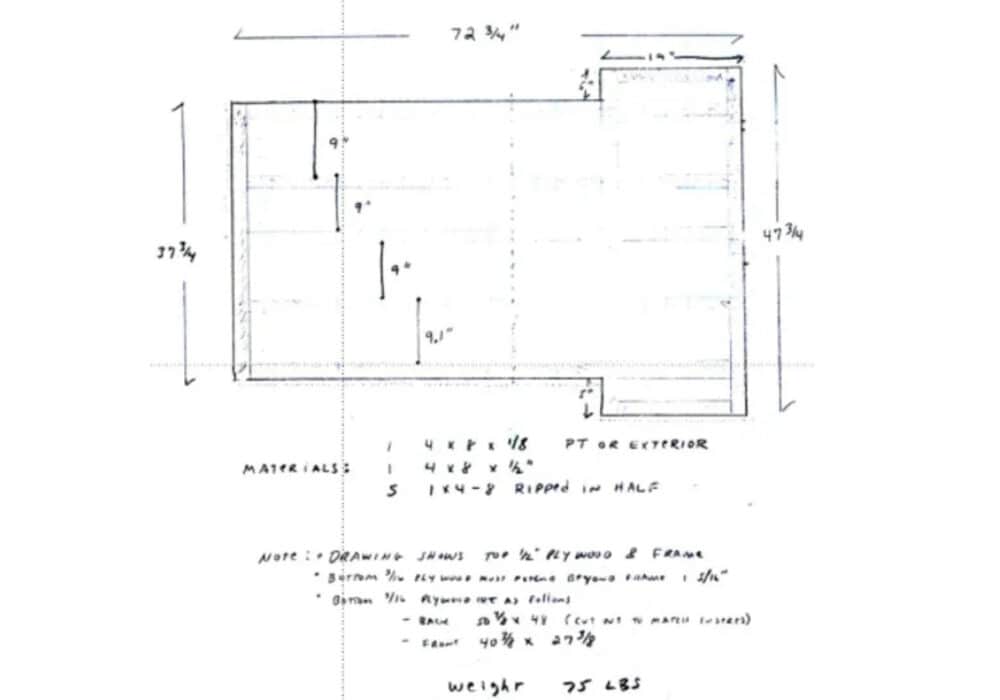
He concluded the design process by drawing each part of the camper frame to scale, first starting with the floor. He managed to keep the total weight of all frame parts, appliances, and fixtures below the 1,100 lb goal.
Design Philosophy of the Truck Camper BuiLD
The design philosophy Bruce employed was akin to that of an airplane’s frame – combining lightweight components in a structurally sound manner. He used select pine lumber for the frame, assembling joints with Kreg pocket screws and reinforcing them with 2” triangular gussets.
The walls and floors, made from plywood, were glued and attached to the frame with brads. Bruce varied the materials by part. For instance, he used 1/2” plywood for the floor for added strength and 3/4” polyisocyanurate insulation for better thermal performance.
Bruce constructed the ceiling using ‘2 by’ rafters and 1 1/2” insulation. He crafted the bed supports from 1x8s, extending them across the side walls and front, and used 1×4 joists for the cab-over bed floor.
To prevent a claustrophobic feel inside the camper, Bruce incorporated four large windows, two skylight/fans, and an additional window in the back door, ensuring ample natural light and ventilation.
Construction Techniques: Building the Camper
Bruce’s toolkit included a chop saw, table saw, Kreg pocket screw set, a brad/staple nailer, and an ample supply of TiteBond II glue.
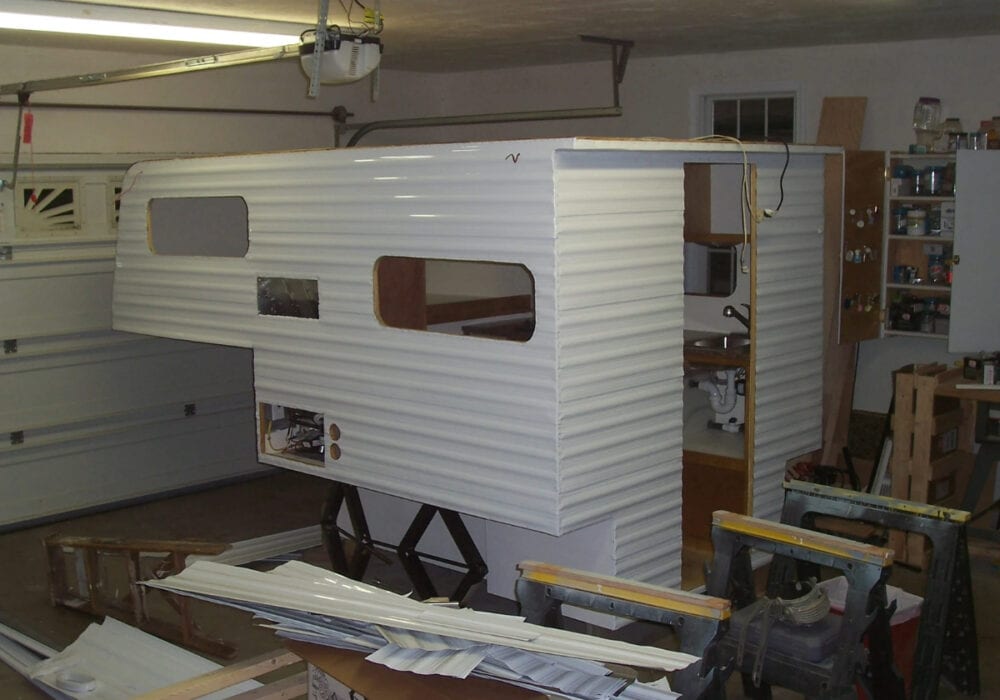
Assembly of the Basic Structure
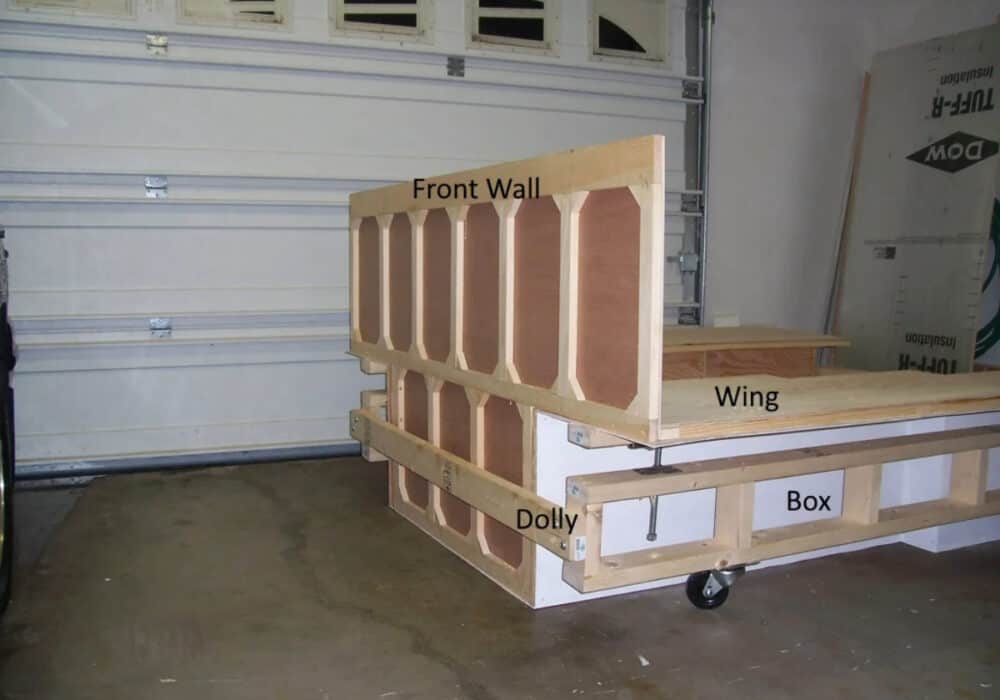
- Bruce started by constructing the main box and front wall of the camper. This included assembling the floor as per the initial drawing, attaching two long and two short sides, and connecting them with two side connectors. The water tank and step partition were integral parts of this assembly.
- The front wall was then added to complete the basic frame.
- An adjustable height dolly was a practical addition to the build, aiding in moving the camper in and out of storage in the garage.
Detailed Framing and Fitting of the Truck Camper Build
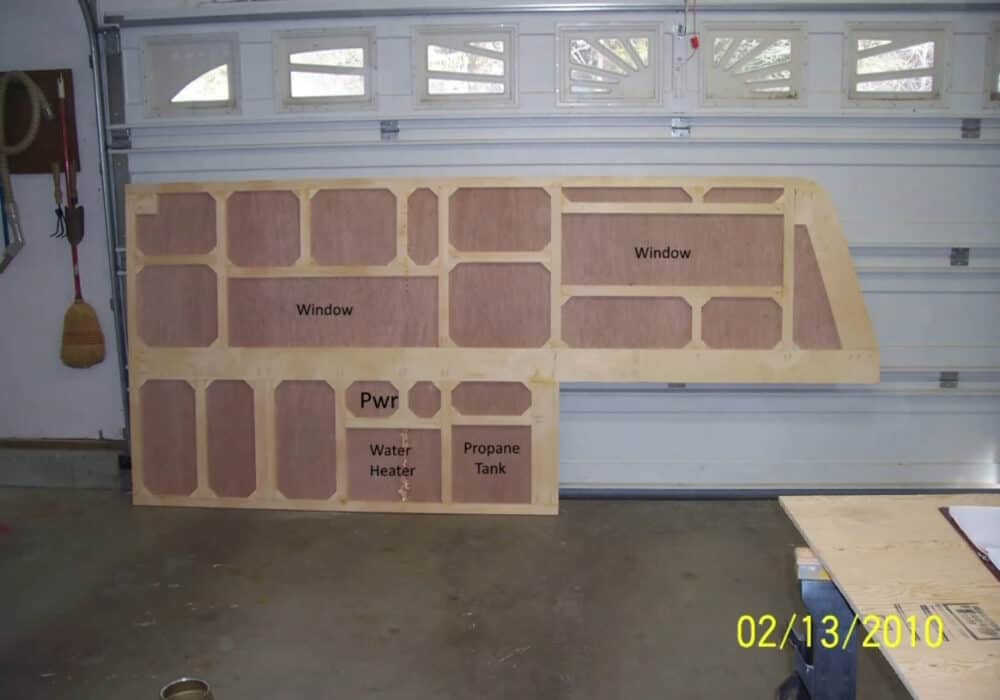
- Bruce crafted each frame opening to match the sizes of the selected components. For example, he designated the power (pwr) opening for storing the 25’ electrical cord used at campsites.
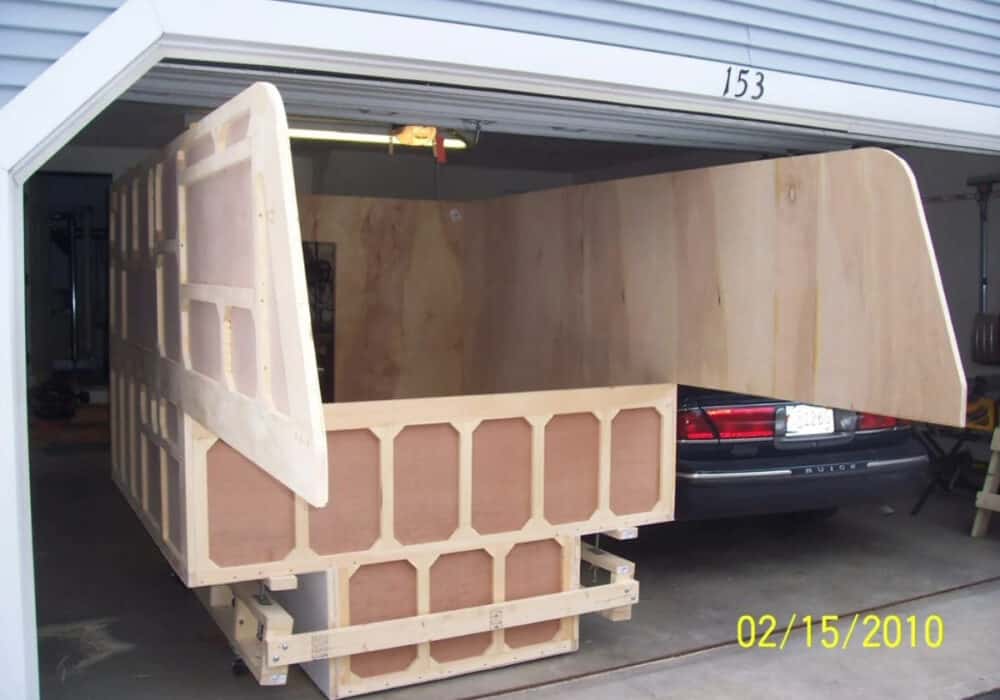
- He then mounted the walls to the box and wings.
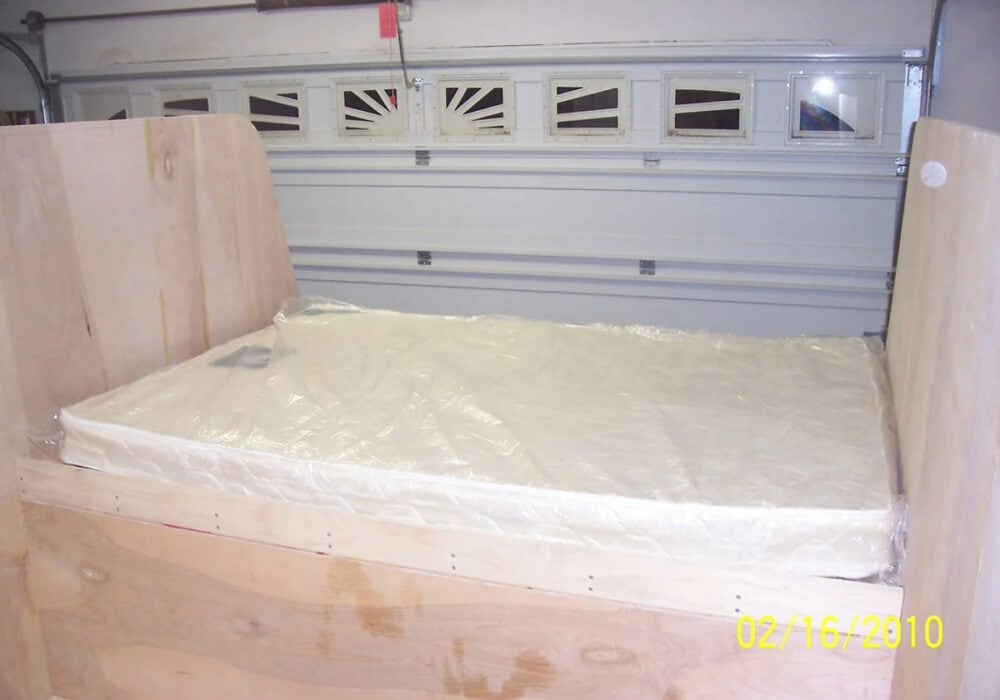
- To confirm the fit, Bruce used a full-size mattress to test the overhangs and reinforced the bed base with 1×8 rim beams and 1×4 joists.
Completing the Frame and Installing Utilities
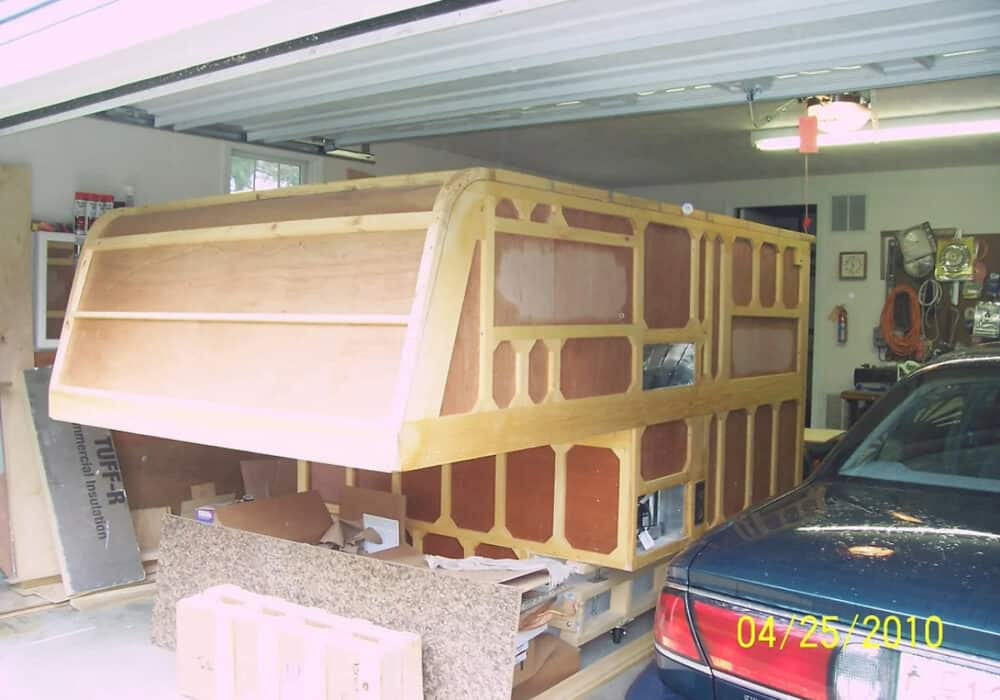
- Once the frame was complete, Bruce and his wife Pam worked on bending the front ceiling curve, softening plywood with boiled water for ease of bending.
- They installed two large side wall openings next to the front wall for the refrigerator controls and ventilation.
- For the LP gas system, Bruce adhered to guidelines from the Copper Development Association, ensuring the system was pressure tested and safe. The LP gas-powered several appliances, including the water heater, stove, and refrigerator.
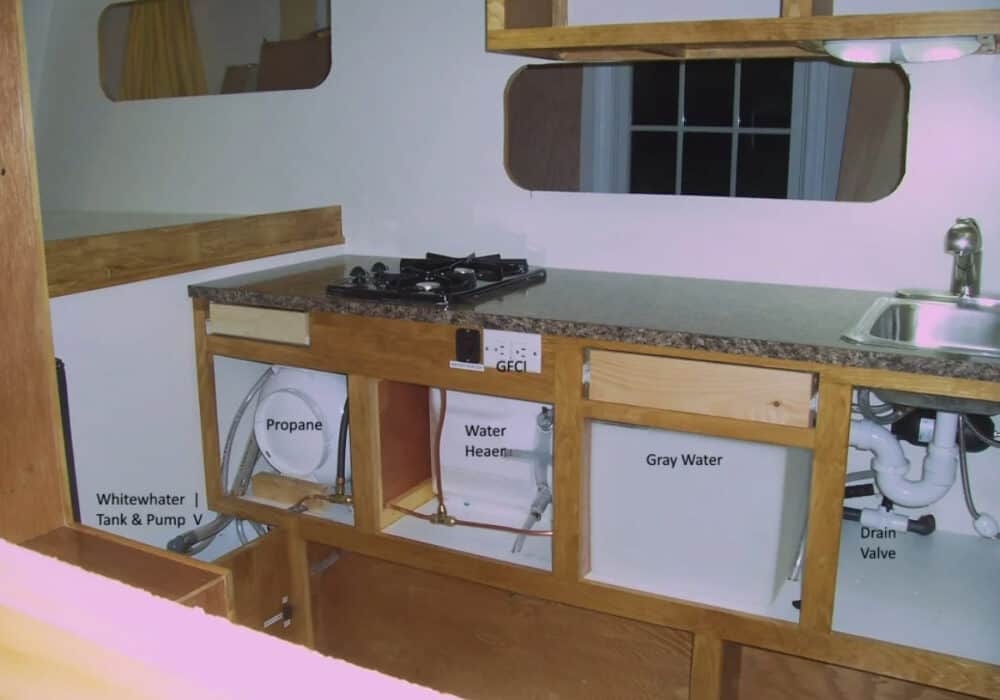
- The water system included a water pump next to the white water tank, an expansion tank, and provisions for a city water feed. The gray water tank was equipped with a marked drain valve and proper venting.
- The electrical system was designed to run on 12V, with a fuse panel managing various circuits. Safety features like a smoke detector and an LP gas detector were included. The house battery, essential for off-grid power, was positioned on the truck bed floor.
Interior and Exterior Details of Bruce’s Truck Camper Build
Bruce’s attention to detail in both the interior and exterior aspects of his camper build played a crucial role in its functionality and aesthetics.
Exterior Finish
- Siding: Bruce clad the camper’s exterior in standard polar white RV aluminum siding, stapling it to the frame.
- Roofing: For the roofing, Bruce used EPDM rubber, a popular choice for its durability and weather resistance. He glued it onto the plywood base and used a wide broom to smooth out air bubbles during installation.
- Sealing: To create a watertight exterior, Bruce applied 3/4” butyl tape along all seams and covered them with aluminum trim. He repurposed the top moldings, initially intended for awning mounts, as he opted for a portable 10’ x 10’ screen tent for more flexibility.
Completed Exterior
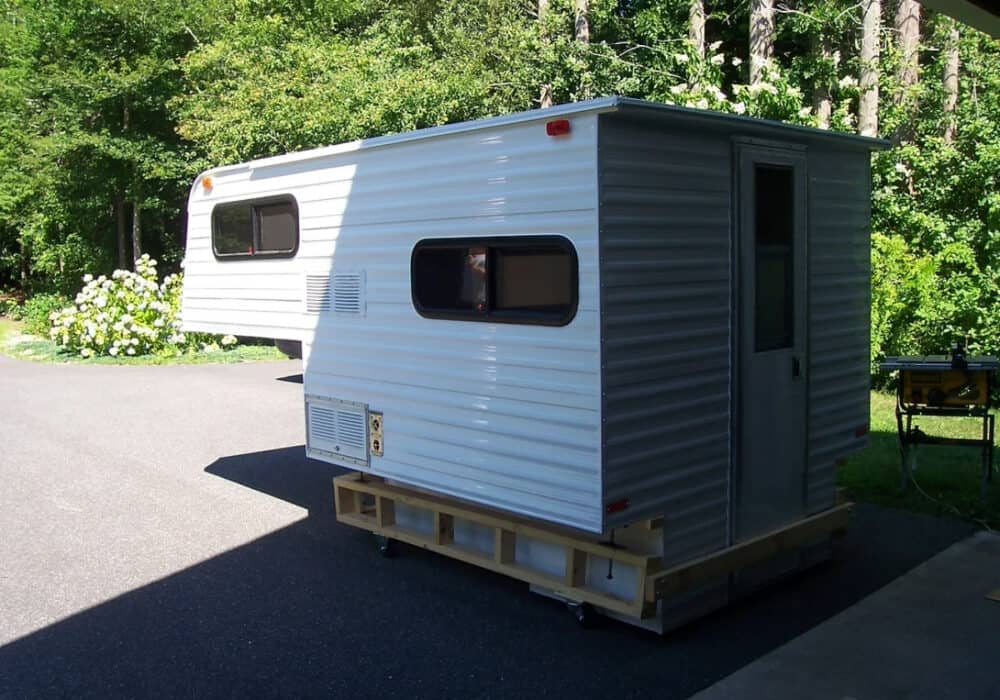
- Windows, Vents, and Door: The camper features standard off-the-shelf windows, roof vents, and a door that is slightly narrower than standard. Initially, Bruce chose single pane windows to minimize weight, but he notes a preference for acrylic thermally insulated windows if he were to build the camper today. All exterior joints and openings were carefully sealed with acrylic adhesive caulk to prevent leaks and drafts.
Interior Finishing
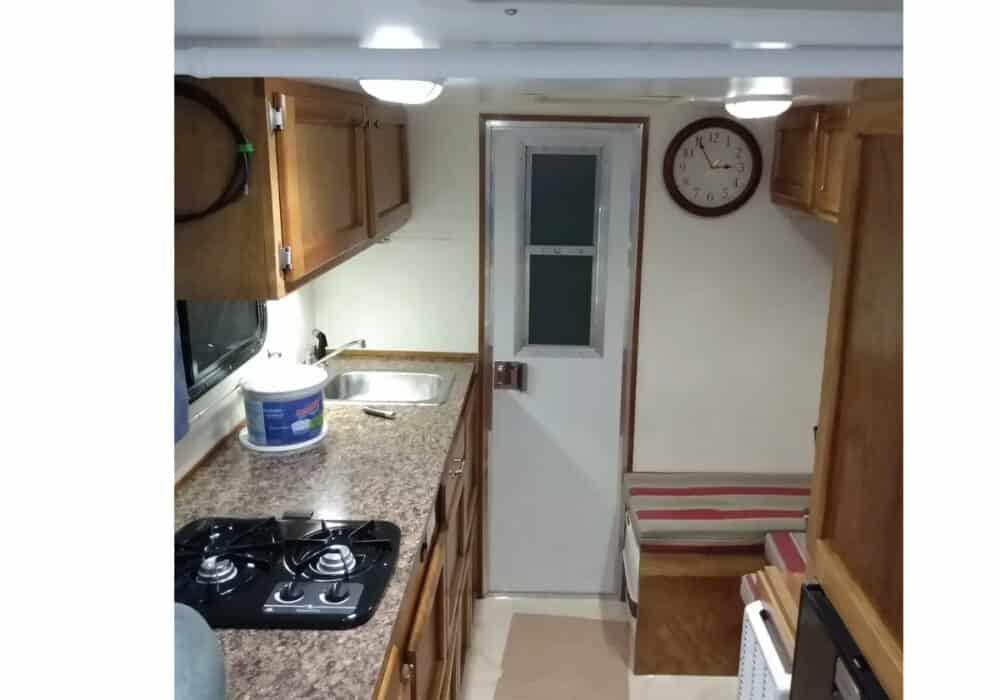
- Walls and Cabinets: The interior walls were primed and painted before the installation of cabinets. These cabinets not only provided storage but also added to the structural integrity of the camper. The final woodwork included cabinet doors, moldings, and a custom dinette table.
- Flooring and Fabrics: Pam, Bruce’s wife, skillfully laid the linoleum flooring and crafted seat cushions, window curtains, and a privacy curtain to separate the sleeping and bathroom areas. Small carpets and fabrics were chosen for their noise-absorbing qualities and to add warmth to the interior space.
- Innovative Dinette Table: An interesting feature is the dinette table, which Bruce designed as a slide-in mount above the furnace, using shiplap boards for a temporary plywood tabletop. This versatile design allows for easy storage and access.
Storage Solutions for the Truck Camper Build
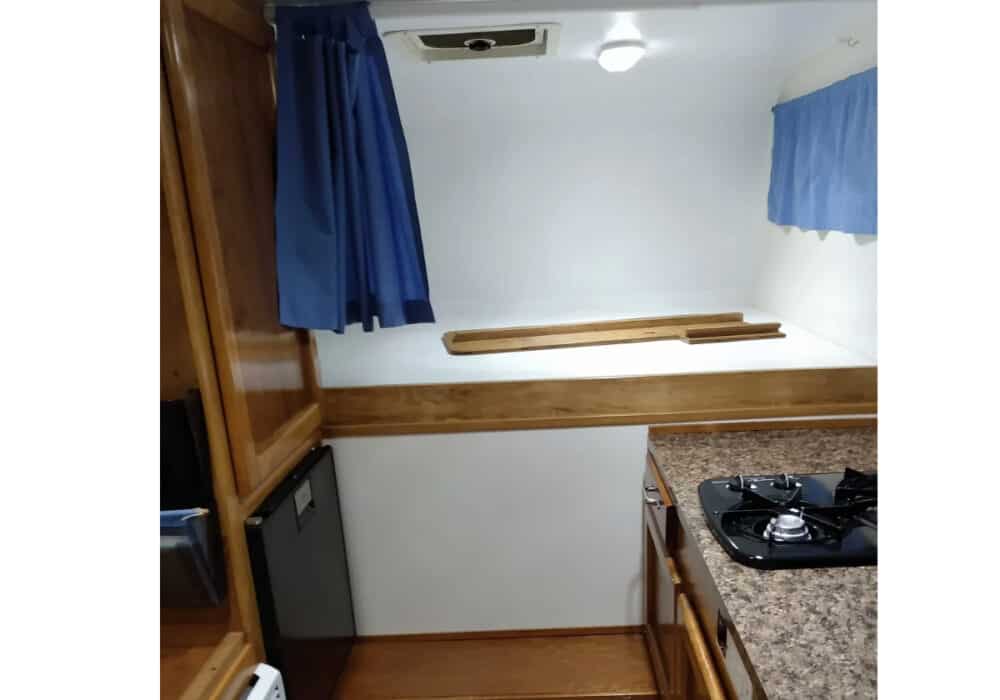
- Kitchen Storage: On the kitchen side, Bruce made the most of every inch, using spaces behind and around doors for storage. The only exception was the propane tank compartment, which was vented externally but airtight from the inside.
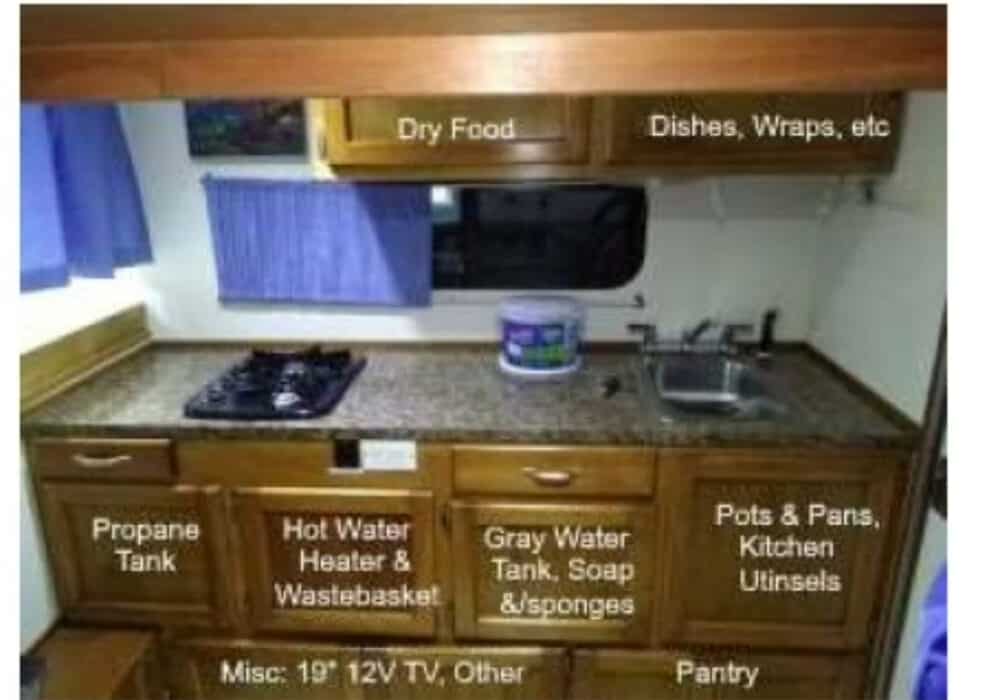
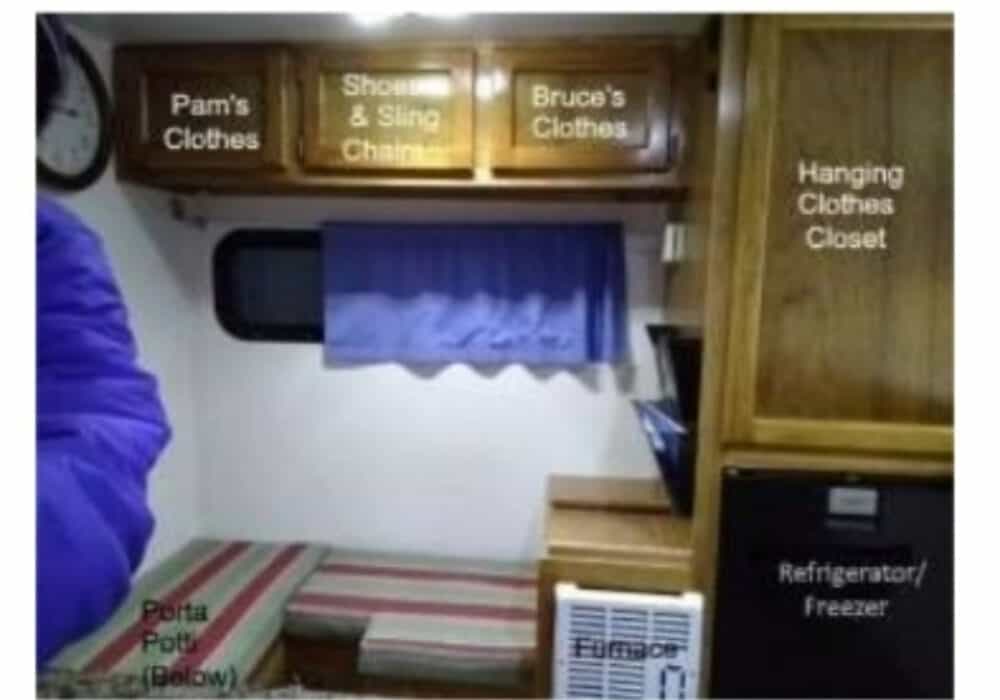
- Dinette and Clothing Storage: The dinette area doubled as a dressing space and night-time bathroom, with a hanging clothes closet proving particularly useful. Additional storage bins in the truck’s extended cab held extra clothes and shoes, essential for adapting to different climates. One bin was dedicated to laundry, accommodating their travel lifestyle.
Additional Modifications and Tweaks for the Truck Camper Build
Bruce’s truck camper project involved not just the construction of the camper itself but also several crucial modifications to the truck to ensure its functionality and safety.
Truck Modifications for Weight Management
To handle the additional weight of the camper, Bruce opted to upgrade the truck’s tires. Furthermore, Air Lift adjustable assist springs were installed to maintain the vehicle’s balance and stability. With the camper fully loaded and the tanks full, setting the Air Lifts to 85 PSI (factory level is 80 PSI) kept the truck at the same height as if it were empty.
Power System and Battery Management
Initially, a battery isolator was used to manage the charging and isolation of the house battery from the truck battery. However, after experiencing two failures over ten years, Bruce switched to a Voltage Sensitive Regulator (VSR). This more reliable system also allowed the house battery to be used for jump-starting the truck if necessary. A 50 Amp circuit breaker was installed under the hood next to the VSR for circuit protection.
Securing the Camper to the Truck
To securely anchor the camper to the truck bed, Bruce employed a system using “speed nuts” permanently attached to the frame. This system used three bolt/plate sets. Tightening these to the speed nuts distributed tension across the plywood to prevent floor damage while ensuring the camper remained firmly in place.
Final Adjustments and Load Testing
Initially, Bruce decided against using camper jacks to minimize weight. To confirm the final weight and balance, he drove the truck to a local transfer station, both with and without the camper and battery. The camper’s dry weight came in at 1,035 lbs, which was 65 lbs below the target weight. This result was a significant relief, as it meant they could mount standard camper jacks for easier loading and unloading.
Why This Truck Camper Build Was Incredibly Fun & Rewarding
Bruce describes himself as a “jack of all trades, master of none,” which suited the project’s diverse challenges. He faced constraints related to space and weight, necessitating precision in both design and construction. The project introduced him to various new technologies and techniques, from LP gas plumbing and alarms to using pocket screws.
The project presented a series of complex problems, each requiring a unique solution. Bruce found joy in breaking down these larger issues into manageable tasks, solving them one at a time. The process of continual problem-solving was both challenging and rewarding, culminating in the successful completion of the camper.
Traveling and Living in the Truck Camper Build
Since its completion, Bruce and his wife have traveled extensively in the camper, covering well over 70,000 miles across the U.S. and Canada. The camper has provided a unique way to connect with nature and explore various landscapes and cities. Their travels have included remarkable experiences like parallel parking in downtown areas and participating in Habitat for Humanity’s RV-Care-a-Vanner program.
The camper’s design has allowed for versatility in travel, from typical campsites to urban settings. Each trip has brought new experiences and adventures, making every journey unique and memorable.
Cost-Effectiveness and Customization
One of the most significant aspects of the camper build was its cost-effectiveness. Bruce was able to construct the camper with more personalized features and functionalities than any factory-made model available at the time and at about a third of the cost.
Conclusion
Bruce’s truck camper project stands as a brilliant example of how creativity, determination, and a willingness to learn can transform a simple idea into a functional masterpiece. His journey from conceptualization to the open road is not just impressive but also inspiring.
We hope Bruce’s story motivates you, whether you’re a seasoned DIYer or just starting out. With his submission, Bruce mentioned, “I hope that some of the design and construction information…will inspire others to take the plunge. Both the build and travel have been extremely rewarding!” For more insight on his truck camper build, visit his blog.
Every project has its own set of challenges and lessons, and we’re excited to see what you’ve been working on. Remember, no project is too small or too complex. If you have a DIY RV project that you’re proud of, we encourage you to share it with our community. Submit your projects through our submission form link. Let’s inspire and learn from each other, one project at a time!