When we decided to sell our home, buy an RV, and go full-time on the road, we knew it wouldn’t just be an extended vacation. Our venture into creating a DIY RV Office began with this major lifestyle shift.
While not retired and still fully engaged in our careers, albeit remotely, much of our existence has been and continues to be centered around computers and the internet. This dynamic didn’t change; only our physical space did, albeit becoming a bit smaller.
As the proud owners of a large 44’ fifth wheel toy hauler, we found ourselves in the company of many RVers who transform the garage space into a DIY RV Office. Initially, we adopted this approach as well. However, traveling with two motorcycles (one equipped with a sidecar) presented a unique challenge: we needed to unload the bikes every time we wanted to utilize our office space.
This requirement quickly became impractical, especially on travel days when we planned to boondock for a night or two. The constant need to dismantle and re-establish our office space at each new location soon evolved into a daunting and tiresome task.
Phase 1: Dedicated Office Space
Initial Realizations and Decisions
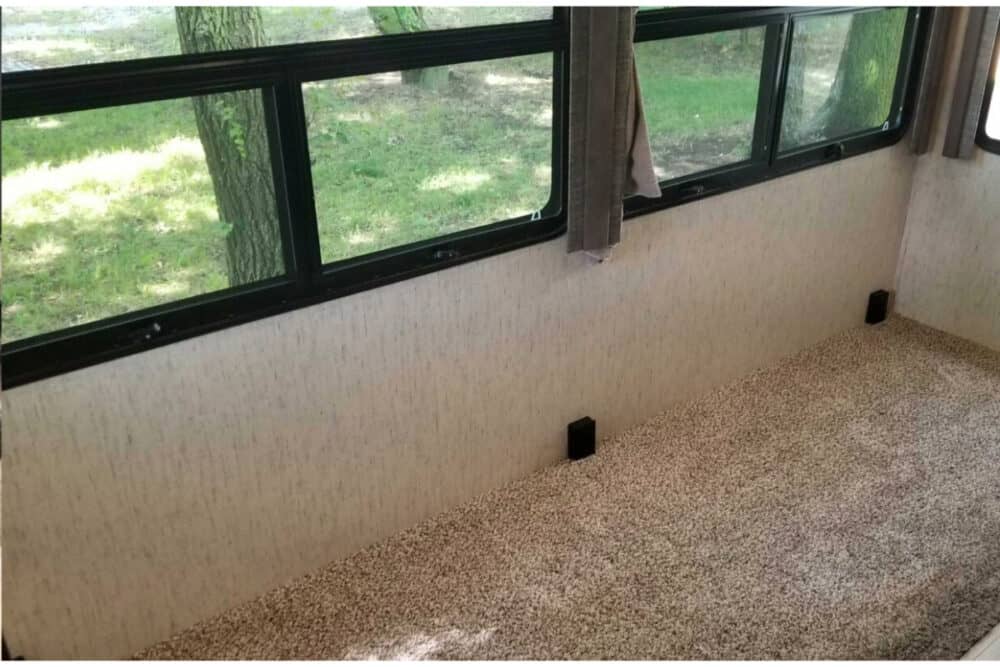
Our journey to crafting the ultimate DIY RV office began with a realization about our living space within the fifth wheel, which was originally equipped with a five-person sofa situated on the large slide. This setup was less than ideal for just the two of us and our little dog, not to mention the awkwardly positioned TV that required a constant leftward gaze to view. The lack of a dining table only added to our discontent. Clearly, the sofa arrangement was not serving our needs, but the spacious slide area presented a promising opportunity for transformation into a functional office space.
Transforming the Space for our DIY RV Office
In pursuit of a more suitable setup, we opted for a two-person desk from Amazon, carefully selected for its ample size that allowed us to work side by side comfortably, yet it was significantly lighter than the bulky sofa. Embracing the DIY RV office concept, we embarked on this transformation with enthusiasm, though aware that fully realizing our vision would take time. We committed to a gradual approach, mindful of our budget for office redecoration, which we aimed to keep as manageable as possible.
The removal of the sofa was the first concrete step in our transition. We managed to sell it to a local furniture store in Kansas, accepting that we wouldn’t recoup its full value but acknowledging its necessity for making room for our new office space. Following the sofa’s removal, we undertook a thorough cleaning and vacuuming of the carpet, preparing our blank canvas for the creation of our ideal DIY RV office.
Desk Assembly and Office Ergonomics
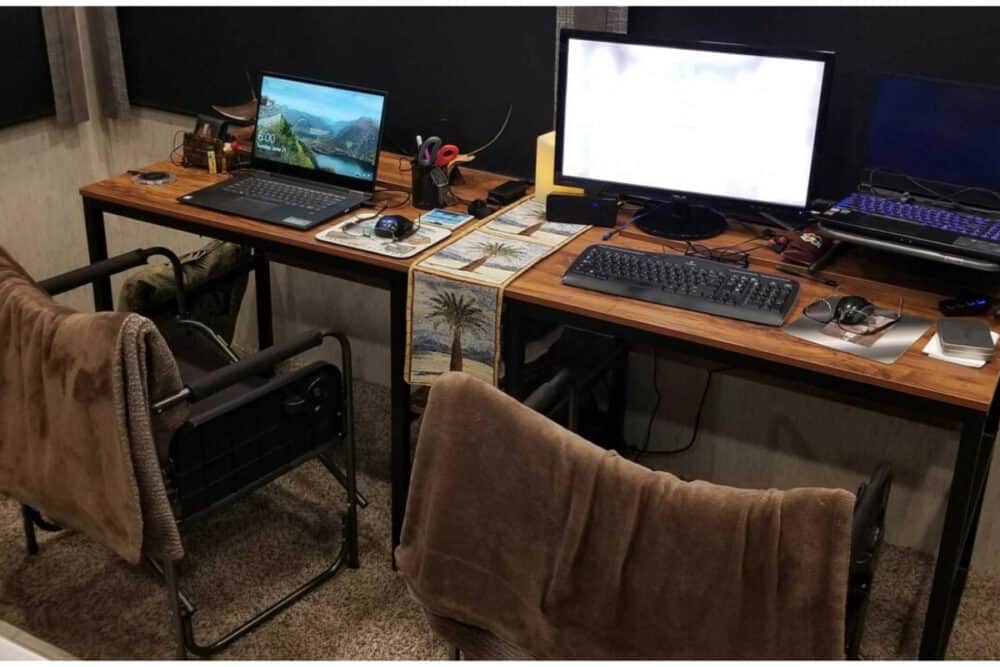
After some straightforward assembly, our desk-in-a-box quickly transformed into an essential component of our DIY RV office, perfectly accommodating dual monitors for each of us, along with the necessary peripherals like keyboards and mice. Given our extensive experience with computers, the preference for external keyboards over the laptops’ built-in ones was a given.
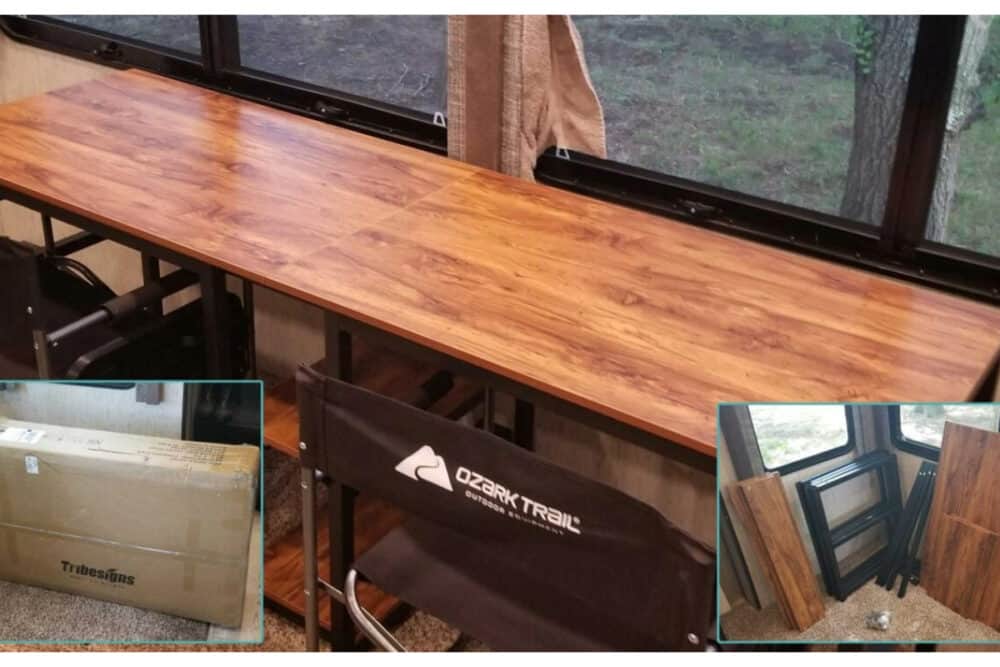
Beneath the monitor and laptop, you might notice an additional board in the picture below. This served as an “under shelf” near our knees. We ingeniously converted these into monitor risers, cleverly creating extra space underneath for better organization. Furthermore, we installed slide-out keyboard shelves under each work area, optimizing the primary desk space for our daily tasks.
Upgrading Seating Arrangements for our DIY RV Office
Initially, our seating arrangement consisted of folding camp chairs. However, we soon upgraded to two “Euro recliners” with footstools, which doubled as both office and relaxation chairs. These recliners, when swiveled, provided a cozy spot for evening TV viewing.
Yet, after about six months, we found the chairs too low for the desk, leading to less-than-ideal posture during our long workdays. In pursuit of both comfort and functionality, we eventually switched to regular mesh office chairs, which proved to be much more suitable for extended periods of sitting. Not only did this change enhance our work comfort, but it also allowed the desk to double as our dining table.
Moreover, positioning the RV just right gave us the added pleasure of enjoying views of nature and wildlife right from our office windows.
Final Touches: Storage and Views
Although not shown in the photographs, we completed the setup by adding bedroom nightstands with drawers at either end of the desk, providing ample storage for our office supplies. This thoughtful addition helped keep our DIY RV office both organized and functional, mirroring the efficiency of a traditional office in our unique, mobile living space.
Phase 2: The Electronics
Transitioning from our sticks-and-bricks to an RV didn’t mean we had to give up on our tech gadgets. We still had our small server computer, network storage system, Alexas, Rokus, laptops, and more.
Obviously, the internet is crucial for our work and personal lives. It’s not just about streaming videos; it’s essential for our productivity. Early on in our RV life, we learned a hard lesson about the importance of reliable internet. We once found ourselves in a valley in Oklahoma, where, despite the cell coverage maps showing full bars for our T-Mobile service, we ended up with no signal at all. Not even a single call could be made. That experience taught us the value of having a backup plan for our internet connection.
Initial Setup
Initially, we equipped our RV with a Pepwave Max Transit Duo. (Note this was in 2022.) This gadget’s a powerhouse, capable of handling multiple SIM cards from different carriers. It was perfect for ensuring we always had an internet connection, no matter where we were parked. We even set up a guest network for when we had visitors, keeping our main network secure. With additional hotspot data added to our T-Mobile phones and acquiring AT&T and Verizon services, we had excellent redundancy.
Now, with the constant advancements in technology and connectivity solutions tailored specifically for RVers, there are even more options to stay connected. MobileMustHave is a company that offers a variety of packages designed to meet the unique needs and budgets of people like us, who work and live on the road. Their solutions provide an updated and simplified way to ensure reliable internet connectivity.
Optimizing Power Usage for our DIY RV Office
We’ve equipped our RV with an Onan generator, lithium battery bank, solar panels, and a sophisticated Victron system to oversee it all. These resources are invaluable for our less frequent boondocking adventures, ensuring we always have the power we need.
To protect our devices and ensure an organized power system, we installed a Blue Sea Systems fuse box. This particular model offers two separate positive power circuits, enabling us to protect devices with correctly sized fuses and avoid the clutter of inline fuses.
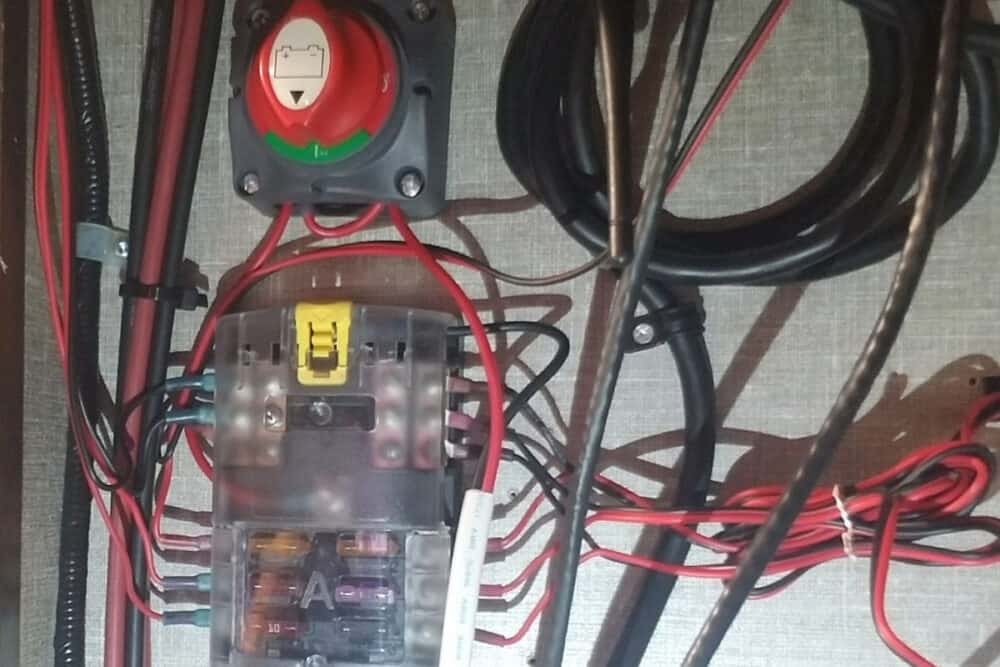
You can see in the picture above that we also added a battery disconnect switch above the fuse box. This allows us to power everything down safely to make changes or add additional components. The white sheathed cable is the primary power source, which runs all the way down to the power distribution block and ground shunt in the front fifth wheel bay where the batteries are stored.
Organizing the Electronics Cabinet
Once we had a solid plan for where everything should go, it was time to get everything mounted. We picked a cabinet above the pantry that we hadn’t used since we got the rig. It was a bit out of the way, but perfect for our needs.
Securing and Cooling the Devices
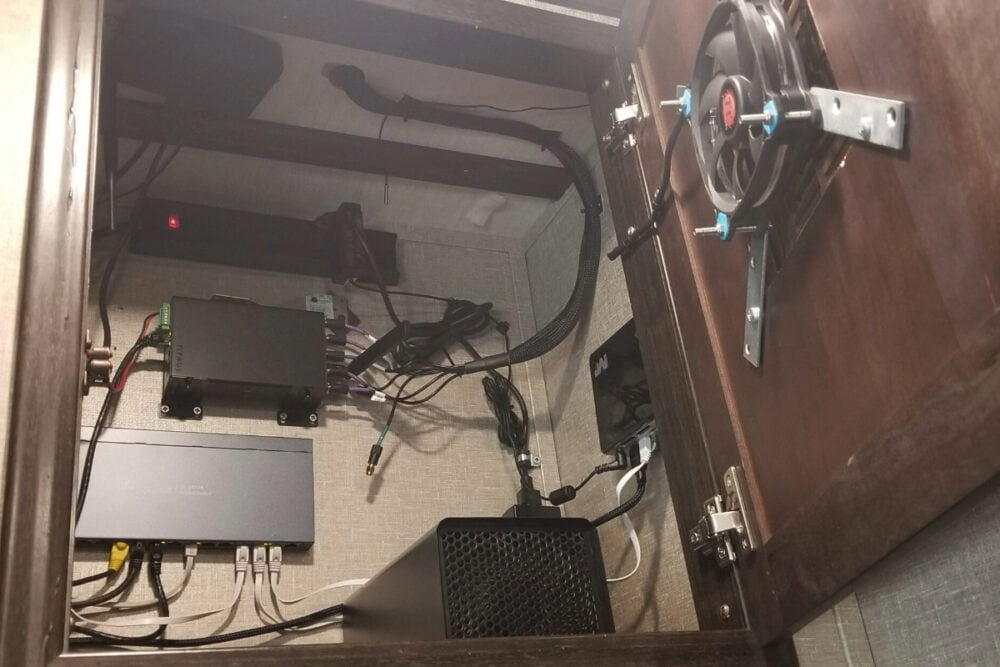
In this cabinet, we strategically placed all our electronic devices, attaching them to the walls to ensure stability and optimize the use of space. Small brackets were used to firmly secure these items in place.
To manage the heat generated by the electronics, we fitted a large 12v computer cooling fan on the door’s interior and a vent cover on the exterior. Cutting the necessary opening in the door was a job for a local cabinet maker, who completed the task quickly and wouldn’t accept payment for his work.
Temperature Management and Signal Optimization
The electronics generate considerable heat, so we integrated a W1209 temperature sensor into another circuit within the fuse block. Positioned discreetly by the door hinge, this sensor activates the fan to dissipate heat whenever temperatures climb too high, safeguarding our devices’ longevity.
An interesting tweak we made, based on our vendor’s advice, was to replace one of the seven wires leading to the roof antenna with a shorter antenna. This was because the RV’s structure was interfering with signal reception. Our laptops, positioned just beneath the internal Wi-Fi source, were mistakenly connecting to the weaker roof signal. Switching to a shorter antenna significantly improved our connection speeds within the RV.
Adding the Antennas
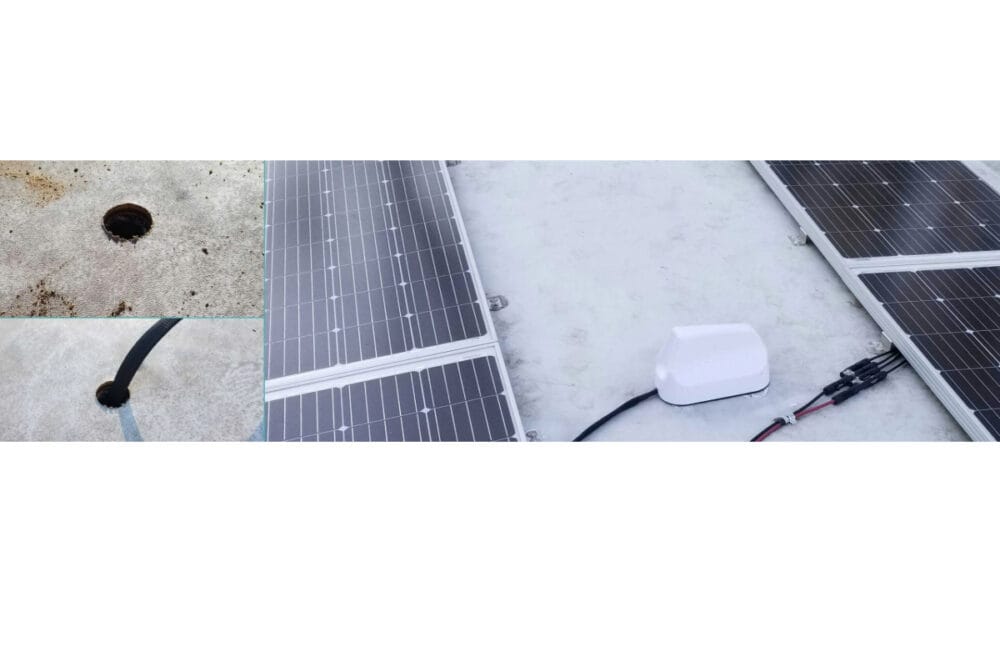
Other than snaking the power cable down to the battery bank, the single largest effort was installing the Poynting antenna and external Wi-Fi booster antenna on the roof to ensure the best cell-based internet signal. As you can see in the cabinet picture, there is a bundle of wires running straight up through the roof! That is the 7-wire antenna connection that goes to the roof. The selection of this cabinet was heavily based on the ability to make this hole in the roof, just under one of the solar panels.
Future Upgrade Plans for our DIY RV Office
Our journey with electronics and gadgets is never-ending. There’s always room for improvement, balancing what’s “good enough” with what could be better as time and budget allow.
While Wi-Fi is convenient, it’s not the fastest for moving big files around, something we do a lot. We’re thinking about setting up a more direct connection to speed things up. This means running Ethernet cables to give us a stronger, more stable link that’s not as affected by outside interference. It won’t make our internet service faster, but it should make our local network zippier, which is great for file sharing and backups.
We’re also mulling over a tweak to our electronics cabinet to deal with the heat better. Right now, we use a fan to keep things cool, but it can get noisy, especially when we’re trying to record audio or jump on a video call. We’re thinking about adding a vent to the outside to let the hot air out more quietly. But, we have to think about this one a bit more because we don’t want to let in outside air that’s too hot or humid. So, we’re still figuring that part out.
Your DIY RV Office is Unique
Everyone who is seeking to assemble a great home office will have different factors affecting what they need. We’re gadget people who love to overengineer, therefore everything is a little “over the top” for us. Some of what we’ve listed here will apply to you, other parts will generate ideas and some will be “just too much” for many. We hope there are parts of the equation that get you into a comfortable, efficient DIY RV office.
Proud of a DIY project? We’d love to see it and possibly share it with our community. Whether you’re a seasoned DIYer or a novice, your creativity can inspire others. Submit your project and photos via our website’s form for a chance to be featured. Let’s celebrate the spirit of DIY together!