
Having readily available hot water in your RV is a luxury that enhances the RV adventure. Taking a hot shower in your RV, equipped with gallons of hot water after a vigorous excursion, is one of life’s simple pleasures, bringing the comforts of home to the great outdoors.
When we’re at ‘home’, we often enjoy the convenience of on-demand hot water, a feature made possible by appliances like electric water heaters. However, in a more economical RV, you might find yourself with a propane-only water heater.
For reasons of economy, water is often not kept hot round the clock. Typically, we have to think ahead to turn on this modern convenience and wait for it to get hot. The heating time can vary depending on the type of equipment.
If you find yourself frequently connected to shore power, relying on propane gas to heat water may seem like an inconvenience. The idea of using electrical power to heat water – offering the ease of maintaining desired temperature without the constant worry about refilling your propane tank – becomes quite appealing.
How To Add an Electrical Element to an RV Propane Water Heater
Numerous aftermarket solutions exist to add electrical heat to most models of common RV water heaters, including those by manufacturers like Atwood and Suburban water heater.
These kits, often found for around $100, promise an easy installation process that could convert your existing setup into an efficient electric water heater, ensuring gallons of hot water are available without the high BTU consumption of propane.
The process typically includes:
- Removing the sacrificial anode to make the port available for the new heater.
- Installing a bushing and a small heating element.
- Mounting a thermostatic control on the tank surface to automatically shut off the heater when the water is hot.
- Mounting an on/off switch to a vertical surface near the water heater to enable you to activate electric heating.
- Connecting a few wires between the heater, thermostat, switch, and a (hopefully) proximate 120V receptacle.
Considerations for Each Step in Adding an Electric Element to Your RV Propane Water Heater
While the installation of an electric heating kit into your traditional RV water heater seems straightforward, it’s crucial to be aware of potential pitfalls you should consider carefully before you buy. However, successful completion of this process promises the convenience of constant hot water for washing dishes or enjoying outdoor showers, much like at home.
Step 1: The Crucial Role of the Anode Rod
The sacrificial anode that needs to be removed (Step 1) to provide a mount for the heating element has an important function. Temperature cycling of dissimilar materials in the water heater creates electrical currents that greatly accelerate corrosion.
The anode can ‘absorb’ this corrosion, preventing other more important parts of the heater from becoming damaged. Operating without an anode WILL result in corrosion occurring everywhere throughout the heater and shorten its life.
Fortunately, SOME heater kits come with a mounting bushing that contains a short tubular anode that may provide some protection. It is so small that it should be checked more frequently, probably every 3-6 months, till you identify a wear pattern. It is also likely to require replacement more often.
Newer Camco 11673 or ‘Lightning Rod w/ Anode’ kits appear to have this combination anode/bushing. Look in kit pictures for a brass threaded adapter with an equal-length silver tube extending from the threaded side. While Camco sells the upgrade heater kit with anode bushing, I was unable to find the anode bushing for sale separately.
Step 2: Heating Element Capacity and Water Flow
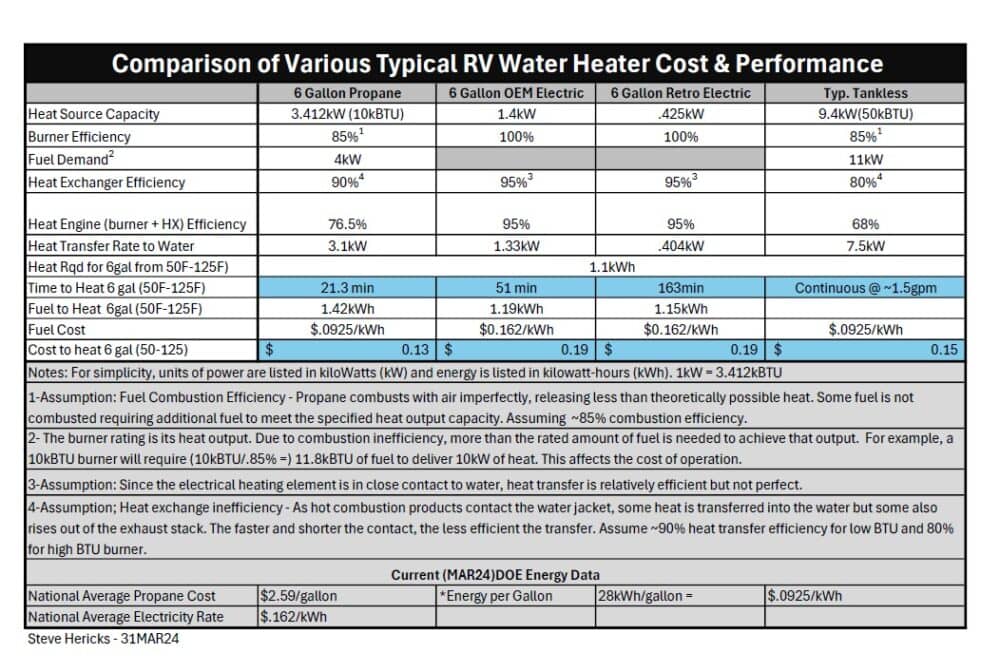
The heating element (Step 2) is not only physically small but has a small capacity, as well. A factory-installed electrical element is typically of about 1400 watt capacity and can heat a 50F tank of water to 125F in less than an hour. The aftermarket heater is only 425-watt capacity and will take 2-1/2 to 3 hours to go from cold water to your desired hot water temperature. in the same tank of water.
This is difficult to accept when propane can do it in about 20 minutes. This small heater might make more sense if you want to keep the heater on all day long and might even require it. The slow rate of heat delivery not only makes heating the first tank slow. It is also very slow to ‘recover’ to operating temp once much of the first tank of water has been used.
Step 3: Thermostat Installation for Safety and Comfort
Mounting the thermostat to the metal outside surface of the tank is probably the hardest but most important installation step (#3). It requires finding an accessible flat(er) surface and cutting through the insulation of the tank that is probably inside a cabinet in your RV to which you might not have ready access.
Think of the thermostat as the ‘off-switch.’ When you turn on the power to the heater, it begins heating and will continue to heat till the thermostat shuts it off. If the thermostat cannot sense the heat from the water in the tank, it may never shut off. If it doesn’t shut off, the water in the tank may become excessively hot and only stop heating when the heating element burns out (not easily done).
Steps 4 & 5: Finalizing the Installation
Mounting the on-off switch into a cabinet can be daunting if you’re unfamiliar with tools, and ANY cutting into your pricey RV is frequently intimidating.
Connecting the components with the supplied wiring is not difficult. The most likely problem will be the availability of a 120V receptacle within the length of the 6ft cord provided. The heater current is ~4A. Running an exposed extension cord for anything permanently installed is a bad idea. Adding a receptacle by tapping on a nearby branch circuit may be needed. This is likely to greatly complicate what was an otherwise simple installation.
Final Thoughts on Adding an Electrical Element to an RV Propane Water Heater
Electric heat is always the most expensive. If you’re not paying metered rates for electricity, it may be a win, but it should not be the primary motivator, as savings will still be small. I’ve assembled a table below outlining the costs to heat water with differing fuels and equipment that may be helpful. The price of propane and electricity both vary widely across the nation, so your situation may be better or worse. This is mostly about the convenience of not having to find propane frequently.
This should only be a shore power tool. Using a fuel-burning generator to produce 120VAC is a very inefficient work-around. The same is true for operating with an inverter on battery power. The amount of energy it takes to heat a tank of water is essentially the entire capacity of a 100Ah battery.
The only option that might make sense is if you have more solar generation than you have battery storage, this could become a ‘dump load’ to receive the power that would otherwise go to waste. If you want to do that, you’d be better off with a DC-powered silicone heating pad applied directly to the bottom of the steel tank, under the insulation.
Wrapping Up: Your Experiences with RV Water Heating Upgrades
Considering adding an electric element to your RV’s propane heater brings up many questions. It’s a balance of maintaining your water’s warmth and managing the practicalities of installation. But this journey isn’t one you have to navigate alone.
Whether you’ve navigated the installation intricacies, from pipe adjustments to pressure relief valve checks, or are pondering the shift, your insights are golden. We’re all ears in the RV LIFE Communities. Dive into discussions on traditional vs. tankless heaters, share ignition tips, or explore water pressure tweaks. It’s our collective space for growth, powered by shared experiences and sparked by curiosity.
If I install this electric system: Can I still heat up the water in the tank using gas – then maintain the water temp using the electrical unit?
I installed 600 watts of solar panels on my Class A. On most days there seems to be enough solar power to both recharge my batteries and heat my HWT using an aftermarket 400 watt heater. It has to be switched off once hot so it is not on “battery” during the night. Cloudy days will not allow this but I am glad to reduce my propane and CO2 emissions with this add on heater.
How do I electrify my Truma water heater?