
Because who doesn’t like saving money and time on the road?
Let me help you, because I’ve discovered the cheapest snack of all time.
 And if you make it right, it’s pretty healthy too.
I make homemade popcorn nearly every single day.
Do you realize how much microwave popcorn costs?
About three dollars for a few bags.
To make matters worse, if you’re dry camping you’ll also need to turn on the generator to run the microwave.
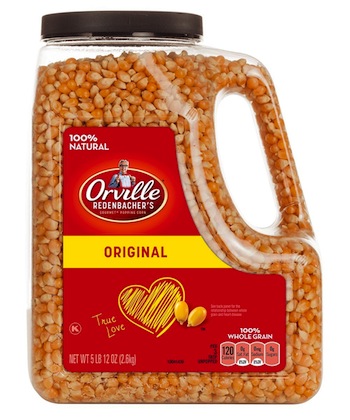
On the other hand, you can buy bulk popping corn for under $3.25 per pound.
If you want to save money and still enjoy something delicious, let me teach you how to make mouth watering homemade popcorn.
Trust me, you will never eat microwave popcorn again.
Here’s what you’ll need:
- A pot with a lid
- Vegetable oil (We use extra virgin olive oil, but coconut oil or even plain vegetable oil works fine)
- Popcorn kernels
- Seasoning
- Large bowl
Step One:
Cover the bottom of your pot with oil. The first few times I measured this, but after a few batches you can eyeball it.
The rule of the thumb is equal parts oil to kernels. I use about 3-4 tablespoons of oil to cover my six-inch pot.
If you’re like my husband and think, “I want buttery popcorn, I’ll just melt butter instead of using oil,” resist that urge.
The butter will burn – unlike the oil – and your popcorn will be brown and a little mushy. Save butter for the finished product.
Step Two:
Pour one layer of kernels into the bottom of the pan.
You want each kernel to be hanging out in the pool of oil and not sitting on top of another.
If you add too much popcorn, it will raise your lid off the pot and burn the popcorn at the bottom of the pan. Remember, burnt popcorn smell lingers a lot longer than fresh popcorn smell. 🙂
Step Three:
Set your stove to medium-high heat. Place the pot on the stove – and don’t forget the lid. I forgot the lid one time and quickly learned how much hot oil stings.
With a gas stove, the popcorn will start popping in about two minutes.
It will take a bit longer if you use an electric stovetop or hot plate, but the taste is equally good.
Step Four:
Wait for the pops!
The key to making popcorn is being a good listener.
The popped corn will rise above the unpopped kernels, so you don’t have to worry about it burning. Soon the popcorn will start to pop rapidly and fill your kitchen with that wondrous smell.
Step Five:
When popping slows to 2-3 seconds between pops, turn off the heat on your stove.
If you have an electric stove, pull it off the eye.
With my gas stove, I let the popcorn sit with the lid on for about thirty seconds to allow those final few kernels to finish popping.
Step Six:
Careful, the pot will be HOT now. Pour your popcorn in a large bowl and add salt! Personally, I pour the popcorn in the bowl in batches and individually salt each layer, but I just really love salt.
I also add Tony Chachere’s Cajun Spice or paprika to give the popcorn extra flavor and color. When we’re plugged in, I’ll melt a little butter to pour over the top of the popcorn to give it that salty, theater taste.
Depending on how much salt you add and which oil you use, popcorn is a pretty healthy snack. That’s what I tell myself every day when I make it at least. 😉
 Hungry for kettle corn?
Right after the first kernel pops, dust your crop with a layer of white granulated sugar. If you used three tablespoons of kernels, use equal parts sugar.
Immediately lift and shake your pot carefully.
Be sure to hold the lid on with one hand! The goal is to use just enough sugar to evenly cover the kernels. Clumps of sugar will burn in the oil.
When the popcorn is done, it’s covered in a sticky coat of melted sugar, just like you would buy at the fair.
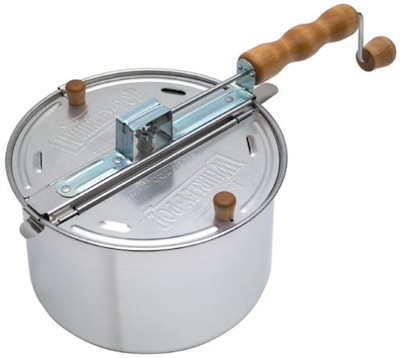
If you’re looking for another way to make your own homemade popcorn, check out the highly-rated and popular Whirley-Pop popcorn popper.
Bon Appétit!


Thanks for your comment Jim.
I have been making popcorn for years just as you have described. It’s easy, fast and comes out great most times. Even if you burn some the rest is very eatable. My favorite seasoning for popcorn is Lawry’s seasoned salt. I don’t think that microwaved popcorn is as good as pop’ed on the stove.
Thanks for the tip Mary, will definitely try that method
Even easier 1/3 cup of popcorn in a paper lunch type bag and microwave. No oil no salt and awesome. Just folr the top tightly and finger crip the corners of the bag.
Thanks for your tip on the Whirley Pop – and congrats on the great find at the garage sale
Even better is – buy a Whirley popcorn Maker – a lot less oil is needed and I now never burn the popcorn – one of the best buys we’ve ever made for the trailer and have given them as gifts to our kids because they work so well. Once found one unused at a garage sale for $4 – they didn’t know what a treasure they had