
It’s a common scenario at RV dump stations across the country:
You unscrew the cap to your RV waste dump pipe, and before the gate is even opened you’re splashed with smelly goo!
If you’ve noticed liquid dripping from your RV waste dump pipe when the valve is closed, this usually means something is preventing the gate valve from seating properly.
The causes?
- debris that gets stuck in the valve as the waste pours from the tank
- seals that fail over time
LiveWorkDream
A Big Repair Bill on the Horizon?
This scenario seems like it could be a costly repair job.
But it’s one of the easiest DIY RV repairs any RVer can tackle.
It will save you money if you know how to replace the RV waste dump gate valve assembly (also referred to as a “knife valve”).
These easy steps will show you how to remove and replace the gate valve yourself – and for under $30.
Part 1: Find the Leaky RV Waste Tank Valve
Since most RVs have multiple waste water tanks, determining where the leak is coming from can take longer than making the actual repair.
Ensure you have adequate time to test each tank by pulling into a full-hookup RV site where you can comfortably park for at least one day.
- First, you’ll need to fill, empty, flush and rinse each tank at least twice to ensure all solids are eliminated from the system.
- Next, disconnect your waste dump hose, then cap the waste pipe.
- Leave all valves open overnight or long enough for the waste pipe to drip completely dry.
- Close all valves, then go back inside the RV and add several gallons of water to just one tank.
- Wait about 30 minutes, then head outside and slowly uncap the waste pipe.
Did any water leak out?
A small amount of leakage is normal but anything more than a cup and you’ve got a leaky gate valve. If nothing poured out, repeat the above steps for each tank until you find your leak.
Note: In a hurry? It might be easier to skip the above steps and just replace all of your RV waste dump gate valves. Since one whole assembly is usually less than $20, spending a little more money upfront can save you precious time later.
Part 2: Replace the Leaky RV Waste Tank Valve
If you can turn a wrench you can make this repair.
Although you can save money by just buying the replacement valves that match your gate valve assembly, it’s more cost-effective to replace the whole unit, which will eventually fail due to wear and tear anyways.
If you just want the valves, they’re available in two different sizes:
Make sure to purchase the appropriate assembly for your needs.
Here are the Tools You’ll Need
- A crescent wrench and/or socket set
- Screwdriver
- Disposable gloves
- Protective eye wear
- Petroleum jelly
- Work light
Steps to Replace the Valve
- Place a ground cover down underneath your RV waste dump valve and bring all tools over to the work area. If your RV tanks are insulated, you will need to remove the undercarriage covers and tank insulation material before getting started with the repair.
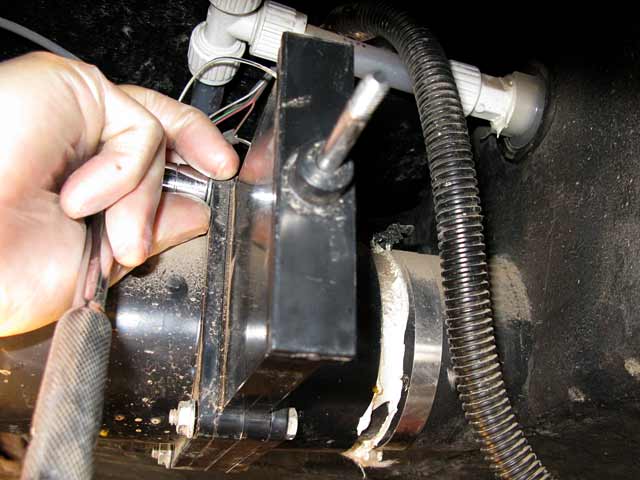
- Unscrew the waste dump gate valve handle from the valve extension rod first, if it extends through the RV chassis or frame.
- Remove the four bolts that hold the valve in place between the two waste pipes.
- Dislodge the flange seals if they did not come out with valve.
- Clean any debris out from in-between the two pipes to ensure new seals will seat firmly in place. Spray with silicone lubricant (not regular WD-40) for easy assembly insertion.
- Open the gate valve assembly package, remove the new flange seals and swipe a generous amount of petroleum jelly on them. The jelly acts as a lubricant and holds the seals in place.
- Place the lubricated seals securely onto the waste pipes.
- If applicable, place valve slider extension rod through hole in frame.
- Insert the new gate valve body in-between the two waste pipes, while ensuring that the seals stay snugly in the valve grooves. Make sure seals do not fold or dislodge when aligning the new gate valve body.
- Return the four bolts to the assembly and loosely put each one in place, while ensuring the seals do not move.
- Tighten each bolt until it makes firm contact with the unit.
- Fill your waste tank with water and check for leaks before testing your new gate valve by opening and closing it a few times.
If you’re still uncertain about how to replace the RV waste dump gate valve, here are two great videos with enough detail to give you that needed boost of confidence:
httpv://youtu.be/u-AFa9hyrpI
Here’s another video by Valterra, a waste dump valve manufacturer (replacement steps begin at 5:50 min):
httpv://youtu.be/UKSHnWhpMf0


