
10 Basic Maintenance Tasks You Don’t Want To Forget
If you’re a new RVer, you’re probably wondering what you need to do to keep your RV in good shape for years to come. The answer lies in making sure your RV receives some basic maintenance on each of the systems that make it function. Luckily, if you are the least bit handy, you can do most of these maintenance chores yourself.
Hiring Somebody Else To Take Care of Basic Maintenance
If you aren’t confident doing your own RV maintenance, you can always seek out the services of a certified RV technician. An RV technician will have recognized certification from either the RV Industry Association (RVIA) or the RV Technicians Association of America (RVTAA).
Technician certification provides consumers with assurance that the technician working on their RV knows all of the unique systems in their rig. To avoid problems down the road, always ask for proof of certification before you allow anyone to work on your RV.
Our Top 10 Tips For RV Maintenance
1. Take An rv tech course
Taking an RV tech course will teach you all about RV systems and the right way to take care of basic maintenance chores yourself.
National RV Technician Academy (NRVTA) offers a comprehensive RV tech course just for RV owners. The course’s self-paced, online format makes it convenient to do anywhere you can get a Wi-Fi or cell signal. It gives you all the basics you need to know in order to maintain your RV yourself. RV LIFE Masterclass also provides several courses with invaluable information for RV owners.
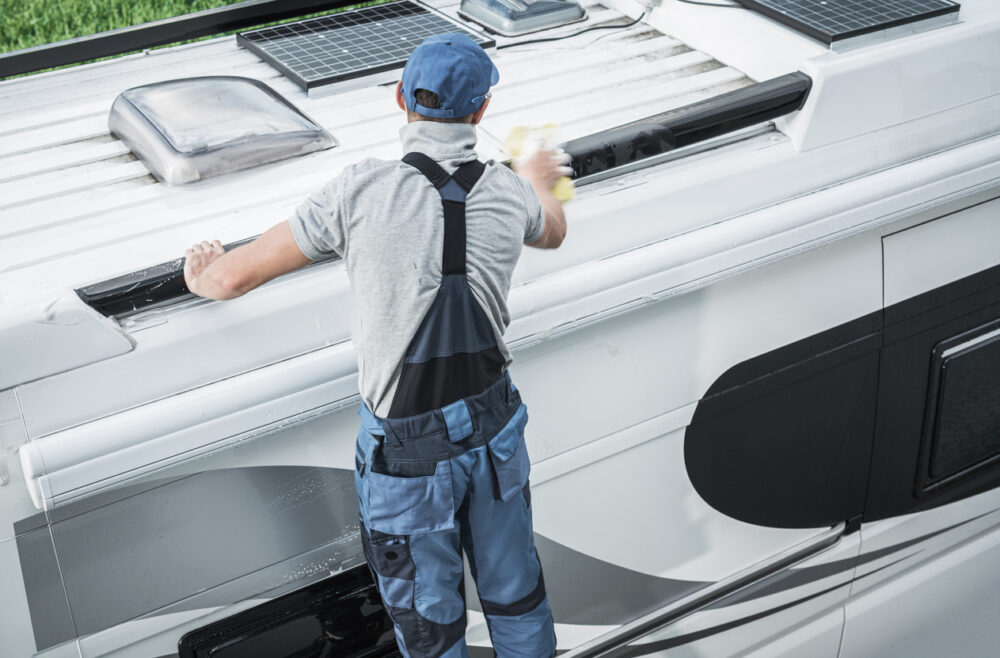
2. Inspect and clean Your roof two times a year
Moisture is your RV’s biggest enemy. Your RV’s roof was designed and built to protect it from rain and snow. However, it can only do this effectively if it’s watertight.
Water leaks can take a long time to become apparent from inside the RV. By the time you notice a roof leak from inside the RV, irreversible damage will already be done to the underlying layers of the roof. Inspecting your RV’s roof around the start and end of every season for damage is essential to preventing leaks.
If you find any damage or cracked sealant during your inspection, they should be sealed immediately with Dicor sealant or Eternabond tape.
You can use Dicor over existing roof sealant a few times. When it gets too built up, you’ll need to remove it before putting new sealant on.
Removing the old roof caulking is made easier with a heat gun and a plastic scraping tool. Sharp edges like razors can damage your RV’s roofing membrane, so you should never try to remove old sealant with them.
Note: Not all RV roofs are robust enough to support your weight. Be sure to check with your RV manufacturer to find out if your RV roof is walkable or not.
3. RV wheels Need Love Too
As much as your RV depends on a sound roof to protect it, your rig depends on its wheels too. Regular wheel and tire maintenance is a must. A tire blow-out or lost wheel can cost thousands of dollars’ worth of damage to your RV.
On RV trailers, you should check your wheels and tire pressure about every 100 miles when you’re traveling. The proper torque and torquing procedure varies from RV to RV. There is almost always a sticker somewhere on the RV that tells you what the correct torque and torquing pattern is for your particular RV. You may also want to check your owner’s manual.
While you are checking the torque on your RV wheels, be sure to check the wheels and tires for any damage or wear. Now’s also a great time to pull out your tire pressure gauge and make sure your tires are inflated according to the recommended tire pressure.
RV tires that are faded, cracked, or otherwise damaged should be replaced. If you do need to replace your RV tires, be sure to replace them with the RV manufacturer’s stipulated tire size.
To get the most life out of your RV tires, use a tire conditioner after you wash your RV. Conditioning the sidewalls of your RV tires helps keep their rubber supple.
4. Use Rubber Seal Conditioner
All of your RV’s exterior doors and slideouts have a black rubber seal that helps keep moisture from getting in.
Sun and air will dry these rubber seals, and they can only do their job if they remain supple. Rubber seals don’t take a lot of maintenance, but you should coat them with rubber seal conditioner three or four times throughout the year.
RV rubber seal conditioner is easy to apply and works wonders to keep rubber seals working the way they should. All you need to do is spray it on, allow it to soak into the seals, and then wipe off any excess.
5. Take care of your slideouts
Does your RV have slideouts? RV slideouts require maintenance every three months. Keep the roof of each slideout debris-free by checking it frequently and sweeping it off when needed. Always sweep the slideout roof before bringing it in.
On the exterior of your slideouts, you’ll find rubber seals to keep rain and debris outside. Slideout seals are made to act as a kind of wiper blade, cleaning the slideout walls and roof as the slideout is pulled in.
To keep them supple enough to do this effectively, you’ll need to apply slideout dressing to both sides of the rubber wiper. Slideout seal dressing also acts as a kind of sunscreen on the rubber seals.
Remember to do the one underneath the slideout too. This should be done three times throughout the year to help keep rain out of your RV when your slideouts are out.
While you are doing your quarterly maintenance on the slideout roof and seals, it’s a good idea to clean and lubricate the tracks that extend the slideout. Using a silicone lubricant will keep them operating smoothly without attracting debris and dirt.
Depending on the type of slideout mechanism you have, you may also need to check the hydraulic fluid for their extension mechanism as well
6. Top Up your RV batteries
Unless you have maintenance-free batteries, you’ll need to keep your flooded lead-acid batteries filled. To do this, simply add distilled water until the plates in the battery are well below the fluid level.
Leave room at the top of the battery for gases to collect. It’s important to use always use distilled water for this, so you won’t inadvertently be adding minerals to the sulphuric acid bath in the battery.
7. Grease your hitch ball (Or Fifth Wheel Hitch) before every trip
A lot of weight is riding on the hitch of your trailer. In order to keep it quiet and working efficiently, you’ll need to lubricate your hitch ball. If you have a travel trailer, you should lubricate your hitch ball with with a dab or two of lithium grease before every trip.
Lithium grease can get messy, so it’s a good idea to wear gloves when you are unhitching. Having a rag or paper towel on hand when you unhitch will allow you to immediately wipe the hitch ball off. This will allow you to avoid getting grease on your hands, clothes, and everything else you touch. You can always apply more grease right before you hitch up again.
If you have a fifth wheel, you’ll need to lubricate all metal parts that come into contact with each other when the trailer is hitched. The easiest way to do this is to use a fifth wheel lube plate. However, you don’t need to have a lube plate to keep your fifth wheel hitch lubricated. Instead you can use a grease gun or dry film graphite spray lubricant.
To lubricate your fifth wheel hitch with a grease gun, first locate all the zerks (aka grease fittings). Then clean each zerk to ensure the grease can get into it. Attach your grease gun to each zerk and add grease until grease seeps out of the joint. After all the zerks are greased, apply grease to the hitch plate and jaws.
8. Water heater maintenance
Inside your RV water heater is an anode rod. The anode rod keeps the water heater from getting damaged and corroded by minerals in the water.
The anode rod is self-sacrificing. This means that it gets eaten away by the minerals that would normally kill your water heater.
You should check the anode rod at least once or twice a year, depending on the hardness of the water in the places you camp. Here’s how to check it and replace it if you need to:
- You’ll need a 1 1/16″ socket and white teflon tape. You may also need a new anode rod.
- Turn your water heater off and wait a few hours for the water to cool.
- First, release the pressure by opening a hot water valve or the pressure relief valve on the tank.
- Then remove the nut at the bottom of the hot water tank panel on the exterior of your RV. This will typically be the nut that holds your anode rod in place.
- Pull the anode rod out. New anode rods are about about 3/4″ in diameter. If more than 3/4 of it has been eaten away by minerals, it’s time to replace it.
- Wrap the threads with teflon tape. Put it in place and hand tighten. Finish by tightening it with the 1 1/16″ socket.
9. Inspect propane appliance vents
For reasons nobody really knows, wasps and mud daubers are attracted to the mercaptan that gives propane its distinct smell. For this reason, these insects sometimes try to make their nest in RV propane exhaust vents. It’s a good idea to use a flashlight to inspect your vents for blockages at the start and end of every season.
10. Change your smoke detector batteries twice a year and maintain your fire extinguishers
RV smoke detectors are notorious for alerting us to events like burnt toast. Sometimes RVers pull the batteries out of their smoke detectors for this reason. However, you need a working smoke detector in your RV in the event of an emergency. If it goes off when you are burning your morning toast, be sure to put them back in place.
Change out your smoke detector battery every six months. You can always save them to be reused for other purposes. The point is, your smoke detector needs a steady supply of fresh batteries so it can wake you up if your RV catches fire.
A good fire safety tip is to turn your RV fire extinguisher upside down, tap the bottom, and give it a quick shake to mix up the fire suppressant chemical in it. Since this should be done every six months, you can do it when you change out your smoke detector batteries.
Track Your RV maintenance
RV LIFE Maintenance allows you to keep track of all your RV maintenance so you’ll always know what’s been done and what needs to be done. This multifunctional app has preloaded basic maintenance schedules for your RV, an easy-to-use fuel log, and more.
Related articles:


