
How Long Can Black Water Stay In An RV Tank?
Although the RV lifestyle can be quite glamorous, there are a few unsavory tasks that are necessary to keep everything in good working order. Emptying out the black water tank is never fun, but it has to be done if you want to continue to enjoy access to a mobile bathroom. Because this chore is distasteful, many people wonder how often they need to do it.
Black water tanks should be emptied and cleaned at least once per week (biweekly is preferable). When they are 2/3 full or more, it’s time to dump them.
Solo travelers and couples can usually opt for weekly cleanings, while larger groups may be required to do cleanings every other day.
The size of the black tank factors in as well, with smaller ones filling up faster than larger ones. But even if the tank isn’t completely full, the waste shouldn’t sit in there for longer than one week at a time.
If you leave your black water in the tank for too long, it can start to develop foul odors, which will spread throughout the entire RV. Nobody wants their home away from home to smell like sewage!
Luckily, there are plenty of tools, cleaning agents, and techniques you can use to refresh your black tank. It may not be a fun chore, but it is important, and it’s pretty easy to take care of once you have a routine.
How to properly clean black water tanks
1. Empty the black water tank
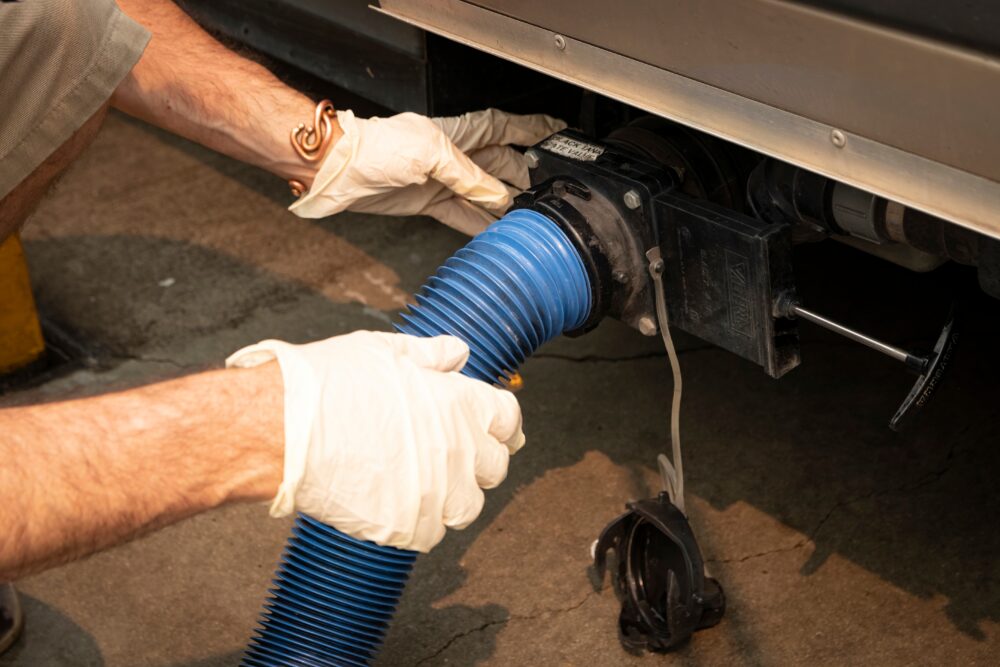
First things first, you need to empty out your black water tank. You can’t just dump the contents anywhere you want because black water is full of dangerous bacteria. It can easily make you sick, plus it will damage the environment if you don’t use an approved dump station.
Locate a safe place to do this job and wear gloves throughout the whole process. Hook up your sewage hose and empty the contents of the black tank. If it’s at least 2/3 full and has a good ratio of water/waste, it should drain fairly easily. Although this is an important first step, you can’t just pack up and leave once you’ve drained the majority of the waste.
2. Flush the gray water tank to clear the hose
Next up, drain your gray water tank. This contains used water that comes from showers and sinks in your RV. It may contain soap scum and grease, but it’s not as dangerous as black water.
Flush gray water through the same hose as the black water so it can clear out the majority of the bacteria that might be lingering. (Note: You should have a separate hose for your fresh water.) You can clean the hose separately later on, but a good flush with gray water will usually suffice.
3. Clear out solid buildup in the black tank
Just because the black tank is empty doesn’t mean that it’s clean. Solid waste tends to stick to the walls, and you need to get rid of this buildup before you can proceed. There are lots of tools you can use for this process. Some useful options include:
- Macerator
- Flush valve
- Permanent tank rinser
- Wand-style tank rinser
Never use your fresh water hose to clean out the black tank! It could become contaminated if it’s exposed to waste water or even airborne particles. You don’t want black water to come anywhere near your fresh water supply, so use an alternative cleaning tool to remove solid buildup.
4. Fill with fresh water and a cleaning agent
Now that the biggest problems are gone, you need to properly clean and sanitize the tank. Fill the container 2/3 full of clean water, then add an RV-safe cleaning agent. Some people like to use bleach, but this can damage your pipes and valves if you’re not careful. Bleach residue can also kill the helpful bacteria that break down the waste, so it’s best to avoid this product if possible.
Instead, you can use more gentle cleaners like Dawn dish soap, hydrogen peroxide, and baking soda. Generally, about 1 cup of your chosen cleaner will suffice, although it takes awhile for some of them to take effect. It’s a good idea to close up the tank and drive your RV around for a few minutes while the cleaner works. This helps the mixture foam up and splash around to hit the various parts of the tank.
Let the mixture sit for at least 1 hour, then drain the tank again.
5. Fill 1/3 full with clean water and add a tank treatment
You’re just about done! Now you just need to add some fresh water to give the tank a good baseline. Water helps prevent clogs and pile-ups, plus it makes it easier for everything to drain once you need to clean again.
Fill up 1/3 of the black water tank. You can do this by flushing clean water down the toilet (it usually takes about 5-6 bowls unless you have a particularly large tank).
Finally, add an enzyme-based tank treatment. These speed up the waste breakdown process, plus they reduce odors. There are plenty of RV-specific products you can choose from. Some good tank treatment options include:
- Happy Campers RV Holding Tank Treatment
- Camco TST MAX RV Toilet Treatment Drop-Ins
- Unique RV Digest-It Black Tank Treatment
How to extend the time between cleanings
In theory, you can keep black water in the tank indefinitely as long as there’s room to add more. We don’t recommend this course of action though! The longer the black water sits, the worse the RV is going to smell. You also run the risk of developing a clog or blockage in the tank. So, although it is possible to extend the period of time between cleanings, it’s not advisable.
That being said, there are a few things you can implement in your RV if you want to make black tank maintenance a less frequent chore.
Use RV-safe toilet paper
The first thing you can do is to stock up on RV-safe toilet paper. If you frequently flush large wads of paper down the drain, this can clog up your black water tank and make it difficult to properly clean it in the future. Options like Scott Rapid-Dissolving Toilet Paper are great because they are designed to break down without leaving a mess.
You can also encourage your passengers to only use a small amount of toilet paper. The less you flush, the less often you’ll have to clean! You could also install an RV bidet if you want to cut back on your toilet paper usage even further.
Add an enzyme treatment
We mentioned this earlier, but enzyme-based tank treatments can help you out when it comes to dealing with black water. They minimize the odor, which will help you go for longer periods between tank cleanings.
Many of them also speed up the process of waste decomposition, so you won’t need to deal with a lot of solid buildup once it’s time to flush everything out.
Flush extra water to avoid clogs
You can also use some extra water to keep everything running smoothly. Dry black water tanks are a recipe for disaster, and they can quickly clog. Plus, they smell absolutely awful if there isn’t anything to act as a buffer!
If you frequently have problems with clogs, try flushing a little extra water down the toilet each time you use it. Keep a water bottle in the bathroom for this purpose.
Use RV park bathrooms when possible
Finally, the best way to avoid cleaning your black tank is to use alternative bathrooms whenever you can. If you don’t put anything into the black tank, you won’t need to clean it!
Try to use campground/resort bathrooms once you set up camp. It’s also a good idea to pull into a gas station or a restaurant for a pit stop instead of running into your RV.
If you truly want to avoid dealing with black water, use your bathroom as infrequently as possible. You’ll still need to empty it out eventually, but you can extend the time between cleanings if you follow the tips above.
Track your RV maintenance
Make sure you keep track of all your RV maintenance and repairs with an online tool such as RV LIFE Maintenance. Not only can you keep all of your documents in one place, but you’ll also receive timely reminders when maintenance is due to help you avoid costly repairs and potentially serious accidents.
Related articles:


“Instead, you can use more gentle cleaners like Dawn dish soap, hydrogen peroxide, and baking soda. Generally, about 1 cup of your chosen cleaner will suffice, although it takes awhile for some of them to take effect. It’s a good idea to close up the tank and drive your RV around for a few minutes while the cleaner works. This helps the mixture foam up and splash around to hit the various parts of the tank.”
What’s the ratio of Dawn, hydrogen peroxide and baking soda? I don’t think you mean 1 cup of each.
Nope. I go 12 days between dumping. I use a chemical that breaks down the solids and desolves the toilet waste.. When I used a deoderant type chemical I would get nothing but odors. I was using regular toilet paper but just switched to Amazon Commercial 2-Ply Quick Dispensing Toilet Paper for RV’s & Marine. It is two ply not the one ply junk. No problems.
In Step 5, the author states to fill the black tank 1/3rd full after one has drained and flushed the tank. In my case, that would mean needlessly carrying 15 gallons (125 pounds) of water at the start of the next trip . I put only 5-6 gallons of water in the black along with an enzyme tab and some Calgon water softener. That is plenty of water to avoid any solids build up.
What’s with all this concern about black water tanks. I lived in a 22 foot travel trailer full time for eight years, used the internal toilet regularly, never used any additive, and never had any trouble. One problem is that a lot of (most) black tank additives are are anti-bacterial. That is, they kill bacteria. That supposedly prevents odor. Maybe, maybe not. But it does stop the natural breakdown of the solids in the tank and encourages blockages. Let the natural processes take place. Wait ’til the tank is two-thirds to three-quarters full before dumping. And you should have no problems.
I have poured about 2 lb of ice just before I drive to the dump station. The movement of the ice helps dislodge solids just before dumping.