
RV AC Repair: Everything You Need To Know
The air conditioning system is an important part of your RV. This is especially true for the summer months and for those living in and traveling to warmer climates.
Before you can attempt RV AC repair, you first must have a basic knowledge of how the AC system works. Here is the basic sequence of operations along with the four main components in the system.
Thermostat
When the temperature inside your RV reaches the level set on the thermostat, it sends an electrical signal to the rooftop AC unit.
There is a sensor that links the thermostat to the AC unit. This sensor tells the compressor to turn on.
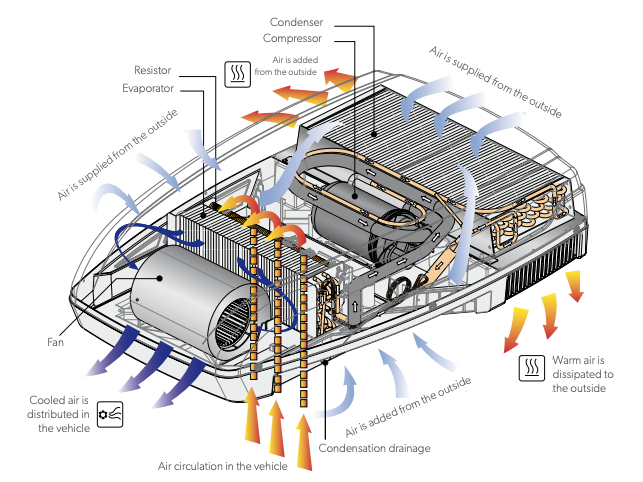
Compressor
When the compressor turns on, it compresses the refrigerant, which is a gas commonly known as freon. The compressed gas is then sent to the condenser.
Condensor
The condenser is similar to the radiator on your car in that it is a series of small tubes covered with fins and has a fan blowing air through it.
As the gas runs through the tubes, the fan blows across the condenser removing much of the heat. With the gas now cooling back down it begins to turn back to a liquid.
Evaporator
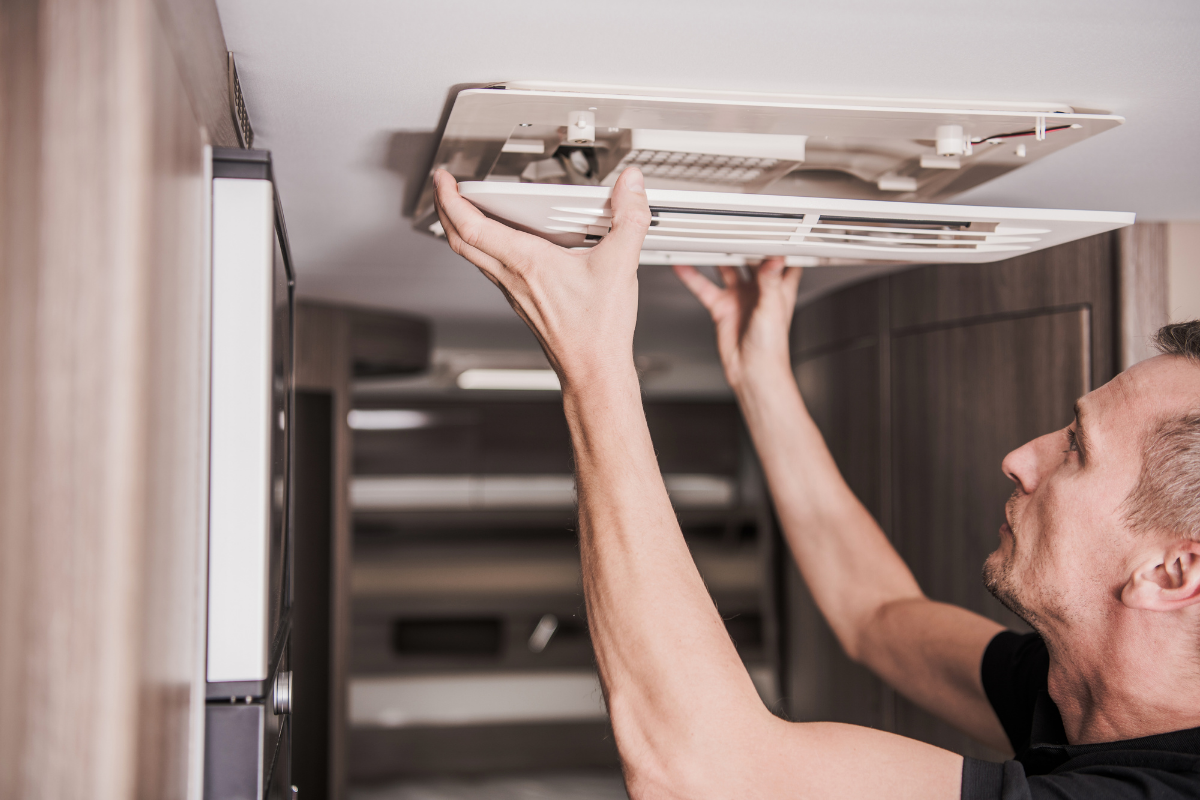
All the time this is happening, the warm air from inside your RV is being pulled into the intake side of the interior, ceiling-mounted AC cover. The side with the filter is the intake side.
This warm air is pulled into the evaporator. Here, the cold liquid refrigerant from the condenser is now flowing through the evaporator tubes. The warm air from the RV is held by the cold refrigerant and the heat dissipated. The cooler air is then blown back into the RV vents.
Humidity from inside the RV is also dealt with by the evaporator. It removes the moisture and directs it to rooftop drains. This is why you see water dripping from them when your AC unit is running.
The cooled liquid heats back up as it is exposed to the warm air from the RV and begins to turn back to a gas. The gas returns back to the compressor and the cycle begins again. This continues until the temperature inside the RV reaches the setting on the thermostat.
Common RV AC repair issues
The AC system is composed of many parts including wires, switches, sensors, sealed tubes, fragile fins, fans, and the list goes on.
Issues involving refrigerant leaks will require the expertise of a trained technician and most likely the replacement of the entire AC unit.
That being said, there are a few common problems that may require RV AC repair that can be tackled by RV owners.
Here are some common RV AC repair problems.
AC blows warm air
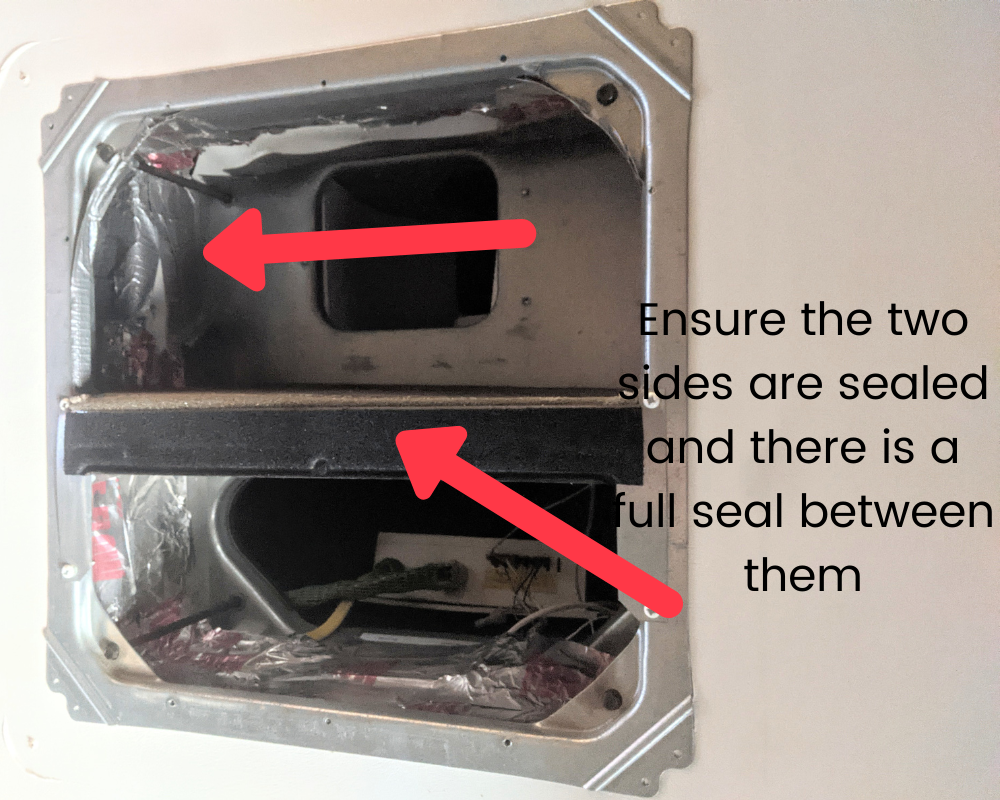
The ceiling mounted AC shroud inside your RV has an intake side with a filter and an exhaust side. These airways are sealed from each other and to the air ducting.
If these seals leak, it is possible the cool air coming back into your RV will just leak back into the intake side and not make it to the RV. If you have cool air but not as cold as normal or low flow back into the RV, check these foam seals and seal up any areas with HVAC tape.
Be sure to clean the intake filter often to ensure there is proper airflow being drawn out of the RV.
The compressor needs to build pressure as it compresses the gaseous refrigerant. If there isn’t enough gas to compress, this can’t happen and the cooling cycle won’t start. The warm air from your RV will just be circulated out of and back into your RV.
If this is the case, you likely have a refrigerant leak and will require the help of a technician to confirm this and most likely replace the unit. Unlike a car AC system, RV systems are sealed and can’t have refrigerant easily added to them.
RV AC freezes up
On the rooftop unit, there is a temperature sensor that is inserted into the evaporator fins that reads the temperature of the evaporator. If this sensor fails or vibrates out of the evaporator fins it will allow the evaporator to freeze up. Replacement is a simple DIY job.
Evaporator fins should be clean and free of dust and debris to function efficiently. A harder working AC unit can freeze up if the evaporator fins are blocked and not allowing moisture to be removed.
The warm air intake side of the ceiling-mounted AC unit has to be sealed from the cold air exhaust side or it can cause condensation and consequently freezing up of the evaporator.
If you are in a very humid area it can be difficult for your AC to keep up with the removal of humidity causing extra condensation and freeze up.
Running your fan on high and adding a dehumidifier or air dryer to your RV will both help prevent freeze-up in these conditions.
RV AC doesn’t turn on
There are a few possible reasons why your AC wouldn’t turn on.
The first may seem obvious to many but could be misunderstood by some. Your RV AC requires 120-volt power to run. This means unless you are plugged into a power source like at a campground or a powerful enough generator, your AC won’t turn on. Running off your 12-volt RV batteries will not run your AC.
If the compressor doesn’t turn on then nothing else will happen. This is the first step for the AC to work. If you don’t hear the AC unit start, check the electrical connections on the compressor to confirm it is working.
This, along with the following tests, will require a multimeter and general knowledge of electrical circuits. When in doubt, use a certified technician.
Next, move to the capacitor and relay to check them for proper function.
This is a great guide to walk you through the process.
It is possible that the AC system is working correctly and it is your thermostat that is the issue.
Thermostats will differ from manufacturer to manufacturer. Wire color function will also vary. However, the process to eliminate the thermostat will be the same. The thermostat must be getting power and it must be sending power back out to the required system – in this case, the AC unit.
Proper maintenance and timely RV AC repair can help you avoid further problems and will keep your RV AC running cool and trouble-free.
Make sure you keep track of all your RV maintenance and repairs with an online tool such as RV LIFE Maintenance. Not only can you keep all of your documents in one place, but you’ll also receive timely reminders when maintenance is due to help you avoid costly repairs and potentially serious accidents.
Continue reading:


