
Professional RV Remodeling Tips and Tricks
As a full-time RVer and the proprietor of Rain2Shine Ventures, an RV renovation company in North Carolina, I try to breathe new life into all my clients’ campers and vans by working directly with each individual. I examine their list of wants and must-haves to style their camper exclusively to their taste. I also try to pass along everything I know to anyone who asks!
Any RVer can update their own home on wheels; it just takes time, a lot of patience, and a little research. Here are my RV remodeling tips and tricks for updating a camper on your own.
1. Paint
Paint is the biggest change you can make in your camper. However, it’s not for the faint of heart and can be a ton of work if done properly. Remember, this is RV remodeling…you aren’t just throwing paint up on sheetrock. Here are my suggestions to save you from a lot of blood, sweat, and tears.
My first recommendation is to pick one or two of the following items to try your hand at painting and see how it goes before committing to the entire RV. The less experience you have in sanding, painting, and priming, the smaller your test subject should be. For instance:
- Cabinetry
- Accent wall
- Slide trim
- Dining area
- Entertainment center
No one ever wants to hear this, but yes… to really do it correctly, you must sand and prime before you paint. Take it from a professional. I’ve created a handy painting guide here to help you get started.
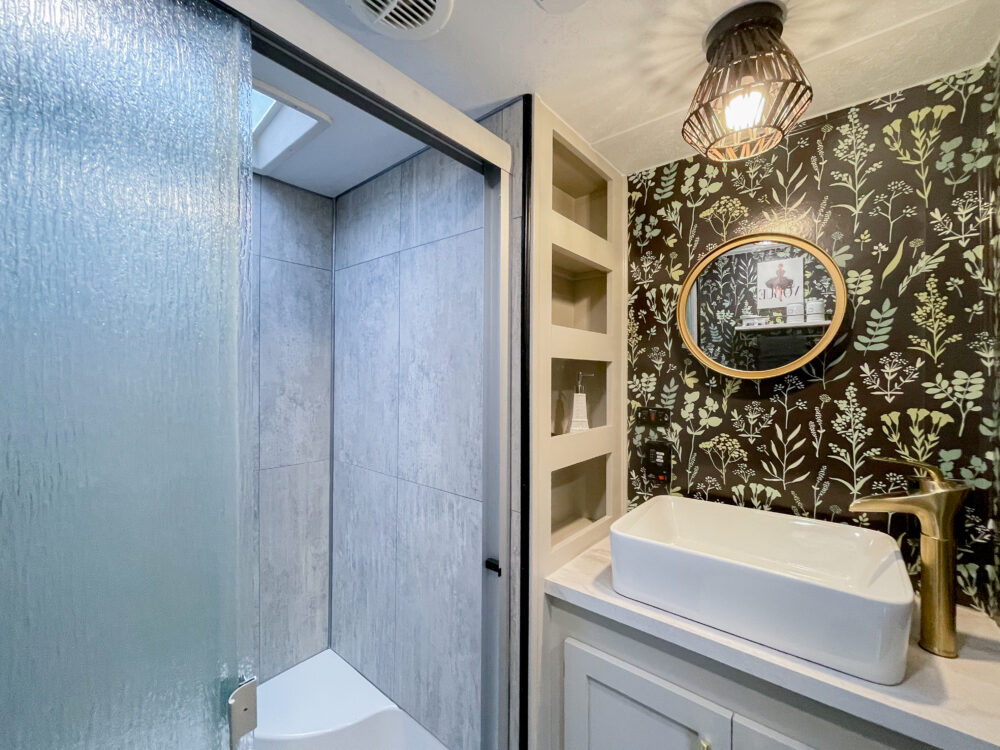
2. Wallpaper
Wallpaper can be challenging, but here are my RV remodeling tips to make it go as smoothly as possible.
- Pick your print and make sure to order extra if there’s a pattern that needs matching along the seams.
- Clean and wipe down the walls you’re going to apply the wallpaper to first.
- Start on one end of the wall at the top.
- Pull the peel-off in small sections as you move down the wall.
- Use a squeegee and press smoothly down the wall.
- Try not to allow any bubbles, but if you do end up with a few small ones, you can pop them with a needle and smooth them out.
- When you get to the bottom, use a razor knife to cut along the edge of the base.
- Match the pattern of the next piece and apply in the same fashion. You can cut any excess off the top with the razor knife.
- You can also use the razor knife to cut around any obstacles (such as vents, outlets, etc.) you run across, but I do recommend removing the covers first. This way, you don’t have to make a perfect cut, since the face will cover any uneven edges.
Additional notes:
- I use 3M adhesive spray for extra grip. You will need to apply this to the wall and the paper separately to create a strong bond.
- Always remember your work doesn’t have to be perfect. I use molding and trim throughout my RV remodels. It will cover any uneven cuts of flooring, wallpaper, tile, etc., and it makes everything look more finished and intentional.
3. Flooring
Flooring is the second biggest change you can make in your camper, and possibly the most rewarding, but it’s not an easy project. When it comes to RV remodeling, paint and flooring are the two biggest jobs we do in all of our clients’ RV renovations, so be prepared. Removing carpet can be difficult, depending on how the manufacturers installed it.
I use an oscillating Dremel to remove the larger staples. You can also use it to cut the carpet around the edges if it’s sandwiched beneath the walls. Another great tool to use for the smaller staples is nippers. Grab the staple head and pull at an angle to remove.
You will most likely need to cut and install a new subfloor after carpet removal and then install your new flooring. I recommend Luxury Vinyl Planking (LVP).
4. Appliances
One RV remodeling secret is to use a high-quality appliance epoxy to repaint your existing appliances instead of upgrading or buying new. Obviously, the appliances should be in good working order.
To get started, use a Scotch-Brite pad to scuff the surface. This gives the epoxy a surface it can cling onto. Clean the appliance well, let it dry, and then spray the epoxy. It will probably take two coats. Use tape to cover any trim or surrounding areas you don’t want painted prior to spraying the epoxy and/or if you wish to paint the trim in an accent color.
5. Faucets
Faucets are an easy upgrade when RV remodeling. They often have a huge, instant impact because in many campers it’s one of the areas a manufacturer might go a little cheap.
For the kitchen faucet, I would suggest one with a pull-down sprayer. It makes cleaning the dishes and sink much easier. If you haven’t seen or used one of these before, it works by adding a weight to the hose underneath the sink, so make sure you have a little room to play under there.
6. Lights
A lot of people think you have to use RV lighting in an RV. That is absolutely NOT true. There are a lot of fun options when you start to look outside the RV lighting genre when you start your RV remodeling project.
- Make sure to check measurements before you buy any lighting for two reasons: First, it will need to fit the intended space, and second, the base of the new lighting will cover the hole under the old light.
- If the light fixture you’re taking out is running on DC and the new light fixture will fit a 12V bulb, it should work in your RV.
- If you’re unsure if the light you are replacing is AC or DC, you can check with a voltmeter to be safe.
- Turn off the power before cutting any wires.
- Make sure to cut the wires as close to the existing light fixture as possible to give yourself enough wire to connect the new lighting.
- Use wire strippers to cut and strip the existing wires to splice with the new.
- With DC (12V), most RV manufacturers make the black wrapped wire the ground and the white wrapped wire the hot (the opposite of a brick and mortar home), so match your new wires accordingly and tie the ground from the new light fixture in with the black.
- Use wire nuts to splice the wires together.
7. Backsplash
Backsplash upgrades are hugely popular when RV remodeling. RV manufacturers have started paying quite a bit more attention to this area of the RV. While it may seem that a peel-and-stick backsplash is the easy way out, it isn’t much easier than using real tile, and real tile won’t add enough weight to make a difference in such a small area. A product called MusselBound is a game changer when it comes to making it easy to use real tile.
MusselBound is a tile membrane that you can use instead of Mortar/All-Set. It’s much faster, less messy, and allows the tile to lay completely flat against the wall. Measure and cut your tiles accordingly with a wet saw. You can place them on the tile membrane but don’t press until you’re ready. Another great benefit of MusselBound is you can grout as soon as you’ve pressed the tiles to the tile membrane because you aren’t waiting for adhesive to dry, ultimately cutting down your RV remodeling time.
8. Shower or tub
Rust-Oleum makes a tub and tile kit that will (literally) make your shower and/or tub look brand new. It’s a little work and does take time, but it will save you money from replacing it with something new or covering it with tile. This is a fantastic way to give your fiberglass RV shower or tub a porcelain or tile look and feel, and it can be used on many surfaces to freshen them up and give them new life.
9. Hardware
Upgrading existing cabinet hardware is an easy way to change the look of your camper in any RV remodeling scenario. Spray paint the old hinges, and upgrade the handles and knobs on the cabinetry.
Hardware is available at your big box home improvement centers, and Hobby Lobby has some fun options if you are looking to go whimsical instead of just functional. It adds a whole new look (especially if you decide to paint your cabinets).
10. Window treatments
Remove those old boxy valances and cheap blinds! You’ll be amazed how much this will open up your camper and let in so much more light.
- Remove and save all the screws carefully. You may need a power/impact drill.
- Putty (and sand if necessary) the screw holes, and find a paint pen or stain to match the walls and apply (after the putty is dry).
- Now, you can install 2” faux wood blinds, curtains, or even shutters, whatever suits you and your style.
Decorating instead of RV remodeling
If you’re not able or up for manual labor, try decorating. Adding rugs, decorative pillows, throws, mirrors, framed photos or collages can liven up your space and make it feel more like home or your “home away from home.”
If you are up to one or more of the RV remodeling tasks above, take your time and do one at a time. Don’t overwhelm yourself with multiple projects. You might be surprised how one completed upgrade changes the whole feel of your camper. Best of luck and have fun!
About the Author

As a full-time RV-er with decades of interior design experience, Alice is the heart and soul of rain2shine ventures. She brings passion and creativity to each project, prioritizing functionality and style, designing every remodel, tackling much of the labor herself, and decorates every RV to bring each client’s vision to life.


Have you ever done a remodel for an “Adoption Rig” ??????
A very good article! It got us thinking about a major improvement idea. We are now exploring the idea of removing our gas oven/cook top to expand our counter space. and increase our kitchen storage. We would then remove the microwave and replace it with a 6in1 or an 8in1 combo microwave, convection oven, conventional oven, broiler, etc.,etc. What would be the comsiderations of such an upgrade? Thank you.