
How Do You Use An RV Winterizing Kit?
With summer over and the temperatures dropping, it’s soon going to be time to winterize your RV. Winterizing is essential to protect your RV’s water systems from being damaged by freezing-cold temperatures. And this process is made easier with an RV winterizing kit.
These handy kits will help you prepare your RV for storage over the winter months. But just what is an RV winterizing kit? And how do you use one?
What is an RV winterizing kit?
An RV winterizing kit is basically just a few items to attach to your RV’s water pump to help with the winterizing process. This involves clearing out your water lines and tanks and adding non-toxic antifreeze to the water system.
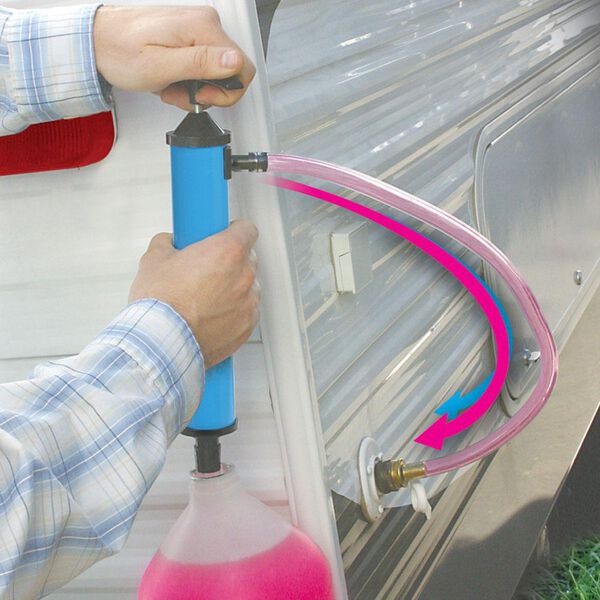
Most commonly, your camper winterizing kit will include a valve and siphon hose as well as adapters to attach to your water pump. The siphon hose is then attached to the bottle of antifreeze to work as an antifreeze pump for your RV. Typically, a winterizing kit will include:
- Valve(s)
- Siphon hose
- Teflon tape
- Pump adapters
There are a few other items that might be used with an RV winterizing kit, such as:
- Water heater bypass kits – Many newer RVs will already include this, but if not, it’s essential so that you don’t damage your water heater with antifreeze. An RV water heater bypass kit can also be purchased separately from a full winterizing kit.
- “Blowout plug” or adapters that can be used to fix an air compressor to your water line – This aids in blowing all of the water out of your system.
- Hand pump – The Camco winterizing kit includes an RV antifreeze hand pump, in case you can’t (or don’t want) to use your onboard water pump to winterize your RV.
You can get an RV winterizing kit at many major retailers of hardware or RV accessories. If can’t find an RV antifreeze pump kit, you may also be able to put together a DIY RV winterizing kit.
How to use your RV winterizing kit
Using an RV winterizing kit is simple.
Whether or not you’re using a kit, the first step in winterizing your RV is to drain all the water from your system.
- Drain your holding tanks.
- You’ll also want to flush out and clean your gray and black water tanks.
Next, you’ll want to drain your water heater. Before you do, relieve the pressure from the water heater, and ensure the water inside is no longer hot to avoid injuring yourself.
Once your tanks and water heater are drained, you next want to open all hot and cold faucets, including your tub and shower. Then, flush the toilet to clear any water from it. You’ll also want to open your low-point drain lines; you’ll have one for hot and cold.
At this point, if using a blowout plug, you can attach your air compressor to blow out the water lines. To avoid damaging your lines, adjust your compressor to no more than 30 psi.
After your system is drained, you can close your drain valves.
While some may stop there in winterizing their RV, it’s best to add antifreeze to your system as well.
Adding antifreeze using your RV winterizing kit
Before adding antifreeze, it’s essential to be sure that you have a bypass installed on the water heater. Once your water heater is bypassed, you can attach your RV pump converter winterizing kit to your RV’s water pump. Or, if you’re using an RV winterizing hand pump, attach it to your city water inlet.
Then, take the intake siphon (the tube that draws antifreeze into the pump) and attach it to the bottle of antifreeze. Ensure you’re not using standard automotive antifreeze; RV antifreeze will be pink, while automotive antifreeze is usually blue or green.
Before turning on your pump, make sure to close your faucets, and if your drain valves aren’t already closed, make sure to close them. Leave open just the hot side of the faucet closest to your water inlet; this is often the kitchen faucet.
Once the faucet runs pink, you can close the hot side and open the cold side, again waiting for it to run pink. You need to repeat this process with every faucet in your RV, starting with the closest faucet and moving away from the water inlet. This includes showers, tubs, and the toilet; for the toilet, you’ll have to flush it until it flows pink.
Once you’re done, turn off the pump and make sure all your faucets and valves are closed up. If you have any appliances that use water lines, such as ice makers or dishwashers, you’ll want to check the manual for any special winterizing instructions.
Avoid busted RV water lines by using a winterizing kit
Winterizing your RV takes a little bit of work, but it’s well worth the trouble to keep your RV in good shape during the cold winter. An RV winterizing kit makes this process easier, letting you easily blow your water lines out and fill them with antifreeze. All you have to do is drain your system, attach the RV winterizing kit, and soon, your RV is ready for winter!
Make sure you keep track of all your RV maintenance and repairs with an online tool such as RV LIFE Maintenance. Not only can you keep all of your documents in one place, but you’ll also receive timely reminders when maintenance is due to help you avoid costly repairs and potentially serious accidents.
Read more:


